Email Media Profile
As the name suggests, it lets the Administrator add an email address as a media profile. After assigning to campaign, this email media profile can be used to send and receive emails to interact with the clients.
Create Email Media Profile
When we create Email Media Profile, then it starts fetching the emails immediately at once. If no routing rule is created to add the fetched emails to a particular campaign or a particular queue, then these fetched emails will not be displayed in the system. Also, the rule to route the emails can be created only after creating the media profile. Therefore, it is suggested to create an incomplete email media profile by some steps such as provide a wrong username or password. After it, create a routing rule in "Rule Engine" → "Routing" by selecting this Email media profile and select the required both queue and campaign. After creating the rule, correct the issues in Media Profile. Now, the emails will be fetched and displayed in the system.
Perform the following steps to create an Email media profile.
- Click "Add" to create an email media profile. It shows the following pop-up.
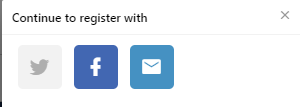
Figure: Register a Media Profile
- Click
 icon to create an Email based Media Profile using the following pop-up.
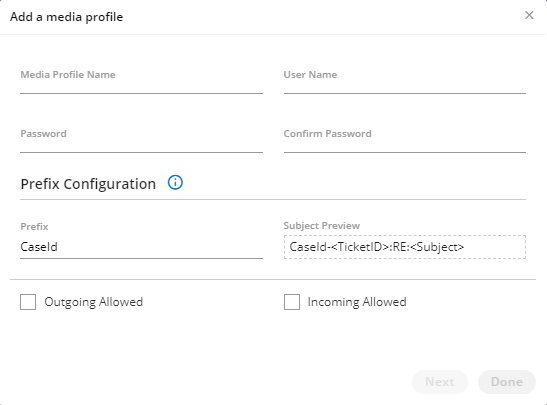
Figure: Create Email Media Profile
- Media Profile Name: Provide a name for the new media profile.
- User Name: Provide the email address as the username.
- Password: Provide a password for the email address entered in "username" field.
A user can generate App-Specific Password through its Google Account Settings and use this App-Specific Password as a password to its Gmail Account while creating an Email Media Profile.
- Confirm Password: Re-enter the same password to confirm.
-
Send From (Name): Provide a name of the sender. All emails sent from this media profile will display this name as "Sender's Name". The limit of 52 characters has been applied to "Send from Name" field. While creating or modifying an Email Media Profile, the number of consumed character limits and the maximum character limit is displayed at the bottom of "Send from Name" field. Refer to the following screenshot.
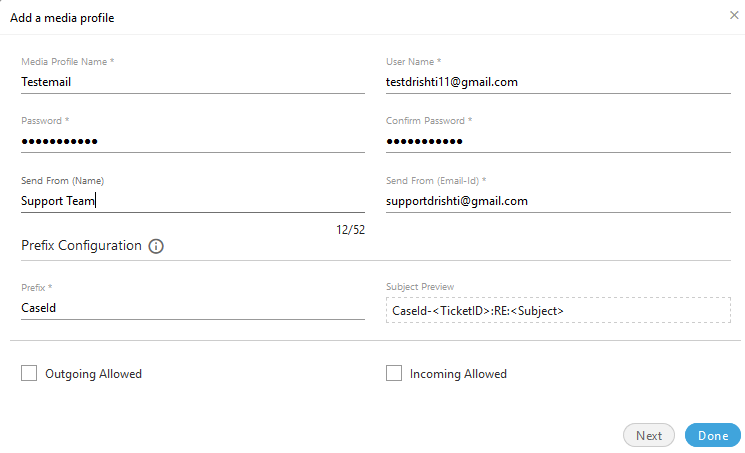
Figure: Send from the Email ID
If a user tries to provide more than 52 characters in "Send from Name" field while adding or modifying an Email Media Profile, then it will show an error below the field that "You have exceeded the maximum character limit."
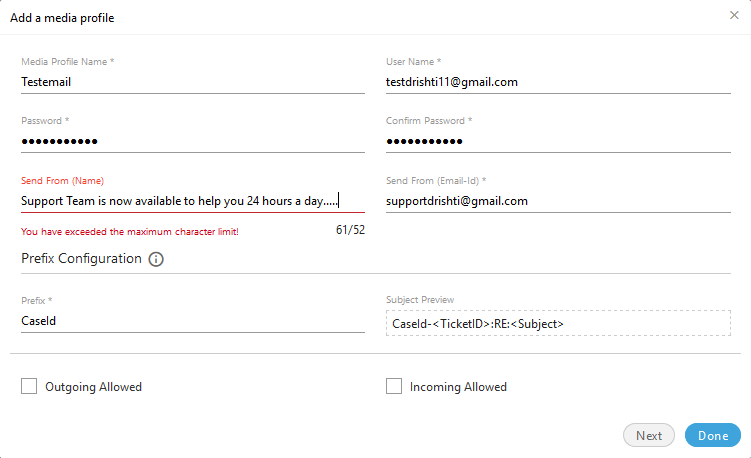
Figure: Error while entering characters more than 52
- Send From (Email Address): Provide a sender's email address. When an agent uses this media profile to send the email, then "Send from Email Address" will be stored and displayed as the sender's address in its ticket in "Activity".
- Prefix: Provide a prefix for the subjects.
- Subject Preview: Provide the subject that will be sent with the emails sent using this profile.
- Outgoing Allowed: Check this box to allow the sending of outgoing emails. After enabling it, you have to provide the following inputs.
- Outgoing Host: Provide the SMTP Address of your email provider.
- Outgoing Port: Provide the port number for sending outgoing emails.
- Send Protocol: Select any of the following protocols to send the emails.
- NONE
- SMTP
- SMTPS
- EWS (Exchange Web Services)
- Outgoing Folder: Provide the folder name that will store the outgoing email.
- Enable 'reply-to' email: Check this box to provide "reply-to" email address. If a recipient click on reply on the received email, then the email address provided here will be the recipient. After enabling it, provide the reply-to email.
- Delete mail on Fetch: Select it to delete those emails which have been fetched.
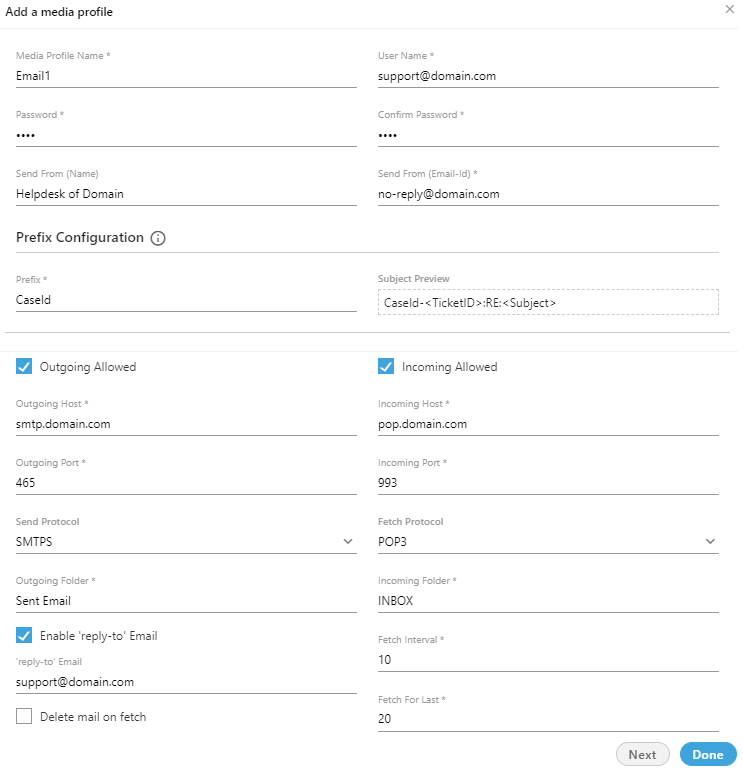
Figure: Sample Email Media Profile
Fetched Emails will not be displayed in the system until the Routing Rule to direct these emails to a particular campaign and queue. And the rule cannot be created until the Media Profile is created. Therefore, provide some wrong details here and create an incomplete media profile. After creation of profile, create a rule in "Rule Engine" → "Routing" the fetched emails to the particular campaign and queue and then modify this email media profile with correct details.
- Incoming Allowed: Check this box to allow the receiving of incoming emails. After enabling it, you have to provide the following inputs.
- Incoming Host: Provide the incoming Address of your email provider.
- Incoming Port: Provide the port number for receiving the incoming emails.
- Fetch Protocol: Select any of the following protocols to receive the emails.
- NONE
- IMAP
- IMPAS
- POP3
- POP3S
- EWS (Exchange Web Services)
- Incoming Folder: Provide the folder name that will store the incoming emails.
- Fetch Interval: Provide a value in seconds. It is the time after which the system will fetch the emails from inbox of the configured media profile. The default value is 10 seconds.
- Fetch for Last: Provide the number of the last days of which emails has to be fetched.
- Here, you can perform any of the following steps.
-
Click "Next" to go to "Ticket Resolvers" page of the pop-up.
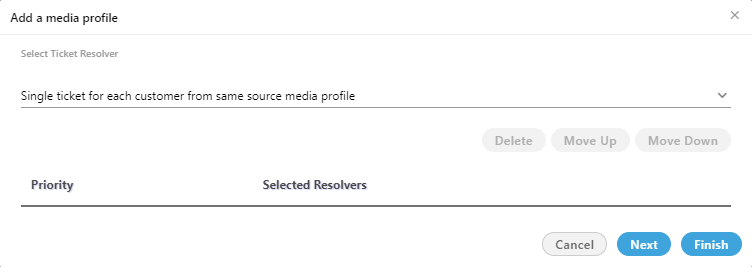
Figure: Ticket Resolver while adding Email Media Profile
Refer to "Ticket Resolvers" Section in this page to know which Ticket Resolvers have to be selected. After it, you can perform any of the following steps.
-
Click "Next" to go to "Define Signature" page of pop-up.
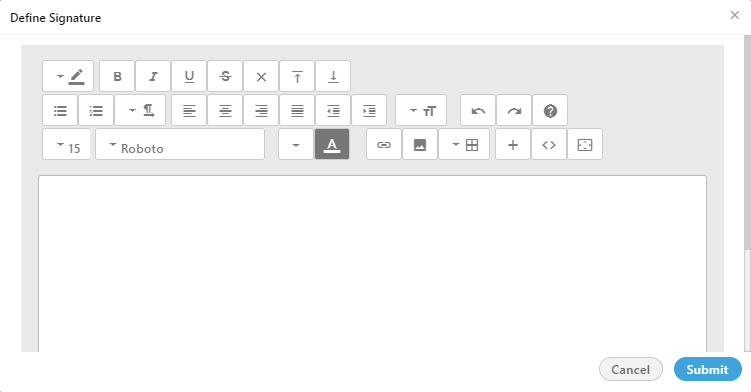
Figure: Ticket Resolver while adding Email Media Profile
Refer to "Signature" Section of this page to know how to define the Signature.
After it, click "Submit" to save the default signature. You can also click "Cancel" to not save it.
-
Click "Finish" to save the Email Media Profile and to finish this process.
-
-
You can also click "Done" to save the Email Media Resolver.
-
Protocol-related Information: The Email Sender Protocol such as SMTP and Email Receiver Protocols such as IMAP and POP, and their folders cannot be changed after creating the media profile.
View and Modify Settings of Email Media Profile
Select an email media profile in the list to view its settings on the right side under "Settings" tab.
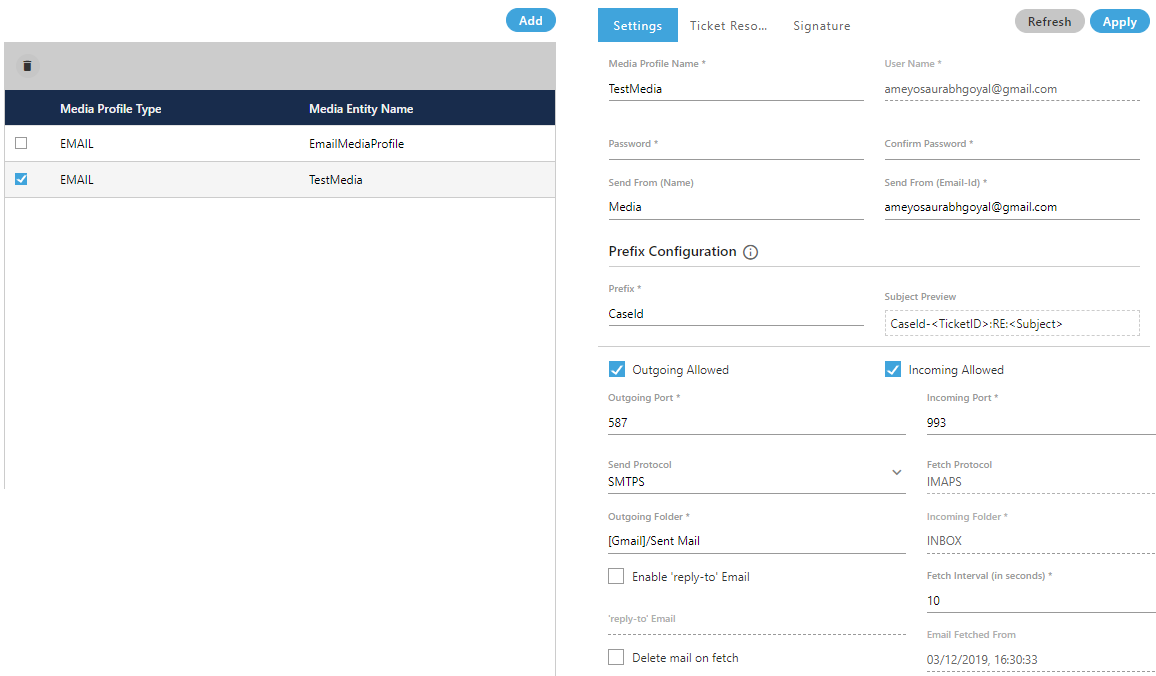
Figure: Settings of Email Media Profile
You can modify the settings here and click "Apply" to apply the same. Rather, you can click "Refresh" to discard the changes.
While editing the media profile, the Email Sender Protocol such as SMTP and Email Receiver Protocols such as IMAP and POP, and their folders cannot be changed.
If you want to change these settings, then, create the new media profile.
The Email Sender Protocol such as SMTP and Email Receiver Protocols such as IMAP and POP, and their folders cannot be changed after creating the media profile. These protocols and folders cannot be changed for the existing Media Profiles.
Delete Email Media Profile
The deleted Email Media Profile cannot be retrieved back. The campaigns, queues, and users using this Media Profile will be disabled to use the Email Media Profile to interact with your clients.
Perform the following steps to delete a Facebook media profile.
- Select an Email media profile.
- Click "Delete" to delete it. It shows the following warning message.

Figure: Asking to delete the Email Media Profile
- Click "Yes" to delete the email media profile. Rather, you can click "No" to not delete it.
Ticket Resolver for Email Media Profile
All Email Media Profile resolvers listed here are now improved that they will work for all email addresses available in the Customer Account Information. These Ticket Resolvers will also work for splitted and merged tickets.
This tab lets you manage how the tickets in a campaign (where the selected media profile is added) will be handled. Following is a screenshot for Ticket Resolver Tab for a Email Media Profile.

Figure: Ticket Resolver of Email Media Profile
You can click the drop-down menu titled "Select Ticket Resolver" to select any of the following options.
- Single ticket for each customer from same source media profile : Select it to create a single ticket for all emails from a same source media profile. It means the email coming from a same email address but to a different media profile will create a different ticket. It acts quite similar to "Single Ticket for each customer" to create a single ticket for each customer; however, it appends the emails to a ticket after checking the Media Profile ID.
Suppose there are separate media profiles IDs for Customer Care and Sales Team. Emails of the customer to the Sales Team will be added to a separate ticket of Sales Department. Similarly, emails to Customer Care will be added to the separate ticket of Customer Care. Without this resolver, all emails of the customers to both Sales and Customer Care will be added to a single ticket only. - Single ticket for each customer: Select it to create a single ticket for all emails from a customer in the campaign. Every new email from the same customer with same or different subject will be appended in the same ticket.
- Single ticket of same subject: Select it to create a single ticket for all emails having same subject. All emails having same subject from same or different customers will be added into the same ticket.
- Single ticket of same subject from same customer: Select it to create a single ticket for all emails having same subject sent from the same customer.
- Case ID based Resolver: A case is created for a new email. All emails replied on this email thread, then these will be appended to the same ticket. If a new email thread is created, a new ticket will be created.
- Single ticket with same subject from observer: Select it to create a single ticket of all emails having same subject from the observer who is in CC of an email received from a customer.
- Subject Media Profile Customer Interaction Resolver: Select it to create a single ticket for all emails having same subject from the same customer for the same media profile. A New ticket will be created only when the customer sends an email with another subject to same media profile or connect with other media profiles with same or another subject.
When you select a resolver, it gets added in the list. The added ticket resolvers will be removed from the drop-down menu. After adding mutliple resolvers, you can move them to up or down to specify their priority. See the following screenshot.
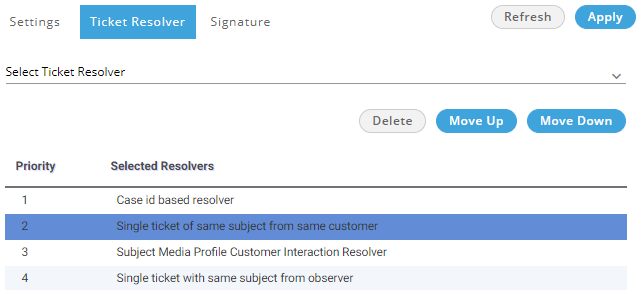
Figure: Added Ticket Resolvers
Signature
This tab will be visible only for Email Media Profile. This tab lets Administrator to specify the signature for all emails that will be sent using this email media profile.
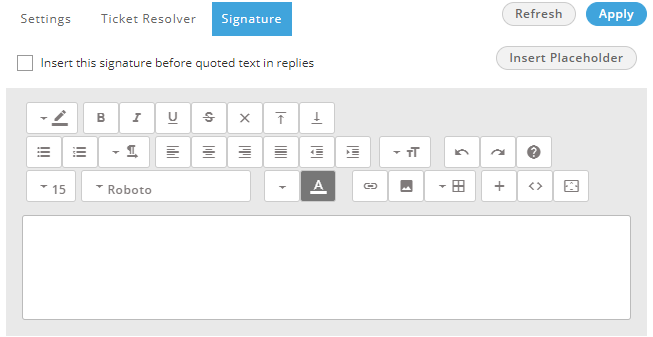
Figure: Blank Email Signature
Here, perform the following steps to create an email signature.
- Click "Insert this signature before quoted text in replies" to insert the signature before the quoted text. Keep it uncheck if you want to insert the signatures after the quoted text.
- You can type the signature in the textarea and use the available tools to format the text, add a hyperlink, and insert an image.
- Click "Insert Placeholder" to insert the dynamic placeholders from the following dialog box.

Figure: Signature Placeholder
- After creating the signature, click "Apply" to apply the same. Now, the created signature will be displayed on all emails being sent through the selected Email Media Profile.
Failure Mail Configuration
The administrator can configure failure mail settings for the Email Media Profile. When the mail-id of the customer is wrong, then the mail sent to the customer is considered as failure mail.
The failure mail can only be configured for “Customer Based Resolver.” If the resolver is “Case Id Based” then a new ticket will be created for the same failure mail. The failure email will get the escalation mark on the dashboard screen of the agent. The agent can reply on the same ticket, and hence the ticket will handled.
Execute the following command to login to the database.
psql -U postgres ameyodb
-
Execute the following query for the Gmail based email profile.
INSERT INTO ic_configuration_parameter (contact_center_id,name,value) Values (<contact_center_id>,'failureMailConfiguration','mailer-daemon@googlemail.com');
-
Execute the following query for the Yahoo based email profile.
INSERT INTO ic_configuration_parameter (contact_center_id,name,value) Values ('<contact_center_id>','failureMailConfiguration','mailer-daemon@yahoomail.com');

Figure: Gmail based Failure Message Configuration
Mapping Incoming and Outgoing Media Profile
The administrator can map any incoming media profile with some other outgoing media profile.
Example
Let’s assume there are two media profiles named as M1 and M2. If a ticket is coming from media profile M1, then the administrator can map the media profile M1 with M2, which means if ticket is coming from M1, then while answering on the same ticket, the media profile M2 will select automatically.
Execute the following query to map the incoming media profile with another outgoing media profile.
INSERT INTO ic_configuration_parameter (contact_center_id,name,value) VALUES ('<contact_center_id>','mediaProfileMapping','{"<Incoming_Media_Profile_Id>":"<Outgoing_Media_Profile_Id>"}');
In the above query, the Incoming_Media_Profile_Id is the Id of the incoming media profile and Outgoing_Media_Profile_Id is the Id of the outgoing media profile id.
With the help of the above query, you can define multiple mappings for multiple set of media profiles.

Figure: Mapping of Two media profiles
If do not have the media profile id, then run the following query and copy the respective media profile id.
Select * from media_profile;
Handling the Email Server Error Messages and Retry Sending Policies in Ameyo
Ameyo introduces the Handling to manage the error messages thrown by the Email Provider Server of an email address and . The following four different policies have been introduced to handle such error messages.
-
Default Retry: Select it to retry sending the email just after the failure. It's configuration code is "DEFAULT_ENTRY". "maxRetryCount" variable is used to define its value and its default value is 3.
-
Rate Limit Retry: Select it to retry sending the email when retry rate limits of the server are breached. By default, the retry is tried to be attempted after 24 hours. It's configuration code is "RATE_LIMIT_RETRY". "rateLimitRetryTime" variable is used to define its value and its default value is 86,400 seconds (that is 24 hours).
-
Progressive Retry: Select it to attempt the retry in the progressive intervals such as every 5 minutes, 10 minutes, 15 minutes, and 20 minutes. It's configuration code is "PROGRESSIVE_RETRY". "progressiveRetryInterval" variable is used to define its value and its default value is 300 seconds (that is 5 minutes).
-
No Retry: There are some error messages for which the retry sending should not be tried again. It's configuration code is "NO_RETRY".
These policies come preconfigured in Ameyo and apply automatically upon detecting their relevant error codes. For example, the following table illustrates the Gmail Error Codes and the corresponding Ameyo Email Error Handling Policy for them.
|
Gmail Error Codes |
Ameyo Email Error Handling Policy |
|---|---|
|
UNIDENTIFIED_ERROR |
DEFAULT_RETRY |
|
ADDRESSING_ERROR |
NO_RETRY |
|
MAILBOX_ERROR |
PROGRESSIVE_RETRY |
|
MAIL_SYSTEM_ERROR |
PROGRESSIVE_RETRY |
|
NETWORK_ROUTING_ERROR |
RATE_LIMIT_RETRY |
|
MAIL_DELIVERY_PROTOCOL_ERROR |
NO_RETRY |
|
MESSAGE_CONTENT_ERROR |
NO_RETRY |
|
SECURITY_POLICY_ERROR |
PROGRESSIVE_RETRY |
|
NO_SUCH_PROVIDER |
NO_RETRY |
|
CONNECTION_ERROR |
PROGRESSIVE_RETRY |
|
UNKNOWN_HOST |
NO_RETRY |
|
INTERNAL_ERROR |
NO_RETRY |
Working of Policies with Default Configuration
The following will be the result of applying the default configuration using the above policies.
-
All the errors corresponding to "Default Retry" Policy should get retried immediately.
-
All the errors corresponding to "No Retry" Policy will not get retired.
-
All the errors corresponding to "Rate Limit Retry" Policy should get retried after 24 hours.
-
All the errors corresponding to "Progressive Retry" Policy should get retried at intervals of 30 minutes, 1 hour, and 1.5 hours.
-
Same can be verified from "s_message_send_info" and "failed_message_send_info".
Working of Policies with Customized Configuration
Perform the following steps.
-
Run the following query to customize the configuration.
INSERT into media_profile_configuration(media_profile_id, contact_center_id, media_profile_type, media_profile_properties) VALUES ('<media_profile_id>,<contact_center_id>,'email', '{"maxRetryCount":"3", "rateLimitRetryTime":"86400", "progressiveRetryInterval":"300"}')
Refer to the following table to know the definition of variables and their default value.
Variable
Definition
Default Value
Linked Policy
maxRetryCount
is the Maximum Count of Retry Attempts.
Its default value is 3.
Default Retry
rateLimitRetryTime
It is the retry late limit of the email server after which the email can be retried to send.
It's default value is 86,400 seconds that is 24 hours.
Rate Limit Retry
progressiveRetryInterval
It is the Progressive Retry Interval after which the email can be retried to send.
It's default value is 300 seconds.
Progressive Retry
-
Run the following CURL command to reload the configuration.
curl -X POST http://localhost:8888/ameyorestapi/media/messages/reloadMediaProfileConfiguration -H 'sessionId: <Administrator-session-id-only>'
The following will be the result of applying the customized configuration using the above policies.
-
All the errors corresponding to "Default Retry" Policy should get retried immediately.
-
All the errors corresponding to "No Retry" Policy will not get retired.
-
All the errors corresponding to "Rate Limit Retry" Policy should get retried after configured time.
-
All the errors corresponding to "Progressive Retry" Policy should get retried at intervals of configured time.
-
Same can be verified from "s_message_send_info" and "failed_message_send_info".