Event-based Rules
The event based rules are executed automatically upon detecting the occurrence of an event.

Figure: Event-based Rules Tab
Create an Event Based Rule
Perform the following steps to create an event-based rule.
- Click "New Rule" to create a new rule. The following fields are displayed in the blank area.

Figure: Add an Event Based Rule
- Provide a name for the new rule.
- Provide a description for the rule.
- Select a process in which the rule will be applicable.
- After selecting, the process, you have to select the campaign in which the rule will be applicable.
- Events: Select any of the following events for which you want to create this rule.
- New Ticket Created: This event is generated when a new ticket is created in Ameyo through email, call, manual, or any API.
- New Lite Ticket Created: This event is generated whenever a new lite ticket created.
- Ticket Updated: This event is generated whenever an update to a ticket is detected such as an escalation is marked, de-escalation is marked, priority is changed, status is changed, new message is received, subject is changed, and others. Selecting it shows an adjacent drop-down menu containing the following options.

Figure: Ticket Updated Event
- Ticket Transferred To Agent: This event is generated whenever a ticket is transferred from the Supervisor to the Agent, from the Agent to the Supervisor, or from an Agent to another Agent. Selecting it shows two adjacent drop-down menus that lets you select the ticket assignor and ticket assignee.

Figure: Ticket Transferred to Agent Event
- Ticket Auto-Assigned: This event is generated whenever a ticket is auto-assigned to the agents. Know more...

Figure: Ticket Auto-Assigned Event
- Priority Changed: This event is generated whenever the priority of any ticket is changed to "Low", "Medium", and "High". Selecting it shows the two adjacent drop-down menus that lets you select the previous and current priority value.

Figure: Priority Changed Event
- Private Note Added: This event is generated whenever a private note is added to the ticket.
- Public Note Added: This event is generated whenever a public note is added to the ticket.
- Message Sent: This event is generated whenever a message is sent out as reply from the ticket.
- Ticket Status Changed: This event is generated whenever the status of a ticket is changed. Selecting it shows the two adjacent drop-down menus that let you select the previous and current ticket status.

Figure: Ticket Status Changed Event
- Heat Value Changed: This event is generated whenever the Heat value is changed, greater than or less than a defined value. Selecting it shows a drop-down menu (to select a sub-condition) and a text field to provide user defined value.

Figure: Heat Value Changed Event
- Mail Sending Failed: This event is generated whenever the mail sending is failed due to the failure of Exchange Server or internal mail service.
- Custom Field Updated: This event is generated whenever a custom field is updated or changed. Selecting it shows an adjacent drop-down menu.

Figure: Custom Field Changed Event
- Ticket Escalated: This event is generated whenever a ticket is escalated.
- Ticket Deescalate: This event is generated whenever a ticket is de-escalated.
- Ticket Picked Manually: This event is generated whenever a ticket is picked manually.
- Resolve SLA Breached: This event is generated whenever the SLA (Service Level Agreement) of resolving a ticket is breached.
- First Assign SLA Breached: This event is generated whenever the very first assigned SLA (Service Level Agreement) of a ticket is breached.
- First Response SLA Breached: This event is generated whenever the very first response SLA (Service Level Agreement) of a ticket is breached.
- New Message Received: This event is generated whenever a new message is received.
- Ticket Reopened: This event is generated whenever a ticket is reopened.
- Conditions: Here, you can specify the conditions based upon which the actions will be taken. Perform the following steps.
- Click
 icon in the middle of the "Condition" box to add a new condition. It shows the following section.]

Figure: Add a Condition
- Click "Condition" drop-down menu to select any of the following conditions.
- Media Profile: Select it to add a condition based upon the ID of the media profile. It contains the following operators.
- is
- is not

Figure: Condition for Media Profile
Select a media profile ID after selecting an operator. - Ticket Status: Select it to add a condition based upon "Ticket Status". It contains following operators.
- is
- is not

Figure: "Ticket Status" Condition
Provide a value in the text field after selecting an operator. - Current Time: Select it to add a condition based upon "Current Time". It contains following operators.
- is
- is not
- greater than
- less than
- Within

Figure: "Current Time" Condition
Provide a value in the text field after selecting an operator. - Queue: Select it to add a condition based upon "Queue". It contains following operators.
- is
- is not
- greater than
- less than
- Within

Figure: "Queue" Condition
Select the queue after selecting an operator. - Priority: Select it to add a condition based upon "Priority". It contains following operators.
- is
- is not

Figure: "Priority" Condition
Select an operator and then select a priority value. - Subject: Select it to add a condition based upon the subject. It contains following operators.
- is
- is not
- contains
- does not contain
- ends with
- starts with
-

Figure: Subject Condition
-
Custom Field: The Custom Field field created at the System-level will appear in the condition. In case of single-level custom field, you just have to select it.
In case of Dependent Multi-level Custom Field, the selection of all values is not required. For a 4-level Custom Field, you can select the values for only one, first two, or first three levels to create the rule.
Example: Take the example of the following multi-level field.
-
Location
-
India
-
Haryana
-
Bhiwani
-
Gurugram
-
Faridabad
-
Rohtak
-
-
-
Now, the Administrator can select only "Location" or "Location" and "Country" to create a rule.

Figure: New type of condition while creating Event-based Rule
-
- Other Conditions: In addition to above, following other conditions are also available. They are listed here collectivity as the steps to select any of them is similar.
- timezone: Select it to set a condition based on timezone.
- twitter: Select it to set a condition based on Twitter username.
- facebook: Select it to set a condition based on Facebok Username.
- phone2: Select it to set a condition based on phone number given in "phone2" field.
- name: Select it to set a condition based on customer's name.
- phone3: Select it to set a condition based on phone number given in "phone3" field.
- phone4: Select it to set a condition based on phone number given in "phone4" field.
- phone5: Select it to set a condition based on phone number given in "phone5" field.
- email: Select it to set a condition based on email address.
- phone1: Select it to set a condition based on phone number given in "phone1" field.
- is
- is not

Figure: Other Condition
Provide a value in the adjoining text field after selecting an operator.
- You can add multiple conditions using the steps discussed above.

Figure: Multiple Conditions
When multiple conditions are added, the following new options are displayed on the top of "Conditions" Tab.- Match any of the following: Select this option to match any of the conditions. The rule will be applied if one or more conditions are being matched.
- Match all of the following: Select this option to match all conditions collectively. The Rule will be applied only when all conditions are being matched, else the rule will not be applied.
You can click "X" icon on the top right corner of an condition to remove it.
- Click
- Actions: You can select actions in this section, which will be performed only upon those messages which meet the pre-selected conditions. Perform the following steps.
- Click icon to add an action. it shows a section.
- You click the drop-down menu to select any of the following actions.
- Escalate Ticket: Select it to escalate the tickets which meets the pre-selected conditions.

Figure: Escalate Ticket
Select any of the following operators.- true: Select it to escalate the ticket.
- false: Select it to not escalate the ticket.
- Set Custom Field: Select it to set a custom field on those tickets who meet the pre-selected conditions.

Figure: Custom Field Action
Select a custom field from the provided options. - Transfer Ticket to Queue: Select it to transfer those tickets to the selected queue and the selected agent which meets the pre-selected conditions.

Figure: Transfer to Queue
Select a queue and then select any of the following options in "Assign to User" drop-down menu.- Available Agent: Select it to transfer the ticket to the agent who is available.
- Agent Available to Take Tickets: Select it to transfer the ticket to any of the agents, who are available to take the ticket.
- Any Agent: Select it to transfer the ticket to any agent randomly irrespective of its availability status.
- Send Email To: Select it to send an email to any recipient for those tickets which meets the pre-selected conditions.

Figure: Send Email To Action
- Enter the email address of the recipient in the very first text field.
- Select the media profile in "Media Profile" drop-down menu.
- Provide a Subject in the subject text field.
- Write a message in the text area, which you can format using the provided tools.
- You can click "Insert Placeholders" button to add the placeholders in the message body.

Figure: Placeholders
- Following is screenshot of such a message.

Figure: Sample Email
- Send Email To All Supervisors: Select it to send an email to all supervisors for those tickets which meet the pre-selected conditions.

Figure: Send Email To All Supervisors
- Select the media profile in "Media Profile" drop-down menu.
- Provide a Subject in the subject text field.
- Write a message in the text area, which you can format using the provided tools.
- You can click "Insert Placeholders" button to add the placeholders in the message body.
Figure: Placeholders
- Following is screenshot of such a message.

Figure: Sample Email
- Send Email To Agent: Select it to send an email to the selected agent for those tickets which meets the pre-selected conditions.

Figure: Send Email To Agent
- All the agents in the already selected campaign and process will be listed in the drop-down menu. Select an agent to whom you want to send the email.
- Select the media profile in "Media Profile" drop-down menu.
- Provide a Subject in the subject text field.
- Write a message in the text area, which you can format using the provided tools.
- You can click "Insert Placeholders" button to add the placeholders in the message body.
Figure: Placeholders
- Following is screenshot of such a message.

Figure: Sample Email
- Send Email To All Agents Assigned to Queue: Select it to send an email to all agents assigned to the queue for those tickets which meets the pre-selected conditions.

Figure: Send Email To All Agents Assgined to the Queue
- Select the media profile in "Media Profile" drop-down menu.
- Provide a Subject in the subject text field.
- Write a message in the text area, which you can format using the provided tools.
- You can click "Insert Placeholders" button to add the placeholders in the message body.
Figure: Placeholders
- Following is screenshot of such a message.

Figure: Sample Email
- Send Email To Requester: Select it to send an email to the requester for those tickets which meets the pre-selected conditions.

Figure: Send Email To Requester
- Select the media profile in "Media Profile" drop-down menu.
- Provide a Subject in the subject text field.
- Write a message in the text area, which you can format using the provided tools.
- You can click "Insert Placeholders" button to add the placeholders in the message body.
Figure: Placeholders
- Following is screenshot of such a message.

Figure: Sample Email
- Send Feedback To Requester: Select it to send a feedback email to the requester for those tickets which meets the pre-selected conditions.

Figure: Send Feedback To Requester
- Select the media profile in "Media Profile" drop-down menu.
- Provide a Subject in the subject text field.
- Write a message in the text area, which you can format using the provided tools.
- You can click "Insert Placeholders" button to add the placeholders in the message body.
Figure: Placeholders
-
Do not delete {{feedback:form}} as this is the placeholder for the Feedback form. If it is deleted, feedback form will not be placed.
Following is screenshot of such a message.
Figure: Sample Feedback Email
- Assign Ticket to Agent: Select it to assign those tickets to the selected agent which meets the pre-selected conditions.

Figure: Send Email To All Supervisors
The agents available in the previously selected campaign and process are listed in the drop-down menu. You just have to select the agent here. - Set Status: Select it to set the status of those tickets which meets the pre-selected conditions.

Figure: "Set Status" Action
- Priority: Select it to increase or decrease the priority of those tickets which meets the pre-selected conditions.

Figure: "Priority" Action
Select any of the following options in the drop-down menu.- Increment: Select it to increase the priority of the ticket.
- Decrement: Select it to decrease the priority of the ticket.
- Set Priority: Select it to set the priority of those tickets which meets the pre-selected conditions.

Figure: "Set Priority" Action
Select any of the following options in the drop-down menu.- Low
- Medium
- High
- HTTP Action: Select it to apply HTTP Action (also called Webhook) to trigger an external API to process those messages which meet the pre-selected conditions. Please refer to "HTTP Action" Page to know more about the same.
-
Set Custom Field Using HTTP Action Response: Select it to allow to ask an external system to update the custom field and as a result thereof, take any additional action upon the creation or modification of a ticket.
When a custom field is hidden then also custom field is getting update, checked from the backend. And able to search the same from the advance filter even custom field is hidden for that ticket.
Sample JSON Formats
The required sample JSON formats for the following custom fields for integer, boolean, and string values, which has to be generated, after calling the API of the third-party external system are also provided.
-
Single-Selection List Box
-
Multi-Selection List Box
-
Single Line Field
-
Checkbox
-
Radio Button
-
Dependent Single Selection List Box
Following is the database entry of a single Selection List Box.
                                custom_field_id          | d625-5d094290-cf-0
                                column_name              | CB
                                contact_center_id        | 1
                                custom_field_data_type   | String
                                custom_field_name        | SSLB
                                custom_field_type        | SingleSelectionListBox
                                default_value            |
                                possible_values          | ["1","2","3","4","['k']"]
                                process_id               | 2
                                is_required              | f
                                is_searchable            | f
                                custom_field_category_id | 2
                                date_added               | 2019-06-19 01:40:08.397
                                date_modified            | 2019-06-26 20:51:12.223
                                mandatory_on_creation    | f
                                is_editable              | t
The required output from the Sample API stored in the AppServer to modify the above SingleSelectionListBox using "HTTP Response Data" should be in the following format.
JSON for Integer Type:
{d625-5d094290-cf-0:2}
JSON for String Type
{d934-5d0229ef-cf-0:\"Payment Query\"}"
The required output from the Sample API stored in the AppServer to modify the multiple Custom Fields in a ticket using "HTTP Response Data" should be in the following format.
JSON to update multiple Custom Fields
{d119-5d134249-cf-2:[1.1,1.2],d119-5d134249-cf-1:[\"string1\",\"string2\",\"string3\",\"string4\"]}
Example of Third-Party API
Following is the sample API that will be called in the test case created for this story.
                                <?php
                                                echo "{d581-5d0a3128-cf-0:{\"Country\":\"New Zealand\",\"State\":\"Zero\"}}";
                                ?>
Steps to create a HTTP Response to update a Custom Field using above Sample API
Perform the following steps.
-
The Administrator has to create or modify a Routing Rule, Event-based Rule, or Timer-based Rule.
-
Select "GET" as the method.
-
In URL, provide the URL at which the Sample API is stored in Ameyo AppServer.
-
Select "HTTP Action" as the first action in "Actions".
-
Select "Post-Request Script" tab and provide the following JavaScript Code.
variables.put("$thridPartyCustomFieldData",responseString);
The above code has to be used as-it-is in whenever you want to update the Custom Field using HTTP Response.
-
Now, click "Add New Action" button in the right corner.
-
Select "Set Custom Field Using HTTP Action Response" in the new action. Refer to the following screenshot.

Figure: New Action for HTTP Response
-
Click "Save".
-
- Following is a sample screenshot containing an Event-Based Rule with sample details.

Figure: Sample Event-based Rule
- You can check "Stop Execution after this rule" box to stop the execution of other selected actions in this rule.
- Click "Save" to create the rule.You can create multiple rules for same or different campaigns to filter the tickets using these steps.

Figure: Added Multiple Event-based Rules
If any rule in "Event Based Rules" is assigning or transferring only one ticket to any agent, then its notification to that agent will be displayed after 5 minutes. However, if more than 5 tickets are being assigned or transferred to an agent, then a notification showing all 5 ticket assignment or ticket transfer will be displayed to that agent in real-time.
Enable or Disable the Rule
You can disable the rules. The disabled rules will be hidden, but you can make them visible. You can also enable the disabled rules.
Disable a Rule
Click the toggle
 switch on a rule to disable it. It shows the following message.
Figure: Asking to disable the rule
Click "Yes" to disable the selected rule. The disabled rule will not be applied in the already selected. Here, its details will be hidden. Following is a disabled rule.

Figure: Disabled Rule
View the Details of Disabled Rules
In a disabled rule, click to check "View Disabled Rules" box to view its details.

Figure: Displaying the Details of Disabled Rule
Enable a Disabled Rule
To enable a disabled rule, click the gray toggle
 switch to enable it. The following message is displayed.
Figure: Asking to enable the rule
Click "Yes" to enable the selected rule. The enabled rule will be applied in the campaign, where it has been selected.
Edit an Event-based Rule
Perform the following steps to edit a rule.
- Click a rule to select it and click
 icon. It shows the following pop-up.
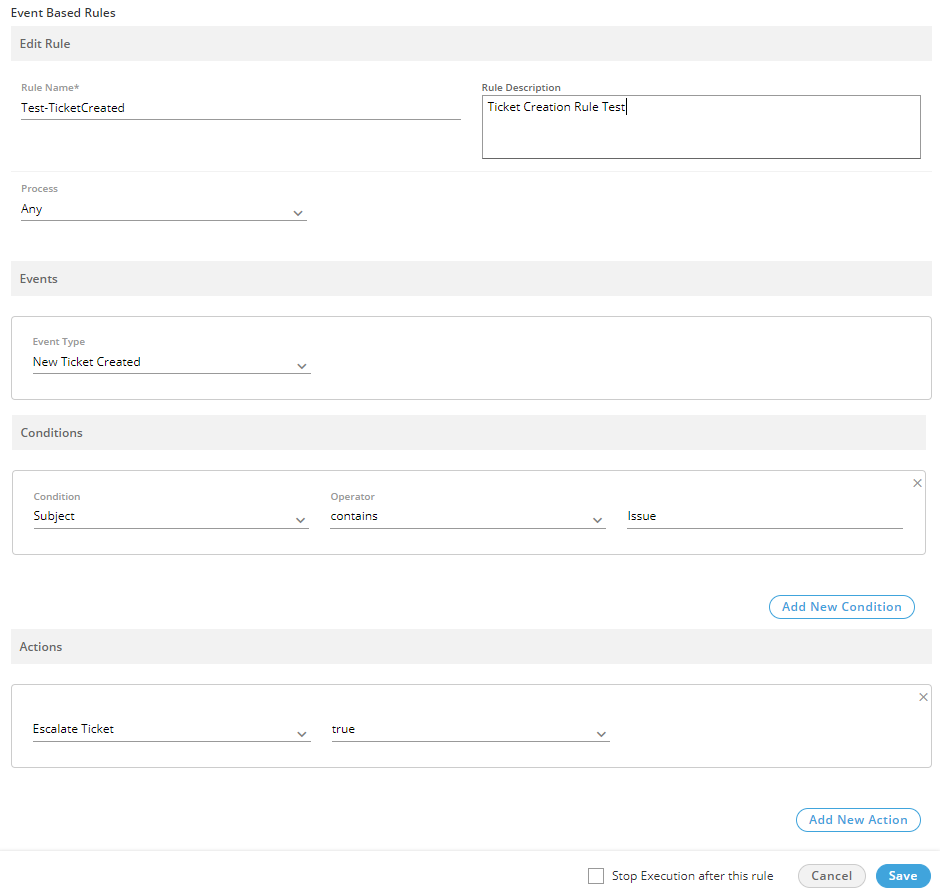
Figure: Edit an Even-based Rule
- You can make the following changes here.
- Rule Name
- Rule Description
- Process
- Campaign
- Event
- Conditions
- Actions
- Stop or Continue Execution of other Rules
- Click "Save" to save the changes.
Rather you can click "Cancel" to discard the changes.
Delete an Event-based Rule
The Deleted Rule cannot be retrieved back. Also, the deleted rule will not be applicable in the selected campaign.
Perform the following steps to delete a rule.
- Click to select a rule and click
 icon to remove it. The following warning message is displayed on the screen.

Figure: Warning before deleting an Event-based Rule
- Click "Yes" to delete the rule.
Rather, you can click "No" to not delete the rule.
- Click