Ticket Settings
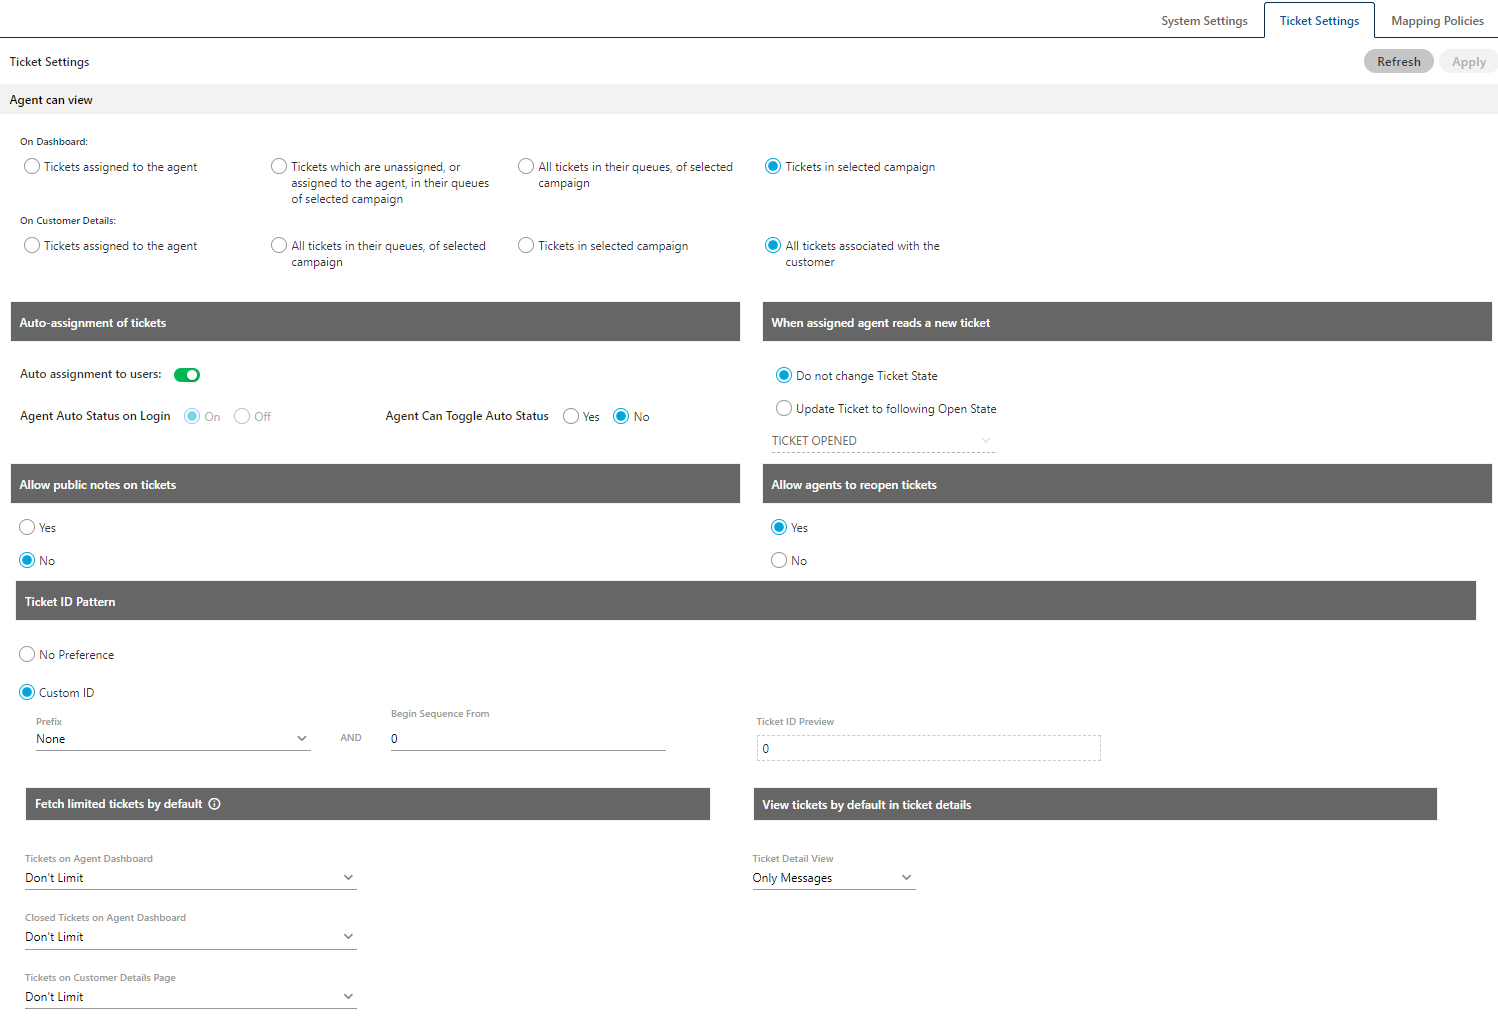
In this Tab, Administrator can define the Ticket Settings.

Figure: Ticket Settings
It contains the following settings.
Agent can view
Select the type of tickets that an agent can see.
- On Dashboard: Select the types of tickets that an agent can see on the dashboard.
- Tickets assigned to the agent: Select it to let the agent view only those tickets that are assigned to him/her.
- Tickets which are unassigned, or assigned to the agent, in their queues of selected campaigns: Select it to let the agent view both those tickets which are unassigned and which are assigned to the agents in their queues of selected campaigns. The tickets assigned to other agents of queues to which he/she is not assigned, will not be displayed to him/her.
- Tickets in queues assigned to the agent in selected campaigns: Select it to let the agent view those tickets in queues which are assigned to the agents in its selected campaigns. It will not show the tickets which are either unassigned or assigned to other agents who are staffed to another campaign, in which he/she was not staffed.
- Tickets in selected campaigns: Select it to view the tickets which are assigned to the agents in the campaigns elected by the agent.
- On Customer Details: Select the types of tickets that an agent can see in the customer details.
- Tickets assigned to the agent: Select it to let the agent view only those tickets that are assigned to the agent.
- Tickets in queues assigned to the agent in selected campaigns: Select it to let the agent view all tickets in the queue which are assigned to the agents in its selected campaigns.
- Tickets in selected campaigns: Select it to let the agent view the tickets in the selected campaigns.
- All Tickets associated with the customer: Select it to let the agent view all tickets associated with the customer.
Auto-assignment of tickets
Configure the options here to enable or disable Auto-Assignment of tickets to Users and allow or disallow the agents turn on or off their Auto-Status in interaction campaign.

Figure: Auto-Assignment of Tickets
It contains the following options.- Auto-assignment to users: Click this toggle switch to turn on the Auto-Assignment of Tickets to the agents by default. If it is enabled, "Agent Auto Status On Login" option will also be enabled by default and remain disabled.
If this option is enabled, the Administrator also get "Auto-Assignment to users" option at the queue level that can be configured. The Queue-level "Auto-Assignment to users" option will override this auto-assignment option of System-level.
If it is enabled, the agents will be on "Auto-Status On" after their login in Interaction Campaign. The next option "Agent Can Toggle Auto Status" will allow or disallow agent to change this status.
The Administrator can turn off this option to not assign tickets automatically to the agents. - Agent Auto Status On Login: This option will be enabled only when "Auto Assignment to Users" option is turned off. Select "On" to force the agents to be on "Auto-Status On" after their login to Interaction Campaign. Else, select "Off" to turn off this feature.
- Agent Can Toggle Auto Status: Select "On" to allow the agents to toggle/change their "Auto-Status On" option. Else, select "Off" to turn off this feature.
When assigned agent reads a new ticket
By default, whenever the assigned agent reads a new ticket, the state of that ticket is changed to "Open" Internal State. If you want to set an external state, created under "Open" Internal State, as the default state when the assigned agents reads a new ticket, then this section helps you define that settings. It contains the following options.

Figure: Set the State of New Ticket when the assigned agent reads it
- Do not change Ticket State: Select it to not change the state of the ticket when then agent assigned to a ticket reads it.
- Update ticket to following open state: Select it to change the update the state of the ticket as per the external state of "Open" Internal State selected the in the drop-down menu.
Allow Public Notes on tickets
Configure this option to allow or disable the public notes on the tickets. The public notes will be visible to all users. It contains the following options.
- Yes: Select it to allow the public notes on the tickets.
- No: Select it to disable the public notes on the tickets.
Allow agents to reopen tickets
Configure this option to allow or disable to agents to reopen the closed tickets. It contains the following options.
- Yes: Select it to let the agents reopen the closed tickets.
- No: Select it to not allow the agent to reopen the closed tickets.
Ticket ID Pattern
The Administrator can now customize the ID Number of the tickets at the System level.

Figure: Ticket ID Pattern
The Administrator has to perform the following steps to do this customization.- Select "Custom ID" to provide a customized ticket ID. Perform the following steps.
- Select any of the following options as the prefix of the Ticket ID.
- NONE: Select it not to add any prefix.
- YYYYMMDD: Select it to add "YYYYMMDD" as the prefix.
- DDMMYYYY: Select it to add "DDMMYYYY" as the prefix.
- MMDDYYYY: Select it to add "MMDDYYYY" as the prefix.
DD, MM, and YYYY will be replaced with their respective values as per the date when the ticket is being created.

Figure: Customized date-based Ticket ID
-
Custom: Select it to add the provided custom alphanumeric input as the prefix. Upon selecting, it enables an additional text field named "Value" at the bottom. You have to enter an alphanumeric value in it.

Figure: Custom-field based Ticket ID
- Begin Sequence From: Here, you have to provide the number from which the numbering of ticket IDs will start.
After this ID customization, the actual ticket will not be displayed in the entire interface of Ameyo System. It will only show the Custom ID. For debugging, it is necessary to fetch the actual Ticket ID from the provided Custom ID.
Custom Ticket ID is also visible in the tickets, that are being exported to CSV formats from the Agent's Dashboard. Improved Ticket Resolvers to manage Custom Ticket IDs: If Custom Ticket IDs are being used for the first time, the Ticket Resolvers of Email Media Profiles are appending the new emails and reply to emails to the same tickets even if their default ticket IDs has been replaced with the new Custom IDs.
However, this will not work if the Custom Ticket ID has been changed again with a new custom ticket ID or default ID. That means the Ticket Resolvers of Email Media Profiles will not append the new emails and reply to emails to same tickets if the already set Custom Ticket ID has been either changed again or reset to default.
Fetch Limited Tickets by default
If there is large amount of tickets, then the performance was being impacted and the Agents have to wait for considerable amount of time. Now, the Administrator can specify the date range within which the tickets will be fetched in the Agent Console. The Administrator have to navigate to "System" → "System Configuration" → "Settings" → "Ticket Settings" to access this option. In "Ticket Settings" page, go to the bottom.

Figure: Option to Fetch Limited Tickets
It contains the following three settings.
-
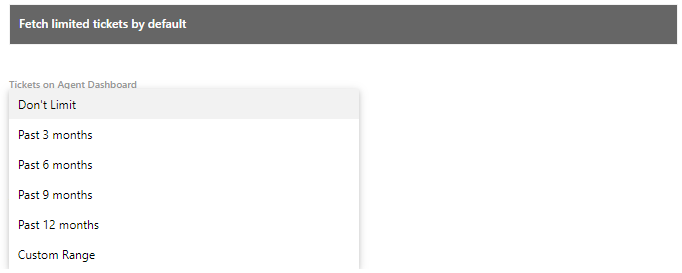
Tickets on Agent Dashboard: It allows you to specify the duration, within which the tickets will be displayed on Agent Dashboard. The tickets not matching this duration will not be available on the Agent Dashboard. The following screenshot shows the available duration for this configuration.

Figure: List of Available Duration for a Settings
It contains the following options.
-
Don't Limit: Select it to not apply any date-range filter on fetching of tickets. If the number of tickets are large, then we recommend not to select this option.
-
Past 3 Months: Select it to fetch the tickets of only past 3 months on the Agent Dashboard.
-
Past 6 Months: Select it to fetch the tickets of only past 6 months on the Agent Dashboard.
-
Past 12 Months: Select it to fetch the tickets of only past 12 months on the Agent Dashboard.
-
Custom Range: Select it to provide the number of past months, of which tickets have to be fetched on the Agent Dashboard. After selecting this option, a text box titled "Define Date Range (in months)" is displayed along with "Tickets on Agent Dashboard" drop-down menu.

Figure: Custom Range Filter Option
Provide a value in number between 1 and 12.
-
-
Closed Tickets on Agent Dashboard: It allows you to specify the duration, within which the tickets will be displayed on "Closed Ticket" pages on both Agent Dashboard and Customer page. The tickets not matching this duration will not be available on "Closed Ticket" pages. It contains the same options as that of "Tickets on Agent Dashboard" configuration, which are explained above.
-
Tickets on Customer Details Page: It allows you to specify the duration, within which the tickets will be displayed on "Customer Details" page. The tickets not matching this duration will not be available on "Customer Details" page. It contains the same options as that of "Tickets on Agent Dashboard" configuration, which are explained above.
View tickets by default in ticket details
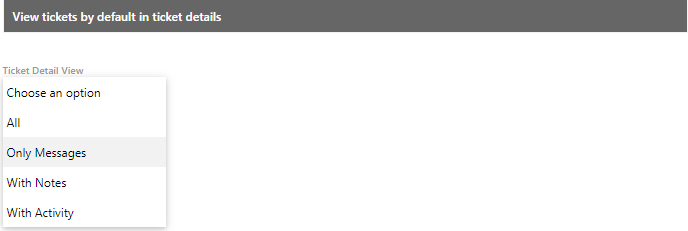
The administrator can enable the ticket view settings to show the default result of the tickets to the agents. It means that the default view of the ticket will be based upon the selected result of the administrator. However, the agent is able to change the selection from this drop-down list. The administrator can select the ticket view detail from the following four available options.
-
All: Selecting this option will allow the agents to view all the transactions and messages done on the ticket.
-
Only Messages: Select it to show only messages used on that ticket to the agent.
-
With Notes: Select it to view the messages with notes shared over the ticket.
-
With Activity: Select it to view all activities performed on the ticket.

Figure: Ticket Detail View List