Call Control Functions
All the functionalities of Call Control Functions for supervisor and group manager are similar as that of agent.
As soon as a call is placed, telephony panel will pop up containing telephony buttons which are used for call control.
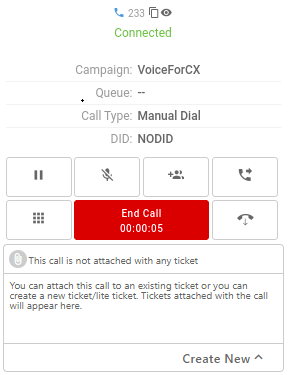
Figure: Call Screen
Attach Tickets to Call
The User can create and attach the tickets during the call in Telephony Panel. Know more...
Call Hold/Talk
While on live calls, the agent can put the customer call on hold by clicking ![]() button. When a call is on hold, both parties will not be able to hear each other. Only music will be played to the caller and the total time for which the call is on hold is displayed on the panel.
button. When a call is on hold, both parties will not be able to hear each other. Only music will be played to the caller and the total time for which the call is on hold is displayed on the panel.
The agent can unhold(resume) the call by clicking ![]() button.
button.
Call Mute
On the live calls, the agent can put the customer's call on mute by clicking  button. When the call is on mute, then customer is not able to hear the voice of agent, but agent can hear all the voices of customer.
The agent can resume the muted call by clicking the same button again.
Conference
Call Conferencing allows to add guests to a call. A guest can be another agent, a field executive, a manager or a Supervisor. If you would like to add one or more guests to the call for a conference call, click  button with the caller on line.
(Licensable) Confer a Call to a User or Supervisor
If the agent wishes to make a conference call to another user or supervisor, the agent may take the user or supervisor over conference call by using this confer option. If you want to see the complete list of the users, then ask about the same from your administrator, as this feature is licensable.
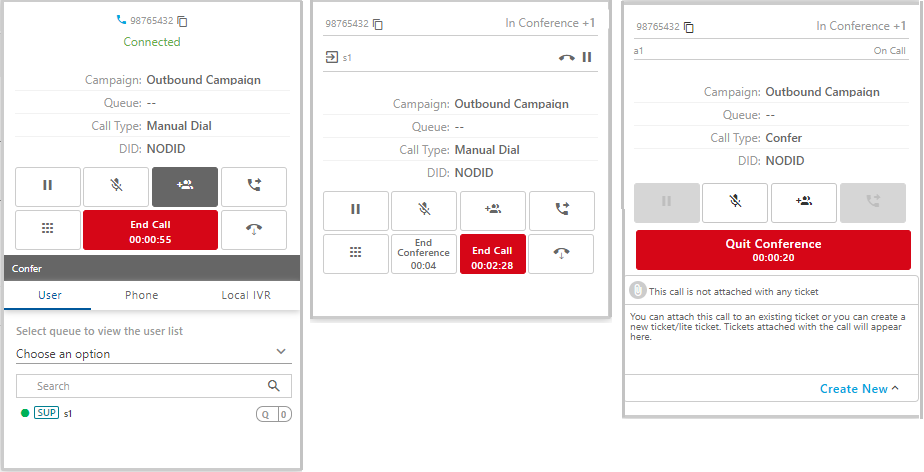
Figure: Call Conferencing with User
-
Only the names of the logged in users will reflect, who are available to take the calls with their User role. The user role will be seen only for the supervisors.
-
Put the customer call on hold by clicking "HOLD" button and click “CONFER” button.
-
Agent can select the name of the person with whom he/she wants to confer a call from the "user" list. During this process, the customer call would be on hold.
-
Agent can unhold the customer by clicking “UNHOLD” button and it will be a three-way conference call with new agent and the caller.
-
The agent can disconnect conference call by clicking “End Conference” button.
-
The agent can give the ownership to the other user while on the conference call by clicking
 button. The primary agent can come out of the call by disposing the call.
 -
The primary agent can remove the added user from the conference call by clicking
 button.
 The conference button also shows the total duration of the call for which the call has been on conference.
Confer a Call to an External Number
The agent can do a conference call with the external customer by entering the telephone number on the dialing pad.
-
Agent will put the customer call on hold by clicking "HOLD" button and click “CONFER” button.
-
Enter the phone number to transfer the call to in the box labeled “PHONE”. After entering the phone number, click “Confer To Phone” button.
-
Once the call gets connected, agent can explain the use case to the new user. During this process, customer call is on hold.
-
Agent can unhold the customer by clicking “UNHOLD” button and it will be a three-way conference call with new user and the caller.
-
The agent can disconnect conference call by clicking “End Conference” button.
-
The primary agent can remove the added user from the conference call by clicking
 button.
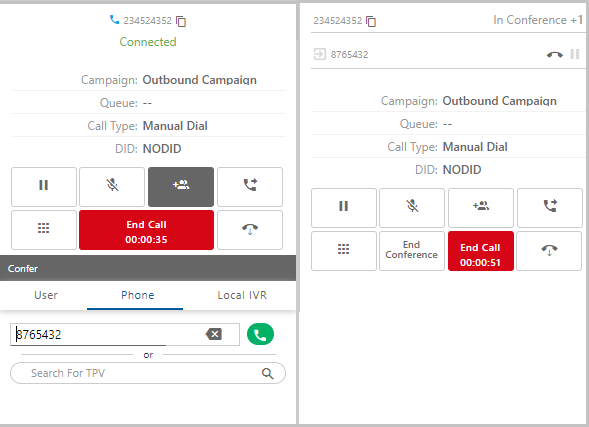
Figure: Call Conferencing with External Number
Confer a Call to IVR
If agent wants to facilitate any payment over IVR or to capture customer’s feedback, then he/she can take the call to local IVR in conference.
-
Agent will put the customer call on hold by clicking "HOLD" button and click “CONFER” button.
-
Agent needs to select the local IVR from the drop-down menu and click “Confer with local IVR” button.
-
Both customer and agent will be in conference with local IVR and both the parties will be able to hear the prompts of IVR (as per configured IVR flow).
-
Customer can enter the required inputs on IVR as per agent instruction or IVR prompts.
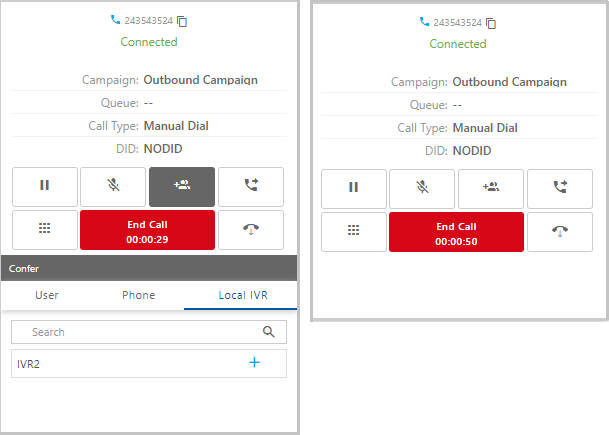
Figure: Call Conferencing with Local IVR
The agent cannot transfer the call to the IVR; however the call can be conferenced to the IVR by agent.
Call Transfer
If an agent wants to transfer a call, then he/she needs to click on the (TRANSFER) button. The agent will be able to select from the multiple options for call transfer.
-
Transfer to User
-
Transfer to Phone
-
Transfer to IVR
-
Transfer to Campaign
-
Transfer to Queue
(Licensable) Transfer a call to User or Supervisor (Warm Transfer)
A warm transfer is when agent will transfer the customer call to another agent or supervisor by giving him/her some background information about the caller. If you want to see the complete list of the users, then ask about the same from your administrator, as this feature is licensable.
For transferring the call to external user follow the below steps:
-
Only the names of the logged in users will reflect, who are available to take the calls.
-
Agent will put the customer call on hold by clicking on "HOLD" button and then click on "TRANSFER" button. However, the agent can directly transfer the call without making the customer on hold, but it is not recommended to do so.
-
Agent can choose anyone of the user from the available list. While transferring the call, the agent can see the user role of the supervisor, so that the supervisor can be easily recognized by the agent. Once call is connected to new user, agent can give the customer details (required information) to the new user. During this process, customer call is on hold.
-
New user will unhold the call by clicking on the “UNHOLD” button and it will be a three-way conference call with new user, the caller and agent himself.
-
Agent can hang up from the conference call by clicking on the “End Call” button. The caller will then be on call with the new user.
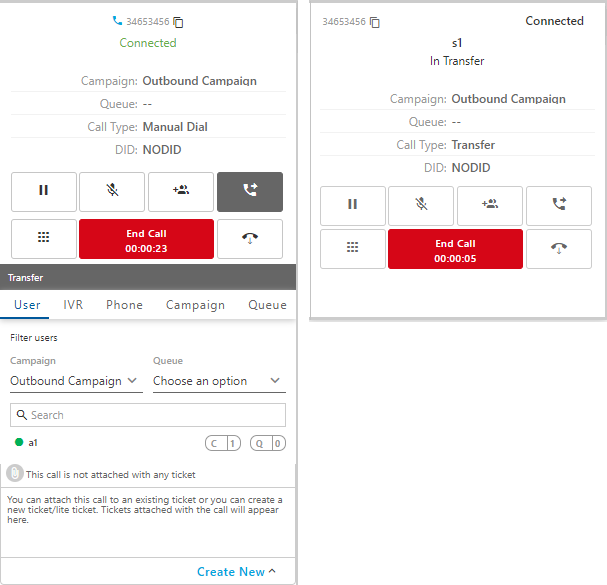
Figure: Call Transfer to User
Exceptional case:
When an agent performs "Transfer to User" for an outbound call and transfers it to another user, then the Call Type for such a call is not available in Live Monitoring tab. For example, agent 1 has received a call and then transferred it to agent 2. In this case, the customer will be reflecting with the agent 1 rather than the agent 2. The supervisor will see that the customer is connected with agent 1.
Transfer a call to external number (Warm Transfer)
A warm transfer is when agent will transfer the customer call to external number by giving him/her some background information about the caller. For transferring the call to external user follow the below steps:
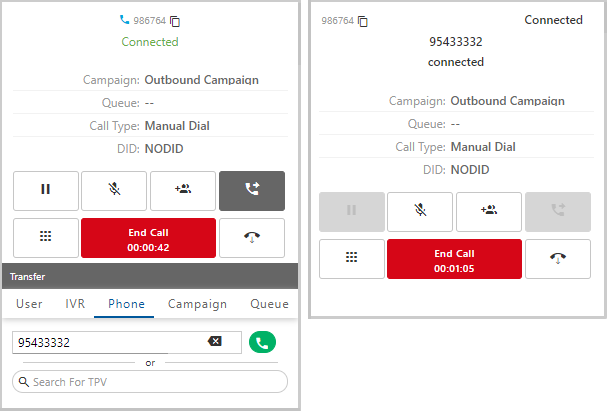
Figure: Call Transfer to External
-
Agent will put the customer call on hold by clicking on "HOLD" button and then click on “CONFER” button.
-
Enter the phone number to transfer the call to in the box labeled “PHONE”. After entering the phone number, click the “Confer To Phone” button.
-
Once the call gets connected, agent can explain the use case to the external party. During this process, customer call is on hold.
-
External party will unhold the call by clicking on the “UNHOLD” button and now there will be a three-way conference call with new user, the caller and agent itself.
-
The agent can give the ownership to the external party while on the conference call by clicking
 button. The primary agent can come out of the call by disposing the call.
 -
The primary agent can remove the external party from the conference call by clicking on
 button.
Transfer a Call to IVR
If agent wants to facilitate any payment over IVR or to capture customer’s feedback, then he/she can take the call to IVR in the conference.
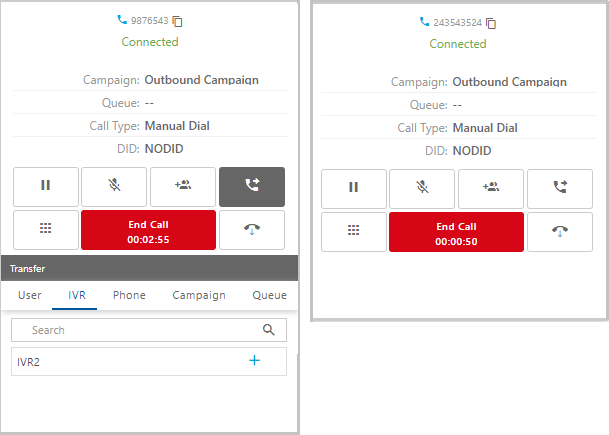
Figure: Call Transfer to IVR
-
The Agent will put the customer call on hold by clicking on "HOLD" button and then click on "TRANSFER" button.
-
The Agent needs to select the IVR from the drop down and call will be transferred to the selected IVR.
-
Customer can enter the required inputs on IVR as per IVR prompts.
Transfer a call to Campaign
There are cases when customer wants to talk regarding a particular concern for which there is a separate campaign, in that case agent can use transfer to “Campaign” option.
-
The Agent will put the customer call on hold by clicking on "HOLD" button and then click on "TRANSFER" button.
-
The Agent needs to select the “campaign” name from the dropdown list, after which the call will be transferred to any available agent in the selected campaign.
Transfer a call to another Queue (of same campaign)
This option can be used by agent if customer has by mistake selected the wrong queue in the IVR, for example IVR has queue of sales, support and general queries and customer called in for support however in error he/she selected sales queue in the IVR so, agent can re-route the call to correct queue by following below steps. This option is applicable for inbound campaigns only.
- "HOLD" button and then click on "TRANSFER" button.
-
The Agent needs to select the queue name from the drop-down list and select the appropriate queue in which the call needs to be transferred.
If the supervisor has configured "ACW Timeout (in sec)" for Connected and Not Connected Calls, then the calls (after disconnection) will be disposed off automatically after the expiry of this timeout value. To avoid such scenario, and in general, we recommend to dispose of the disconnected calls within this duration.
Add Notes
The agent can add the notes during or after the call. Enter your note in the "Add note" textbox of the telephony panel. If you want to provide the note during the call, then click the disposition button and then enter the note. Once you dispose the call, the note will automatically be saved and can be seen on the call details page.
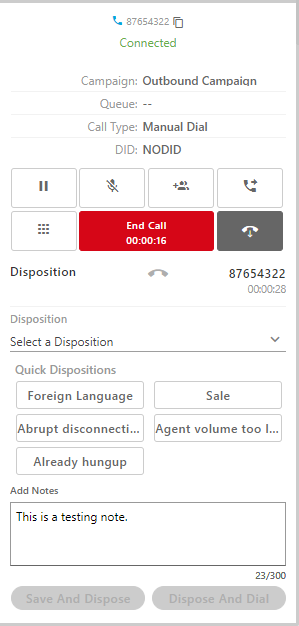
Figure: Adding the Call Note During the Call
Call Disposition
After completing the call, the two-level call dispositions are displayed in the telephony panel.
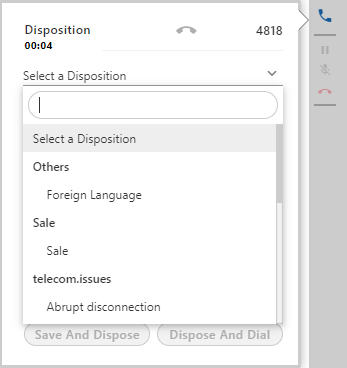
Figure: Dispositions of a Manual Preview Outbound Call
The agent has to select the disposition through the drop-down menu or select any of the on-screen displayed quick dispositions, as no disposition is selected there by-default. Until the agent do not select the disposition, the "Dispose" button remains unavailable to click.
Agent may receive any of the following disposition screens based upon the configurations.
|
Figure: Single Level Disposition |
|
Figure: Two level Disposition Selection |
It contains the following two option of buttons.
-
Save and Dispose: Click it to dispose the ticket associated with the call using the selected disposition.
-
(Licensable) Dispose and Dial: Click it to dispose the current call ticket and continue to make a manual dial call. It shows a textbox at the bottom of telephony panel.
It is a licensable feature, so contact your administrator about the license of the same.
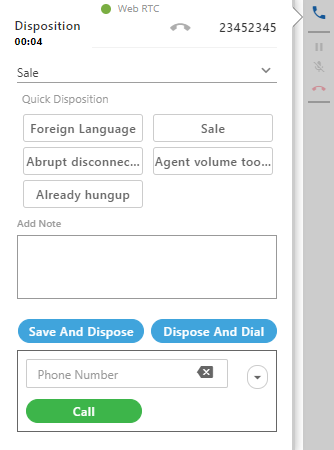
Figure: Continue to Manual Dial after Disposing Current Call
After entering the number, click "Call" to dispose the current call with the selected disposition and make a new outbound call with manual dial.
There are 2 types of Disposition codes, System-defined and User-defined. User-defined disposition codes are prioritized over the system-defined ones. At once, only 5 disposition options are displayed under Quick Disposition. These disposition options are alphabetically ordered.
Disposition options that are displayed on the screen under Quick Disposition are for the purpose of quick disposition by the agents. These are not the latest/recent dispositions used by the agent.
Restrict the Users to dispose the call from Telephony Panel and Allow them to dispose it from CRM only
If the administrator has configured and restrict the disposition of the call from the telephony panel, then the agent will not be able to dispose the call from Telephony Panel. In this case, the agents have to dispose the call through CRM only.
As soon as the call is ended, the telephony panel will not slide out to the left side from the right bar.
When the agent tries to dispose of the call in the telephony panel, then an error message is displayed.
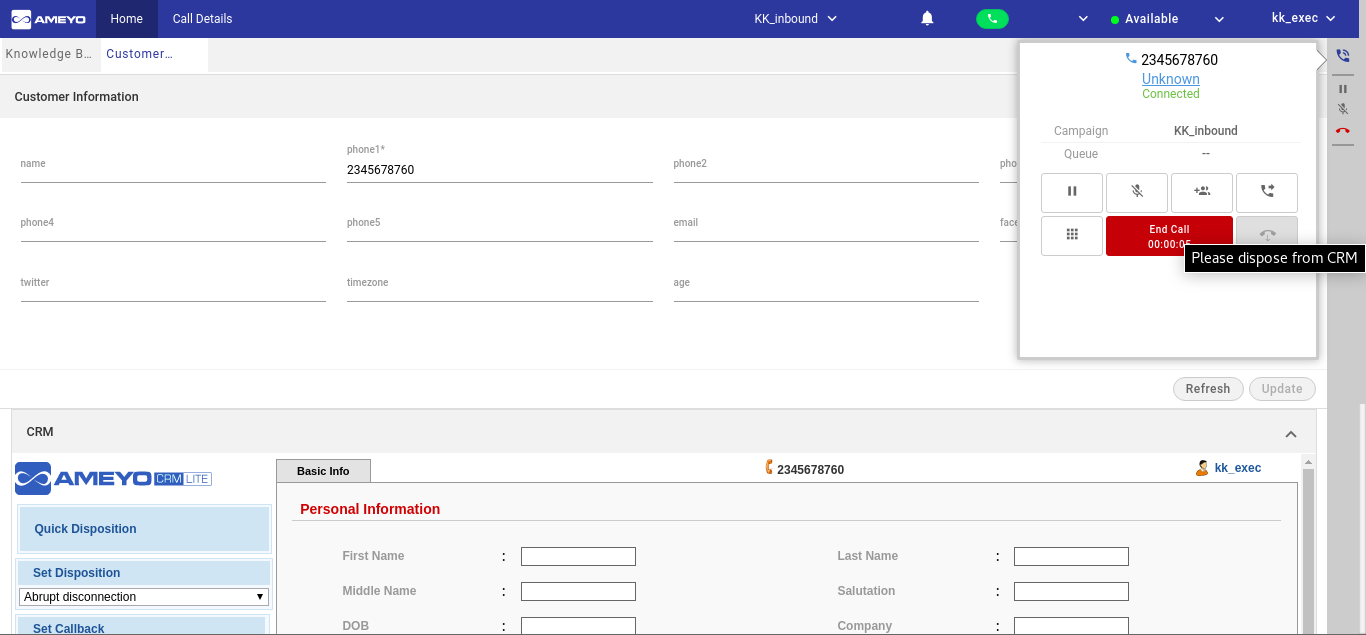
Figure: Disposition of Call is disabled in Telephony Panel
If the disposition is restricted at the telephony panel but can be done at CRM, then the "ACW Timer" is displayed in the tooltip of the phone icon in the right panel after the call disconnection (since the telephony panel is not shown to the agent). When the agent disposes of the call from the CRM, then an inline message is displayed on the page.
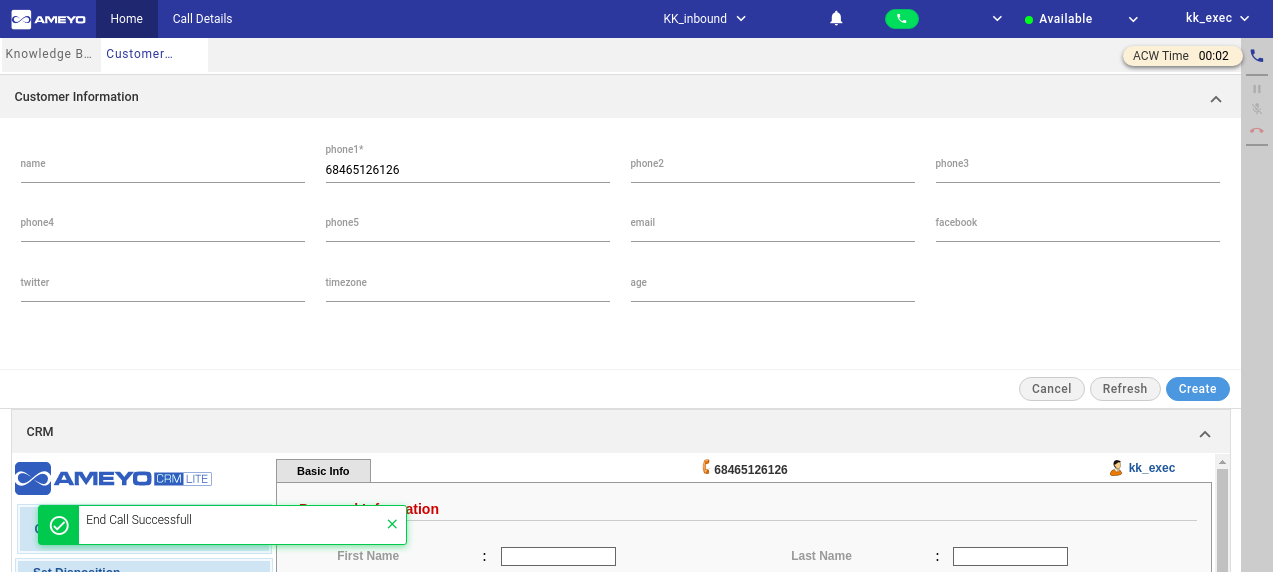
Figure: Disposed of the Call from CRM
If the disposition is disabled from the telephony panel, then Dispose and Dial will also be performed through CRM.
Callback and call notes are understood in the normal disposition operation through the telephony panel only.
Option to use the Customer Code while Transferring the Call to IVR
The customer code is a unique 6-digit code that can be used to request a transaction at the IVR linked with the Payment Gateway. The agents have the privilege to paste and use a custom code while performing a call transfer to IVR.
The agent can copy the code from the third-party CRM and paste it in the telephony panel during
call transfer to IVR,
cold transfer to IVR with the parameter and values (conferIVRData or ivrData): to replicate the crm screen from agent1 to agent2, and
warm transfer to IVR with the parameter and values (conferIVRData or ivrData): to replicate the crm screen from agent1 to agent2.
Refer to the following screenshot.
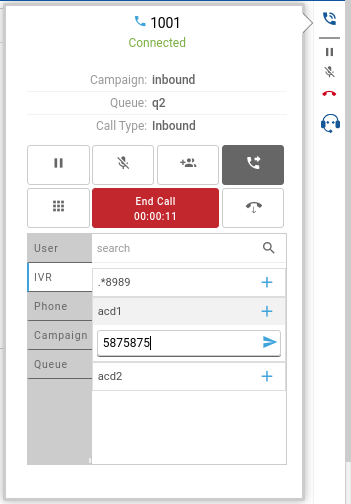
Figure: Copy Customer Code in Telephony Panel
BlackListing the customers at Agent Console (Workbench Level)
The agents also have been given the privilege to blacklist the customer's phone number. A disposition named "Blacklist Disposition" can be used to add the customer to the blacklist. The agent can use this blacklist disposition in both the telephony panel and in the web-chat modal.
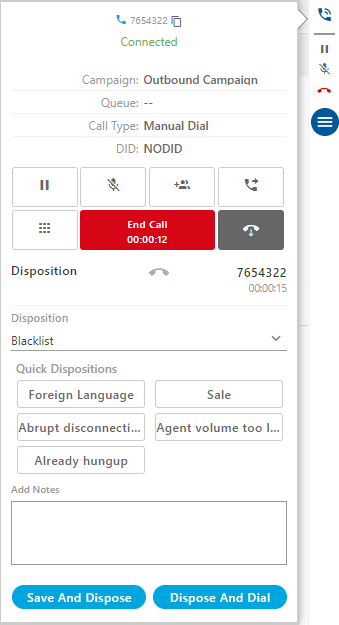
Figure: Blacklist Disposition at Telephony Panel
