Call Details
"Call Details" tab shows call details or history of the last 200 calls on a rolling basis and along with that an advanced section where call logs can be fetched with filters like date range, call duration, users, leads, customer status, call types. Fetched logs can individually listen, recordings can be downloaded, and whole call data can be extracted to CSV.
The tab will remain blank until you select the Date Range filters and apply them.
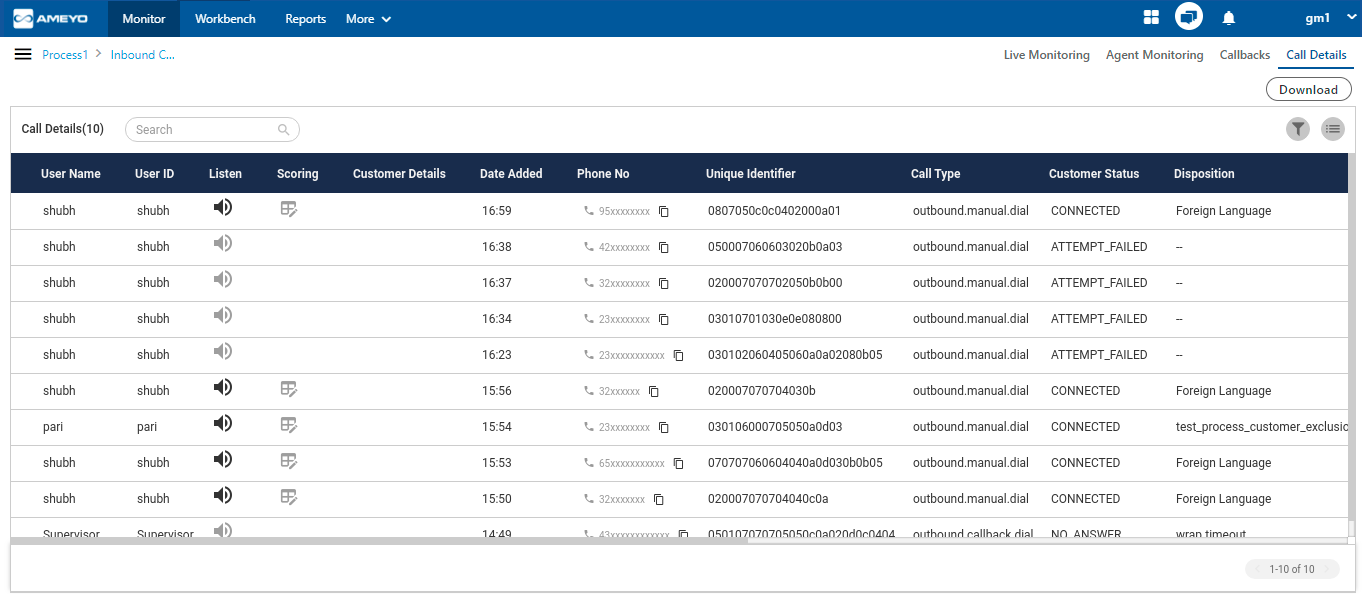
Figure: Manage Inbound Campaign
Filters
The Group Manager can click ![]() icon to filter the call details.
icon to filter the call details.
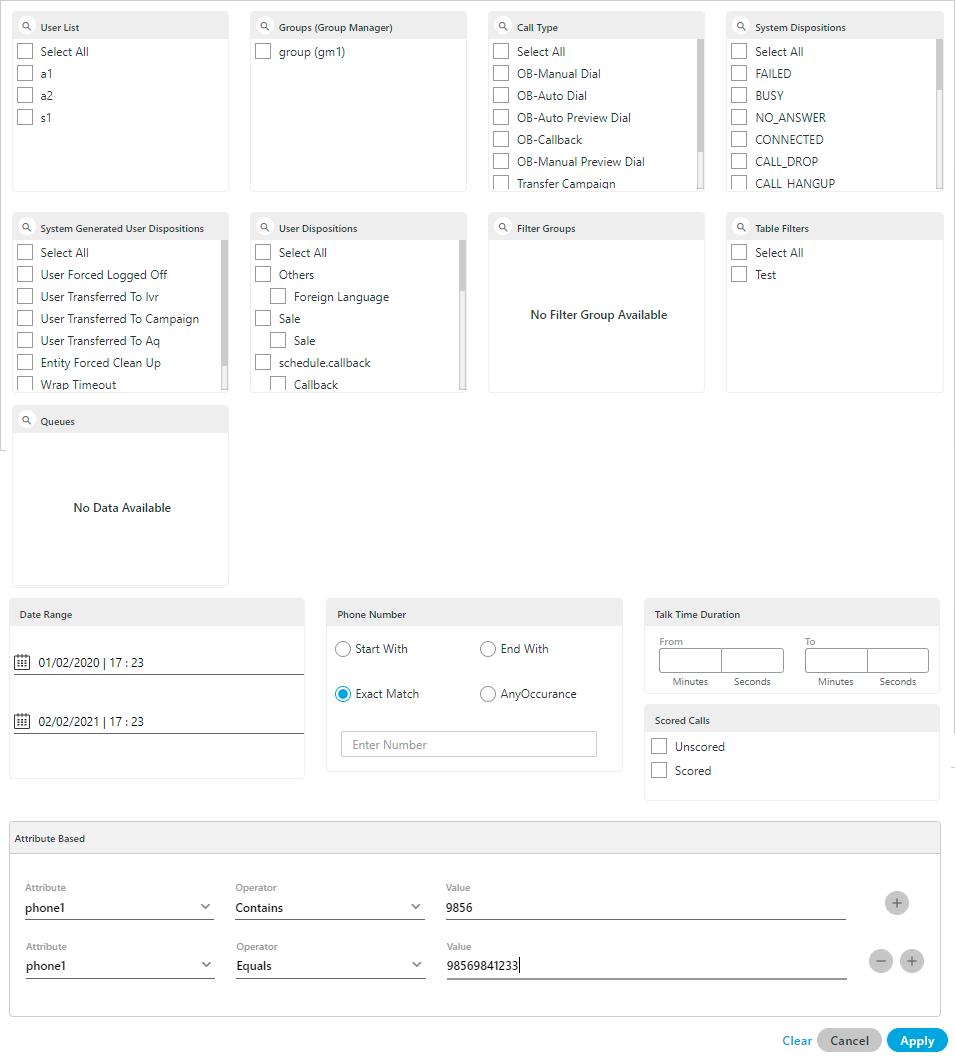
Figure: Filter Call Details
It contains the following filters.
-
User List: Group Manager can select the users for whom the Group Manager wants to fetch the call details.
-
Call Type: Group Manager can also filter out the data in terms of the type of call, that is, whether it was OB Manual dial, OB Auto Dial, Transfer to phone, etc.
-
Disposition Status: Group Manager can also filter out the call details on the basis of disposition status, that is, No Voice, Echo, Sale, and others.
-
Customer Status: Group Manager can filter the data on the basis of the status of the call, that is, whether it was connected, failed, call drop, etc.
-
System Generated User Disposition: Group Manager can filter the call details according to the system generated user disposition used to dispose the call.
-
User Disposition: Group Manager can filter the call details according to the user disposition used to dispose the call by the user.
-
Filter Groups: Group Manager can filter the data on the basis of the filter groups.
-
Table Filter: Group Manager can filter the data on the basis of the table filters .
-
Date Range: Group Manager can also filter out the data on the basis of date range, that is, the Group Manager can select the date by entering the range in From and To respective text boxes. Once you selected the date from the opened calendar, the default time corresponding to that date is also picked.
-
Phone Number: Group Manager can also filter the data in terms of following phone number patterns.
-
Start With: Enter the initial digits of the phone numbers to filter out the records, for example, 1234, 3456, and others.
-
End With: Enter the last digits of the phone number to filter out the records, for example, 4343, 6344, etc.
-
Exact Match: Enter the phone number digits to filter out the records, for example, 1234, 3456, and others.
-
Any Occurrence: Enter few digits to filter out the records, for example, 34,87, and others.
-
-
Talk Time Duration: Group Manager can filter out the data by selecting the specific call time duration. For example, if it wants to fetch the incoming and outgoing calls in which call time duration was between 40 to 60 minutes, then the Group Manager can enter the range in the respective text boxes.
-
Scored Calls: Group Manager can filter for those calls whose scores are already been provided. The Group Manager can select either the Unscored or the scored calls.
-
Queues: The Group Manager can filter the call details of the agents according to the queues. The Group Manager can select the queues present in that campaign. If there is more than one queue, then the Group Manager can click "Select All" option to select all the queues at once. The search option has also been provided; that is, the Group Manager can search for the queues.
-
Attribute based: Group Manager can select the attribute- based upon the defined filterable field in the table creation.
Select the campaign in which attribute based filter, that is, the filterable fields are mapped.
Now, in attribute based filter section, select the attribute type, which is the column name which is mapped as filterable field in campaign by the administrator.
Select the operator type through which you want to filter the calls. It contains the following three operators.
Contains: It filter the calls which contains the provided input in their values.
Equals: Selecting "Equals" as the operator will filter the calls which have the exact match to the applied content.
Not Equals: Selecting "Not Equals" as the operator will filter the calls which do not have the match to the applied content.
Starts with: It will filter those content, in which the entered attribute is starts with.
Ends with: It will filter those content, in which the entered attribute is ends with.
Now, enter the value for which you want to filter the calls in the values column.
You can provide multiple attributes to filter the content, by clicking "+" icon, or click "-" icon to delete the provided attribute- based filter.
The Group Manager can click the search icon for any filter to convert the top header into a search box. Type the keyword and press "Enter" key to search for the required value in the list.
The filter can be cleared any time by clicking the "Clear" button. Click "Apply" to apply the filter, whereas you can click "Cancel" to not apply it.
Operations
The Group Manager can perform the following operations here.
Download
Click "Download" button to download the searched voicelog data in the CSV format. It downloads the complete content which is showing on the screen to the CSV format.
After clicking on the "Download" button, a pop-up comes up. Click "Save" button to download the voicelog. The name of the downloaded file is "CallDetails" by default, however you can change the name of the file.
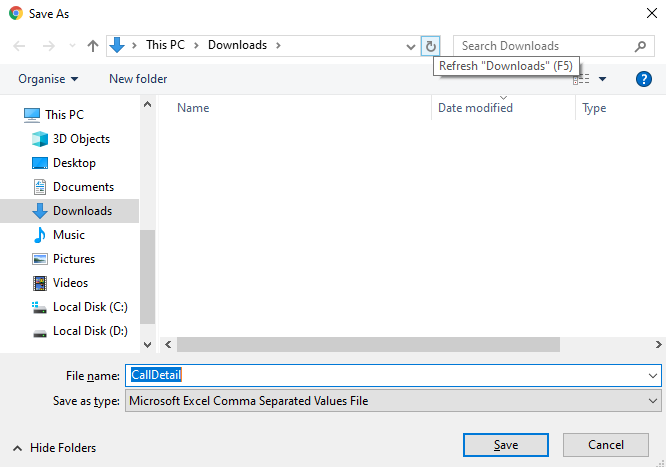
Figure: Downloading Pop-up
Before clicking on the save button the Group Manager can also change the name of the voicelogs.
The downloading option depends upon the browser's setting. If the setting of the browser is set not to ask before downloading file then the pop-up will not come up.
Voice Log Search
The Group Manager can use the search bar to search for any voice log. Group Manager can search the voicelog with user's name or with phone number. Enter any one in the search bar and press enter, the result starts showing on the screen.

Figure: Search Voicelogs
Listen to Voicelogs
Group Manager can listen to the voice logs by clicking on ![]() icon, the Group Manager can listen to the connected call and a pop-up will appear at the bottom of the page, using which the user can download, increase/decrease volume along with other features like forward/reverse, mute/unmute, pause/un-pause the call. Hover your mouse cursor on
icon, the Group Manager can listen to the connected call and a pop-up will appear at the bottom of the page, using which the user can download, increase/decrease volume along with other features like forward/reverse, mute/unmute, pause/un-pause the call. Hover your mouse cursor on ![]() icon to use the speaker related options like call volume and mute/unmute the calls.
icon to use the speaker related options like call volume and mute/unmute the calls.
For not connected calls, "the listen button" remains disabled ![]() .
.
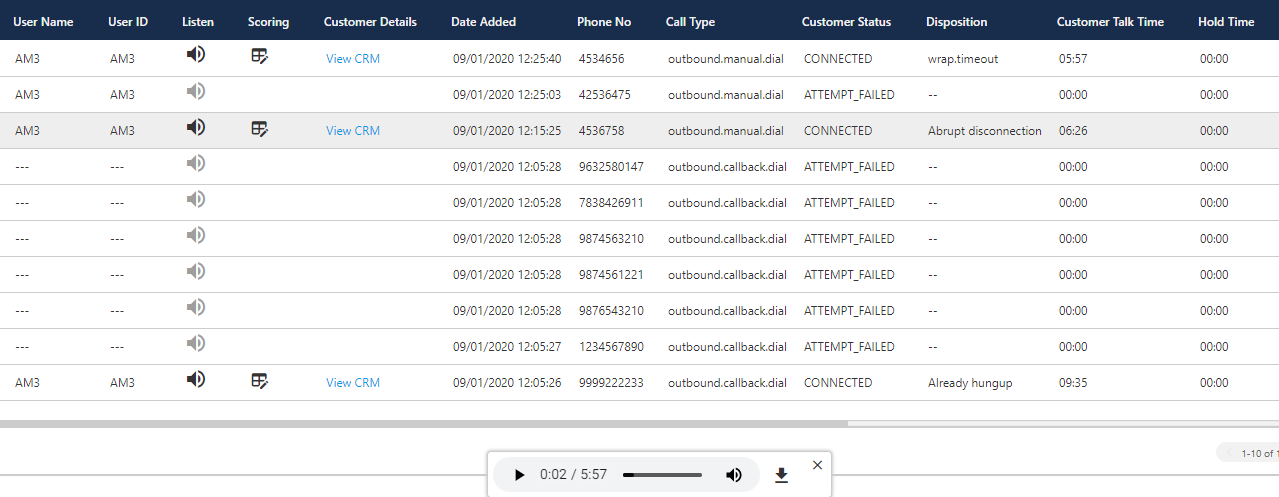
Figure: Play Voicelog
Clicking anywhere on the same page will not close the pop-up. Hence, the audio play will remain continuous. The Group Manager has to click ![]() icon to close the pop-up.
icon to close the pop-up.
If you change the screen to any other menu or the campaign, then the voicelog play pop-up will be paused and hence whenever the Group Manager will return to the same page, the voicelog can be started to where ever the it was paused, hence no need to restart it.
Scoring
Group Manager can provide scoring to the agent's call. Click ![]() icon present in the scoring column of the voicelog and the pop-up comes up.
icon present in the scoring column of the voicelog and the pop-up comes up.
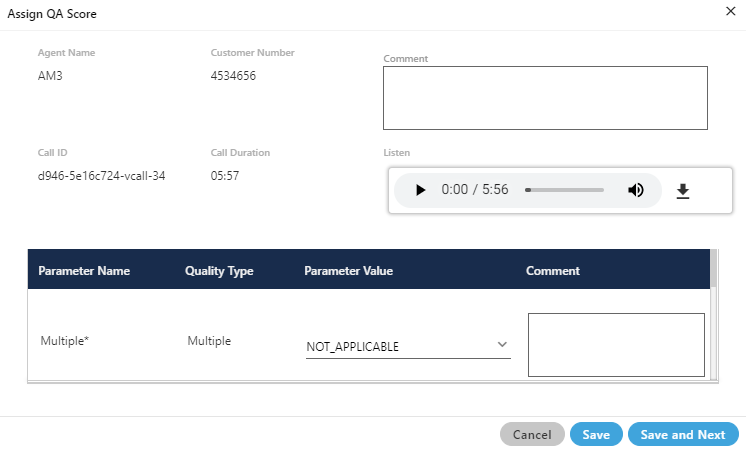
Figure: Provide Remarks to Voicelog
On the opened pop-up, Group Manager can perform following tasks.
Agent's Name: Group Manager can see the agent's name who attended the call.
Customer's Number: It shows the customer's number through which the call has been done.
Call Id: It shows the call-id of the call. Ameyo generates the call-id for every call.
Call Duration: It shows the total duration of the call.
Comment: Group Manager can provide the comment to the call in the comments box.
Listen: Group Manager can listen to the call connected call. Click the call listing button to listen the call log.
Download Voicelog: Group Manager can also download the voicelog and listen to them. Click
 icon to download the voicelog file.
 After clicking on the "Download" button, a pop-up comes up. Click "Save" button to download the voicelog. The name of the downloaded file contains the extension name followed by the agent name and the data and time of the call.
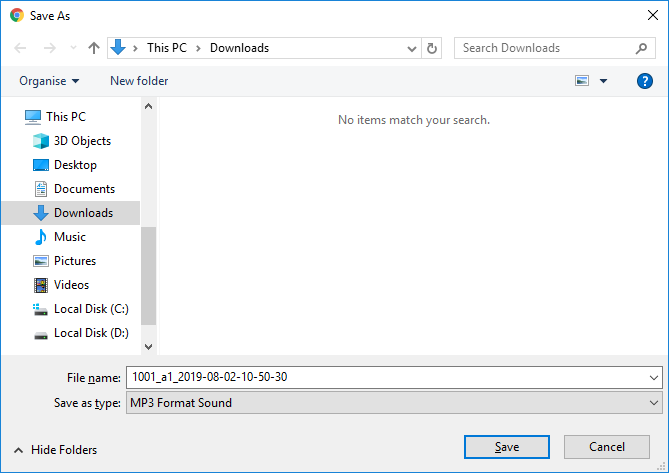
Figure: Downloading Pop-up
Before clicking on the save button the Group Manager can also change the name of the voicelogs.
The downloading option depends upon the browser's setting. If the setting of the browser is set not to ask before downloading file then the pop-up will not come up.
Parameter Name: It shows the list of the QA Parameters which are created to provide the ratings to the agent.
Quality Type: It represents the quality type of the QA Parameters, (here we have the QA parameters in Range types).
Parameter Value: It shows the QA value which is provided by the administrator to rate the call for QA Parameters.
Comment: It is the comment box to provide the comment on the ratings parameters. It can be provided for individually for each parameter name.
After completing above steps, click "Save" to save the data or "Save and Next" to save the data and view the next call log from the same screen.
View CRM
Click ![]() icon to see the customers detail in the CRM which was filled by the agent at the time of the call. It shows the following pop-up.
icon to see the customers detail in the CRM which was filled by the agent at the time of the call. It shows the following pop-up.
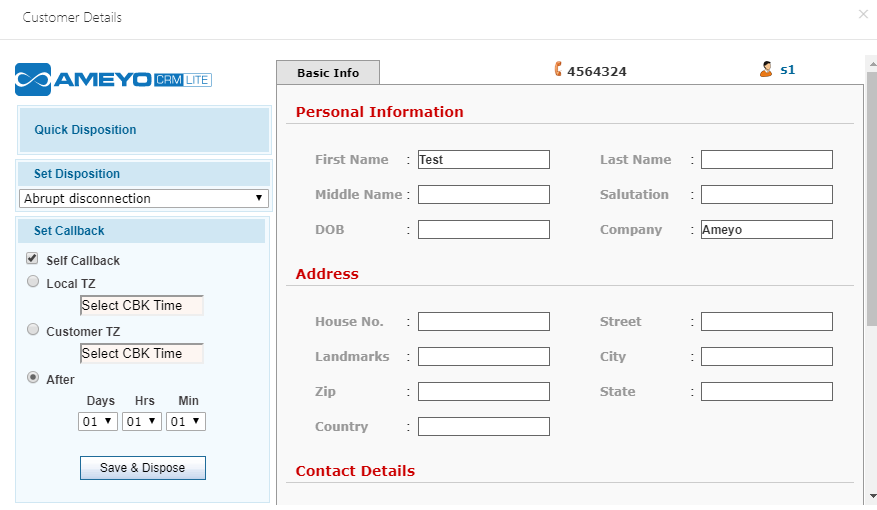
Figure: Customer details in CRM
On this screen, Group Manager can see the complete details of the customer. If the details are not filled by the agent, then the Group Manager can edit any customer's information from this screen as well. After editing, click "Save" button to save the provided information.
View Customer Card
Group Manager can view the customer card, which contains the basic information configured by the administrator to be displayed to the agent, by hovering the mouse over the customer's name.
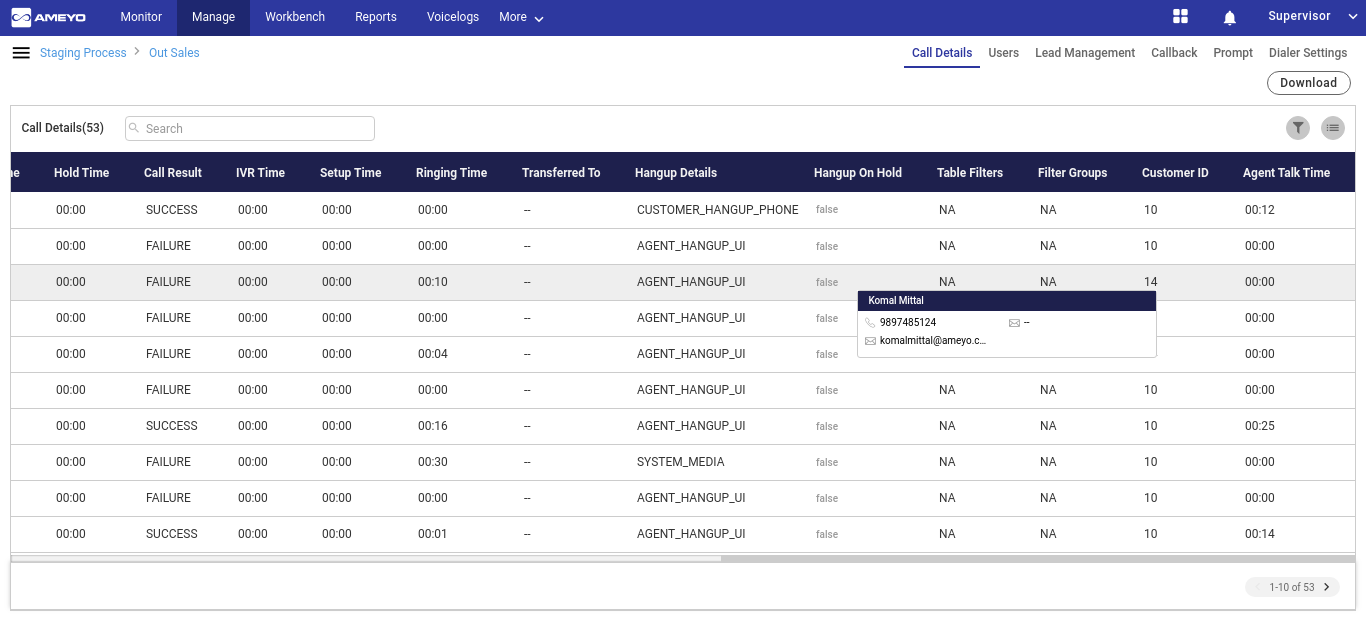
Figure: Customer Card
Call Notes
The notes which are given by the agent at the time of the call are known as call notes. The Group Manager can view these notes along with the details of that call. Click ![]() icon to view the call notes of that call.
icon to view the call notes of that call.
If the call note is not provided, then the expendable icon will also be not shown in the call details bar.

Figure: Call Notes
If the filters are not applied, then the call notes dumped very last by a user on a call will be displayed. The Group Manager has to apply the filters to view the call notes differently for individual users.
Customize the View
The Group Manager can click ![]() icon to use the settings of the Call Details.
icon to use the settings of the Call Details.
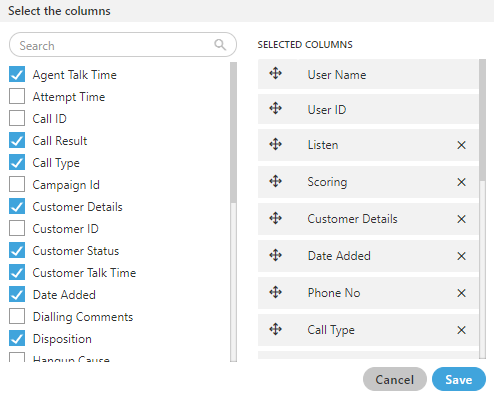
Figure: Settings Call Details
Group Manager can manage the display bar menu present at the top of the page. Settings icon helps the Group Manager to sort the menu listings bar.
Check the boxes to see only those filters which are useful for the Group Manager and helps him to monitor the agents.
In the right part of the section, the user can click and hold ![]() icon and drag a column upward or downward to change the sequence of the columns in the table. The column on top will be displayed at the first position from the left.
icon and drag a column upward or downward to change the sequence of the columns in the table. The column on top will be displayed at the first position from the left.
If some columns are mandatory to be displayed, then the user will not have the option not to select or deselect the columns.
User Card
The Group Manager can see the basic information of agents assigned in that campaign by hovering its mouse over the agents name. The user card is displayed while hovering the mouse on the user name of the user. Following screen is displayed while hovering the mouse over the username of the user.
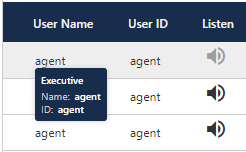
Figure: User Card
The user card contains the user-role, username, and userID.
Columns
Following are the columns which are used to define the call details.
User Role: It shows the type of the user who is logged-in to the Ameyo.
User Name: It shows the name of the user.
User ID: It shows the id of the user.
Listen: It is a clickable entity which allows you to listen to the voicelogs(explained above).
Scoring: It is a clickable entity which allows you to provide the rating to the agent's call(explained above).
Customer Details: It is a clickable entity which shows the complete information of the customer in the CRM.(explained above)
Customer ID: It shows the customer id. Customer id is unique for all customers and it generates only for those customers whose details are registered in CRM.
Date Added: It shows the date and time of the customer's details when detils has been saved in the CRM.
Phone No: It shows the phone number of the agent through which the call has been handled.
Unique Identifier: It contains the unique identifiers for the masked phone numbers.
Call Type: It shows the type of call.
Group Manager: It shows the name of the group manager under whom the agent is assigned in.
Groups: It shows the name of the group in which the agent is assigned in.
Call ID: It contains the call-id. Call-id id different for every call and is generated by Ameyo automatically.
Customer Status: It shows the status of the customer. Here, "CONNECTED" means that customer picks the call and "BUSY" mean that the customer did not picks up the call.
Dialing Comments: It shows the comments which has been inserted by the agent while calling to customer.
Transferred to: It shows whether the call has been transferred to another campaign/queue or not.
Hangup Details: It shows the reason of the call for which the call has been disconnected.
Hangup Cause: It shows the cause code for the Hangup Details for which the call has been disconnected.
Hangup Cause Code: It shows the cause code for the Hangup Details and Hangup Cause for which the call has been disconnected. This Hangup code is based upon the codes which has been registered in Ameyo according to Hangup Cause.
Hangup On Hold: It shows whether the call has been disconnected while the agent put the call on hold or not.
System Disposition: It allows the group manager to view the system disposition of the call.
Disposition Class: It allows the group manager to identify the exact reason for the call disposition.
Disposition Code: It allows the group manager to view the disposition code through which the call was disposed off.
Customer Talk Time: It show the total duration of the call in between the agent and customer.
Hold Time: If the agent put the call on hold, then it shows the total duration of the hold time for which the call has been put on hold.
Campaign ID: It shows the campaign ID from which the call has been dialed by the agent.
Queue Name: It shows the queue name from which the call has been dialed by the agent.
Lead ID: If the call is dialed from the lead, then this column shows the id of the lead from which the call has been dialed to the customer.
Attempt Time: It shows the date and time of the call when the call has been attempted to dial.
Call Result: It shows whether the call is successfully dialed and received by the customer or there was some error while dialing the call.
IVR Time: It shows the total duration of the call when the call was in the IVR.
Setup Time: It is the total time which is taken to connect the both numbers, that is, the time taken to connect the customer and agent through network channel.
Ringing Time : It shows the total duration of the ring before the call is picked by the user.
Table Filters: It shows the table filter which had been used while making the call.
Filter Groups : It shows the filter group which has been used in making the call.
Agent Talk Time : It shows the total duration of the calls handled by the agent, which consists of total duration spent by agent on call for all the customers.