Create a Campaign
Perform the following steps to create a new campaign.
Click "Create New Campaign" button in the sidebar.
To create a new campaign, click "Create New Campaign" button. A new page is displayed on the screen.
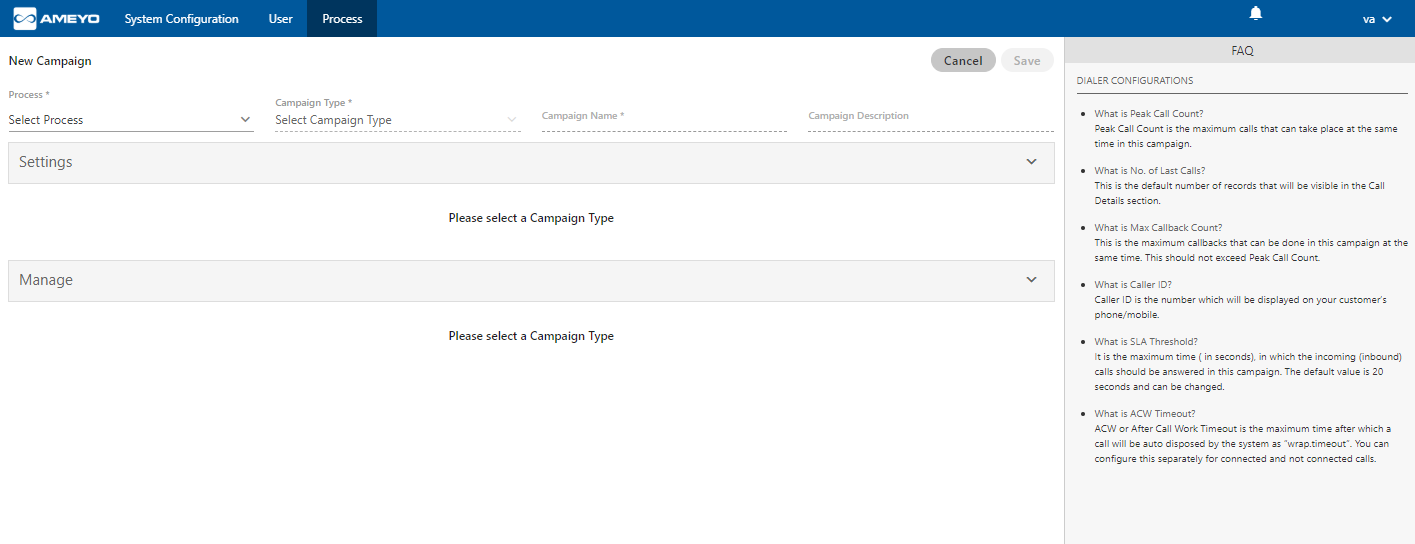
Figure: Create New Campaign
While creating the campaigns, the answers for some of the commonly asked questions have been listed. The administrator can refer to those definitions to know more about the campaign settings.
Provide the input for the following fields.
Process: Select the process in which the campaign is to be created.
Campaign Name: Enter the campaign name.
Campaign Type: Voice-Admin can create any of the following types of campaigns.
Chat Campaign: This campaign includes chat-based interactions with the clients. The chat includes the following chat applications.
Ameyo Web Chat
External Chat Applications
Twitter Direct Message
Line Messenger
Viber Messenger
Facebook Messenger
WhatsApp
WhatsApp for Business
It is mandatory to create both Chat and Interaction Campaign else the users will not be able to login to the Chat Campaign.
Interaction Campaign: This campaign includes the interactions based on Email and chat applications included in the selected Chat Campaign.
Interactive Voice Application: This campaign includes inbound voice communication. Here, the clients will call at your number and interacts with your users through an IVR or directly.
Outbound Voice Campaign: This campaign includes outbound communication. Here, your users call the clients.
Voice Blast Campaign: This campaign provides you the facility to broadcast the prerecorded messages to the clients automatically.
Campaign Description: Enter the description of the campaign.
-
General Settings: Now, the steps to configure the General Settings are different for each campaign type. These steps are mentioned hereinbelow.
-
Chat Campaign: Provide the inputs for the following fields to configure General Settings for a chat campaign.
-
Preview URL: Provide the preview URL. If you are using Ameyo CRM, then following will be the preview URL.
http://<Server_IP>:8786/<CRM_Name>/preview.php
Replace <Server_IP> with the IP Address of your computer where CRM is installed.
-
CRM URL: Provide the CRM URL. If you are using Ameyo CRM, then following will be the CRM URL.
http://<Server_IP>:8786/<CRM_Name>/customer.php
Replace <Server_IP> with the IP Address of your computer where CRM is installed.
-
Disposition URL: Provide the Disposition URL. If you are using Ameyo CRM, then following will be the Disposition URL.
http://<Server_IP>:8786/<CRM_Name>/disposition.php
Replace <Server_IP> with the IP Address of your computer where CRM is installed.
Replace <CRM_Name> with the Name of the CRM created.

Figure: Creating New Chat Campaign
-
ACW Connected(in sec): Provide the duration after which the idle chat session will be closed and disposed of.
-
Disposition Plan: Select any of the following disposition plans.
-
DefaultOVCDispositionPlan
-
DefaultIVADispositionPlan
-
DefaultVBCDispositionPlan
-
DefaultCCDispositionPlan
-
DefaultIVRCDispositionPlan
-
DefaultCSTACDispositionPlan
-
DefaultAOVCDispositionPlan
-
-
Column Mapping: It shows the default and custom column mappings. You can select any one.
-
Peak Chat Count: Provide the maximum number of chat sessions that can be handled by an agent at a time even during the peak hours.
-
Chat Logs Enabled: Check this box to enable the logging of chat logs. However, you can uncheck it to disable the chat logs.
It is mandatory to create both Chat and Interaction Campaign else the users will not be able to logon in the Chat Campaign.
-
-
Interaction Campaign: Provide the inputs for the following fields.
We support only one Interaction Campaign. It is advised to create multiple queues in IC to address the different functions of the business requirements (like sales, and support). However, the Queue Monitoring is not available in IC.
Ticket will be created only in Interaction Campagin and not in other campaigns. If you want to create tickets for any Voice Campaign, you need to create this campaign also. It is mandatory to create and force users to use both Interaction and Chat Campaigns together.-
CRM URL: Provide the CRM URL. If you are using Ameyo CRM, then following will be the CRM URL.
http://<Server_IP>:8786/<CRM_Name>/customer.php
Replace <Server_IP> with the IP Address of your computer where CRM is installed.
-
Column Mapping: It shows the default and custom column mappings. You can select any one.

Figure: Creating New Interaction Campaign
-
Customer API URL: If you want to use a third-party API within this campaign, provide the URL of the third-party API.
-
Default BCC Address: Provide the email address to which all emails be sent by default through BCC.
-
-
Interactive Voice Application: Provide the following inputs to create an interactive voice application campaign.
-
Preview URL: Provide the preview URL. If you are using Ameyo CRM, then following will be the preview URL.
http://<Server_IP>:8786/<CRM_Name>/preview.php
Replace <Server_IP> with the IP Address of your computer where CRM is installed.
-
CRM URL: Provide the CRM URL. If you are using Ameyo CRM, then following will be the CRM URL.
http://<Server_IP>:8786/<CRM_Name>/customer.php
Replace <Server_IP> with the IP Address of your computer where CRM is installed.
-
Disposition URL: Provide the Disposition URL. If you are using Ameyo CRM, then following will be the Disposition URL.
http://<Server_IP>:8786/<CRM_Name>/disposition.php
Replace <Server_IP> with the IP Address of your computer where CRM is installed.
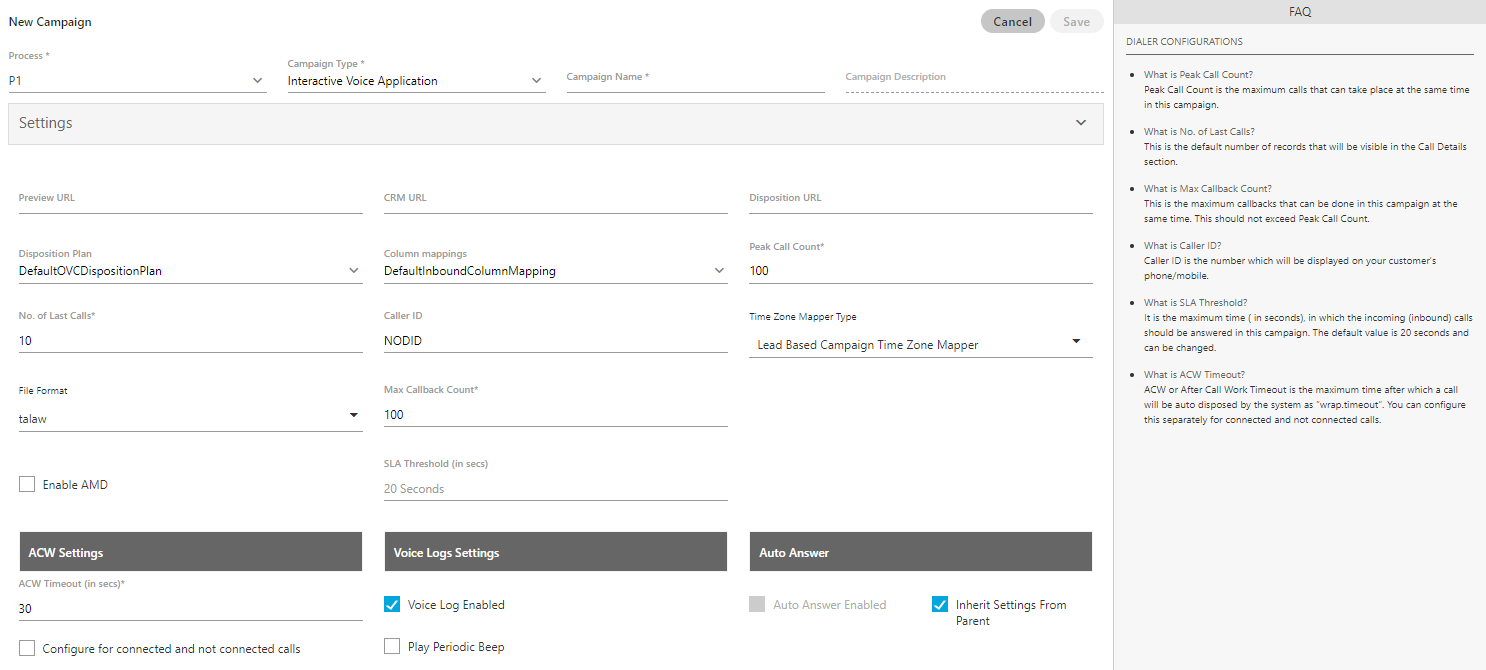
Figure: Creating New Interactive Voice Application Campaign
-
Disposition Plan: Select any of the following disposition plans.
-
DefaultOVCDispositionPlan
-
DefaultIVADispositionPlan
-
DefaultVBCDispositionPlan
-
DefaultCCDispositionPlan
-
DefaultIVRCDispositionPlan
-
DefaultCSTACDispositionPlan
-
DefaultAOVCDispositionPlan
-
-
Column Mapping: It shows the default and custom column mappings. You can select any one.
-
Peak Call Count: Provide the maximum number of chat sessions that can be handled by an agent at a time even during the peak hours.
-
No. of Last Calls: Provide the maximum number of last calls.
-
Call ID: Enter the DID Number that will be displayed as the caller ID. "NODID" is the default value.
-
Time Zone Mapper Type: Select any of the following time zone mapper types, which allows you to map the time zones.
-
Lead Based Campaign Time Zone Mapper: In this case, the time zone of the customer is specified from the time zone set in the lead settings.
-
Default Campaign Time zone Mapper: In this case, time zone is determined from customer data. We get the time zone info from the column specified against time zone column mapping in the campaign.
-
Phone Pattern Based Campaign Time zone Mapper: It is related to number management in Ameyo. With phone pattern based campaign time zone mapper, country code and area code can be mapped to a time zone and all numbers with that country code and area code will be dialed according to that time zone restriction/criteria.
-
State Based Campaign Time zone Mapper: It is related to number management in Ameyo. With state based campaign time zone mapper, users are grouped as per their states mentioned in their details and all numbers with the same state will be dialed according to its time zone restriction/criteria.
-
-
File Format: Select any of the following file formats in which the voice recordings will be saved.
-
talaw
-
tulaw
-
tgsm
-
tg729
-
alaw
-
-
Maximum Callback Count: Provide the maximum number of callbacks, which can be made by a user.
-
Enable AMD: AMD stands for Answering Machine Detection. Check this box to enable the detection of answering machines when the auto-dialer makes the outbound calls automatically.
-
SLA Threshold: Here, you can define the SLA Threshold, in which the incoming (inbound) calls should be answered in this campaign. The default value is 20 seconds, but it can be changed here.
-
ACW Settings: Here, you can apply the ACW Timeout Settings. A textbox named "ACW Timeout (in sec)", which is a mandatory field while creating or modifying the campaign. The Administrator have to provide the value between 1 and 3600 seconds, which is the duration in which the call (after disconnection) should be disposed of or wrapped. Here, you can configure this option for both "Connected Calls" (calls which are connected with both customer and agent) and "Not Connected Calls" (calls which cannot be connected with either agent, or customer, or both). Perform the following steps here.
-
If you want to configure same ACW Timeout value for both Connected and Not Connected Calls, then just enter the timeout value.
-
If you want to configure different ACW Timeout value for Connected and Not Connected Calls, then check the box titled "Configure for Connected and Not Connected Calls". Once checked, it shows the different textboxes at the bottom.
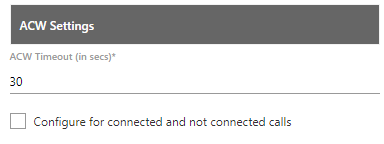
Figure: ACW Timeout
If you are enabling the option to give separate timeout values for Connected and Not Connected Calls, then their values should be different else the Ameyo System will not accept them. If both values are kept same, then the selection of "Configure for Connected and Not Connected Calls" will be undone.
The Agent has to dispose of the Connected or Not Connected Calls, after their disconnection within the specified ACW Timeouts else these calls will be automatically disposed of.
-
-
Voice Logs Settings: Here, you can manage the settings related to the Voicelogs.
-
Voice Logs Enabled: Check this box to enable the logging of voice logs. However, you can uncheck it to disable the voice logs.
-
Play Periodic Beep: Check this box to play a beep periodically during the call to notify the caller that the call is being recorded. After checking it, you can specify the interval in seconds after which the beep will be played.
-
-
Auto Answer Enabled: Check this box to enable the auto answer of the call for the campaign. This check box will be remained disabled, if the Auto-Answer setting is not enabled in the system settings.
-
Inherit Settings from Parent: Check this box to inherit the settings from the parent, that is, from the system settings. It means that, if the settings in the system is enabled to the auto-answer then, auto-answer setting will be same for the campaign. You can disable the auto-answer settings from here, as well.
-
-
Outbound Voice Campaign: Provide the following inputs to create an outbound voice campaign.
-
Preview URL: Provide the preview URL. If you are using Ameyo CRM, then following will be the preview URL.
http://<Server_IP>:8786/<CRM_Name>/preview.php
Replace <Server_IP> with the IP Address of your computer where CRM is installed.
-
CRM URL: Provide the CRM URL. If you are using Ameyo CRM, then following will be the CRM URL.
http://<Server_IP>:8786/<CRM_Name>/customer.php
Replace <Server_IP> with the IP Address of your computer where CRM is installed.
-
Disposition URL: Provide the Disposition URL. If you are using Ameyo CRM, then following will be the Disposition URL.
http://<Server_IP>:8786/<CRM_Name>/disposition.php
Replace <Server_IP> with the IP Address of your computer where CRM is installed.
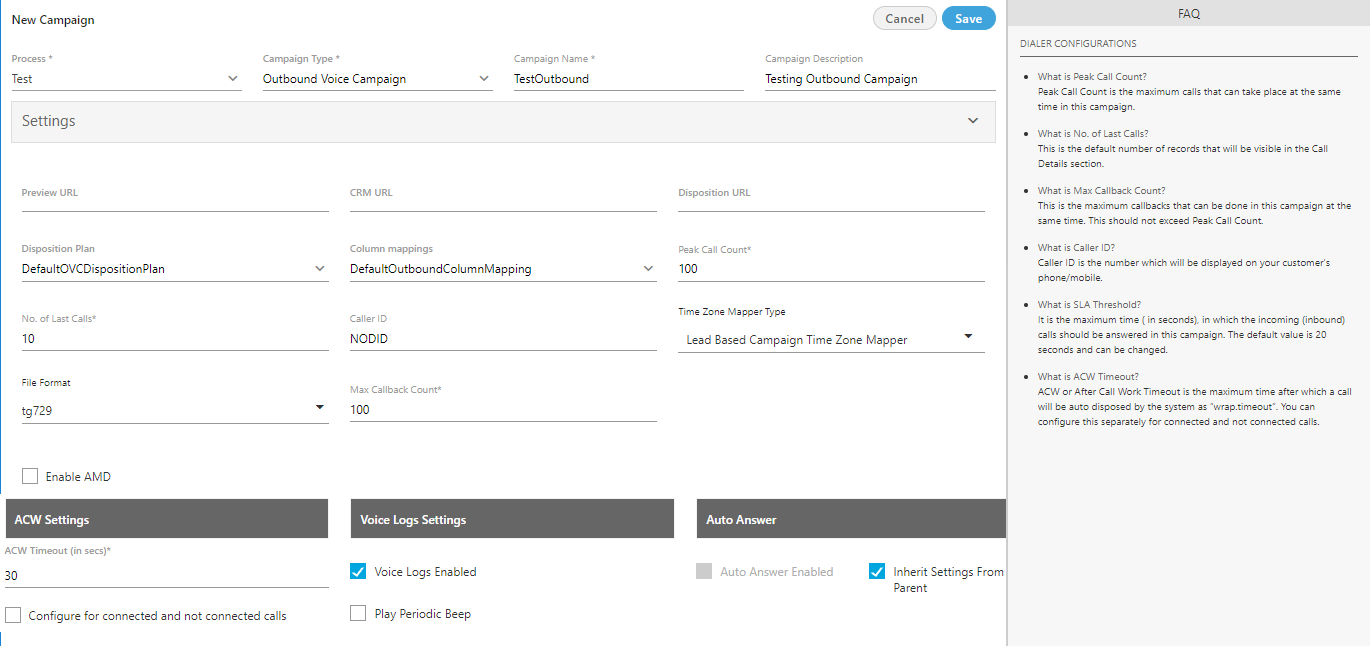
Figure: Creating New Outbound Voice Campaign
-
Disposition Plan: Select any of the following disposition plans.
-
DefaultOVCDispositionPlan
-
DefaultIVADispositionPlan
-
DefaultVBCDispositionPlan
-
DefaultCCDispositionPlan
-
DefaultIVRCDispositionPlan
-
DefaultCSTACDispositionPlan
-
DefaultAOVCDispositionPlan
-
-
Column Mapping: It shows the default and custom column mappings. You can select any one.
-
Peak Call Count: Provide the maximum number of chat sessions that can be handled by an agent at a time even during the peak hours.
-
No. of Last Calls: Provide the maximum number of last calls.
-
Call ID: Enter the DID Number that will be displayed as the caller ID. "NODID" is the default value.
-
Time Zone Mapper Type: Select any of the following time zone mapper types, which allows you to map the time zones.
-
Lead Based Campaign Time Zone Mapper: In this case, time zone of the customer is specified from the time zone set in the lead settings.
-
Default Campaign Time zone Mapper: In this case time zone is determined from customer data. We get the time zone info from the column specified against time zone column mapping in the campaign.
-
Phone Pattern Based Campaign Time zone Mapper: It is related to number management in Ameyo. With phone pattern based campaign time zone mapper, country code and area code can be mapped to a time zone and all numbers with that country code and area code will be dialed according to that time zone restriction/criteria.
-
State Based Campaign Time zone Mapper: It is related to number management in Ameyo. With state based campaign time zone mapper, users are grouped as per their states mentioned in their details and all numbers with the same state will be dialed according to its time zone restriction/criteria.
-
-
File Format: Select any of the following file formats in which the voice recordings will be saved.
-
talaw
-
tulaw
-
tgsm
-
tg729
-
alaw
-
-
Maximum Callback Count: Provide the maximum number of callbacks, which can be made by a user.
-
Enable AMD: AMD stands for Answering Machine Detection. Check this box to enable the detection of answering machines when the auto-dialer makes the outbound calls automatically.
-
ACW Settings: Here, you can apply the ACW Timeout Settings. A textbox named "ACW Timeout (in sec)", which is a mandatory field while creating or modifying the campaign. The Administrator have to provide the value between 1 and 3600 seconds, which is the duration in which the call (after disconnection) should be disposed of or wrapped. Here, you can configure this option for both "Connected Calls" (calls which are connected with both customer and agent) and "Not Connected Calls" (calls which cannot be connected with either agent, or customer, or both). Perform the following steps here.
-
If you want to configure same ACW Timeout value for both Connected and Not Connected Calls, then just enter the timeout value.
-
If you want to configure different ACW Timeout value for Connected and Not Connected Calls, then check the box titled "Configure for Connected and Not Connected Calls". Once checked, it shows the different textboxes at the bottom.

Figure: ACW Timeout
If you are enabling the option to give separate timeout values for Connected and Not Connected Calls, then their values should be different else the Ameyo System will not accept them. If both values are kept same, then the selection of "Configure for Connected and Not Connected Calls" will be undone.
The Agent has to dispose of the Connected or Not Connected Calls, after their disconnection within the specified ACW Timeouts else these calls will be automatically disposed of.
-
-
Voice Logs Settings: Here, you can manage the settings related to the Voicelogs.
-
Voice Logs Enabled: Check this box to enable the logging of voice logs. However, you can uncheck it to disable the voice logs.
-
Play Periodic Beep: Check this box to play a beep periodically during the call to notify the caller that the call is being recorded. After checking it, you can specify the interval in seconds after which the beep will be played.
-
-
Auto Answer Enabled: Check this box to enable the auto answer of the call for the campaign. This check box will be remained disabled, if the Auto-Answer setting is not enabled in the system settings.
-
Inherit Settings from Parent: Check this box to inherit the settings from the parent, that is, from the system settings. It means that, if the settings in the system is enabled to the auto-answer then, auto-answer setting will be same for the campaign. You can disable the auto-answer settings from here, as well.
-
-
Parallel Predictive Voice Campaign: Provide the following inputs to create a voice campaign that will be equipped with the features of Predictive Dialing Algorithm.
-
Preview URL: Provide the preview URL. If you are using Ameyo CRM, then following will be the preview URL.
http://<Server_IP>:8786/<CRM_Name>/preview.php
Replace <Server_IP> with the IP Address of your computer where CRM is installed.
-
CRM URL: Provide the CRM URL. If you are using Ameyo CRM, then following will be the CRM URL.
http://<Server_IP>:8786/<CRM_Name>/customer.php
Replace <Server_IP> with the IP Address of your computer where CRM is installed. -
Disposition URL: Provide the Disposition URL. If you are using Ameyo CRM, then following will be the Disposition URL.
http://<Server_IP>:8786/<CRM_Name>/disposition.php
Replace <Server_IP> with the IP Address of your computer where CRM is installed.
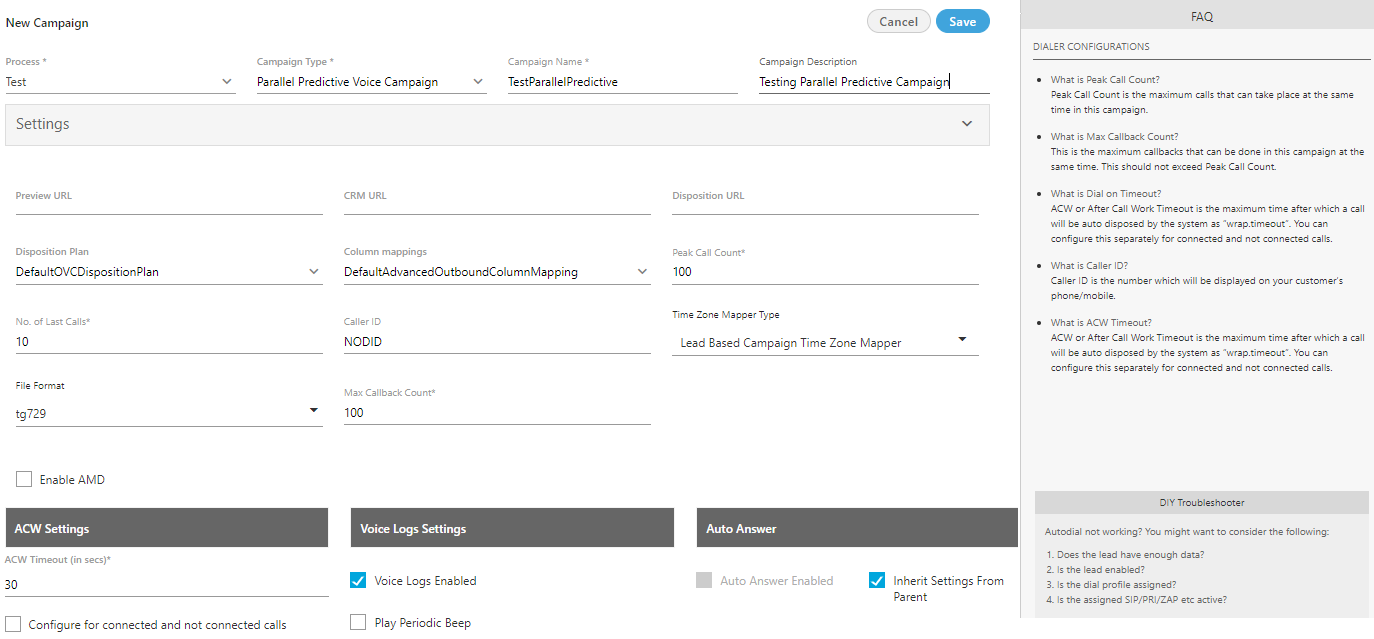
Figure: Creating New Parallel Predictive Voice Campaign
-
Disposition Plan: Select any of the following disposition plans.
-
DefaultOVCDispositionPlan
-
DefaultIVADispositionPlan
-
DefaultVBCDispositionPlan
-
DefaultCCDispositionPlan
-
DefaultIVRCDispositionPlan
-
DefaultCSTACDispositionPlan
-
DefaultAOVCDispositionPlan
-
-
Column Mapping: It shows the default and custom column mappings. You can select any one.
-
Peak Call Count: Provide the maximum number of chat sessions that can be handled by an agent at a time even during the peak hours.
-
No. of Last Calls: Provide the maximum number of last calls.
-
Call ID: Enter the DID Number that will be displayed as the caller ID. "NODID" is the default value.
-
Time Zone Mapper Type: Select any of the following time zone mapper types, which allows you to map the time zones.
-
Lead Based Campaign Time Zone Mapper: In this case, time zone of the customer is specified from the time zone set in the lead settings.
-
Default Campaign Time zone Mapper: In this case time zone is determined from customer data. We get the time zone info from the column specified against time zone column mapping in the campaign.
-
Phone Pattern Based Campaign Time zone Mapper: It is related to number management in Ameyo. With phone pattern based campaign time zone mapper, country code and area code can be mapped to a time zone and all numbers with that country code and area code will be dialed according to that time zone restriction/criteria.
-
State Based Campaign Time zone Mapper: It is related to number management in Ameyo. With state based campaign time zone mapper, users are grouped as per their states mentioned in their details and all numbers with the same state will be dialed according to its time zone restriction/criteria.
-
-
File Format: Select any of the following file formats in which the voice recordings will be saved.
-
talaw
-
tulaw
-
tgsm
-
tg729
-
alaw
-
-
Maximum Callback Count: Provide the maximum number of callbacks, which can be made by a user.
-
Enable AMD: AMD stands for Answering Machine Detection. Check this box to enable the detection of answering machines when the auto-dialer makes the outbound calls automatically.
-
ACW Settings: Here, you can apply the ACW Timeout Settings. A textbox named "ACW Timeout (in sec)", which is a mandatory field while creating or modifying the campaign. The Administrator have to provide the value between 1 and 3600 seconds, which is the duration in which the call (after disconnection) should be disposed of or wrapped. Here, you can configure this option for both "Connected Calls" (calls which are connected with both customer and agent) and "Not Connected Calls" (calls which cannot be connected with either agent, or customer, or both). Perform the following steps here.
-
If you want to configure same ACW Timeout value for both Connected and Not Connected Calls, then just enter the timeout value.
-
If you want to configure different ACW Timeout value for Connected and Not Connected Calls, then check the box titled "Configure for Connected and Not Connected Calls". Once checked, it shows the different textboxes at the bottom.

Figure: ACW Timeout
If you are enabling the option to give separate timeout values for Connected and Not Connected Calls, then their values should be different else the Ameyo System will not accept them. If both values are kept same, then the selection of "Configure for Connected and Not Connected Calls" will be undone.
The Agent has to dispose of the Connected or Not Connected Calls, after their disconnection within the specified ACW Timeouts else these calls will be automatically disposed of.
-
-
Voice Logs Settings: Here, you can manage the settings related to the Voicelogs.
-
Voice Logs Enabled: Check this box to enable the logging of voice logs. However, you can uncheck it to disable the voice logs.
-
Play Periodic Beep: Check this box to play a beep periodically during the call to notify the caller that the call is being recorded. After checking it, you can specify the interval in seconds after which the beep will be played.
-
-
-
Voice Blast Campaign: Provide the following inputs to create the campaign that broadcasts the pre-recorded voice messages automatically to the provided list of numbers.
-
Column Mapping: It shows the default and custom column mappings. You can select any one.
-
Peak Call Count: Provide the maximum number of chat sessions that can be handled by an agent at a time even during the peak hours.
-
Call ID: Enter the DID Number that will be displayed as the caller ID. "NODID" is the default value.

Figure: Creating New Voice Blast Campaign
-
Time Zone Mapper Type: Select any of the following time zone mapper types, which allows you to map the time zones.
-
Lead Based Campaign Time Zone Mapper: In this case, time zone of the customer is specified from the time zone set in the lead settings.
-
Default Campaign Time zone Mapper: In this case time zone is determined from customer data. We get the time zone info from the column specified against time zone column mapping in the campaign.
-
Phone Pattern Based Campaign Time zone Mapper: It is related to number management in Ameyo. With phone pattern based campaign time zone mapper, country code and area code can be mapped to a time zone and all numbers with that country code and area code will be dialed according to that time zone restriction/criteria.
-
State Based Campaign Time zone Mapper: It is related to number management in Ameyo. With state based campaign time zone mapper, users are grouped as per their states mentioned in their details and all numbers with the same state will be dialed according to its time zone restriction/criteria.
-
-
File Format: Select any of the following file formats in which the voice recordings will be saved.
-
wav
-
talaw
-
tulaw
-
tgsm
-
tg729
-
alaw
-
-
-
-
Manage [Manage Users]: In this section, you can assign the selected users to the campaign. Only the users having following system (user) roles are displayed here. You can add other users having other roles while modifying the campaign.
-
Supervisor
-
Professional-Agent
-
Executive
-
Analyst
-
Group Manager
-
Only Supervisors can be added in Voice Blast Campaign.
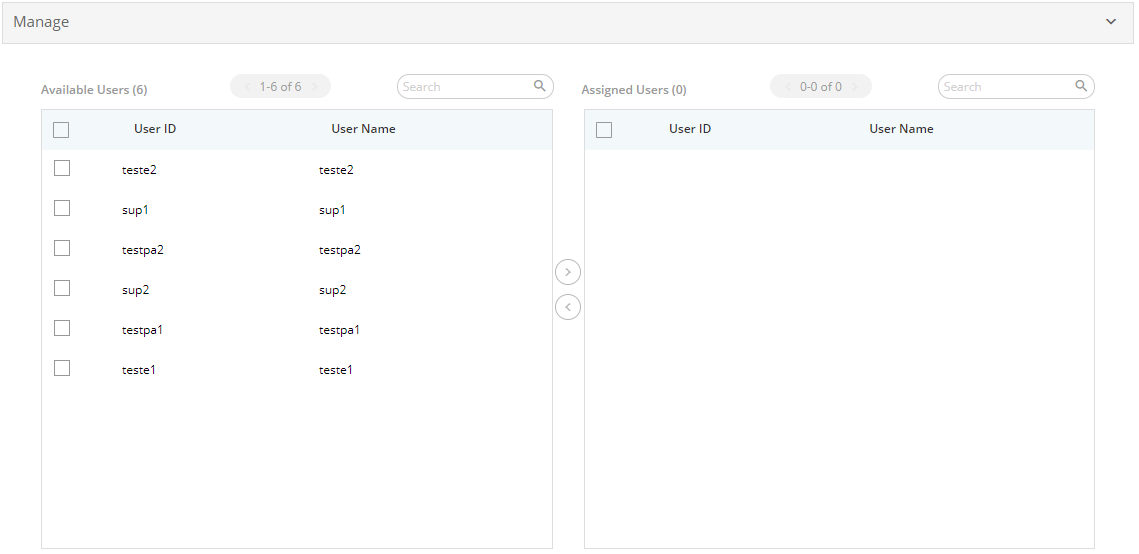
Figure: Section to assign users
Perform the following steps to assign the users to this campaign.
-
Select the users from the "Available Users" section. You can click the checkbox given on top to select all users.
You can also search for the user names in the provided search box. -
Click
 icon to add the selected users.
To unassign the users, select the users in "Assigned "Users" section and
 icon.
icon. -
Browse to top, and click "Save" button to create the campaign.
Alternatively, you can click "Cancel" to not create the campaign. Once the campaign is created, it is visible under its process in the sidebar. You can click the Process to view the campaigns created in it.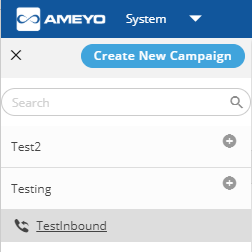
Figure: Created the Campaign
Similarly, the following campaigns are created in "Testing" Process.
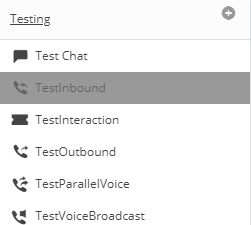
Figure: Created Multiple Campaigns
After creating any or multiple campaigns of any type, multiple tabs are created in "System" → "System Configuration" Tab. These tabs can be configured to have unique settings on all campaigns.