User Management
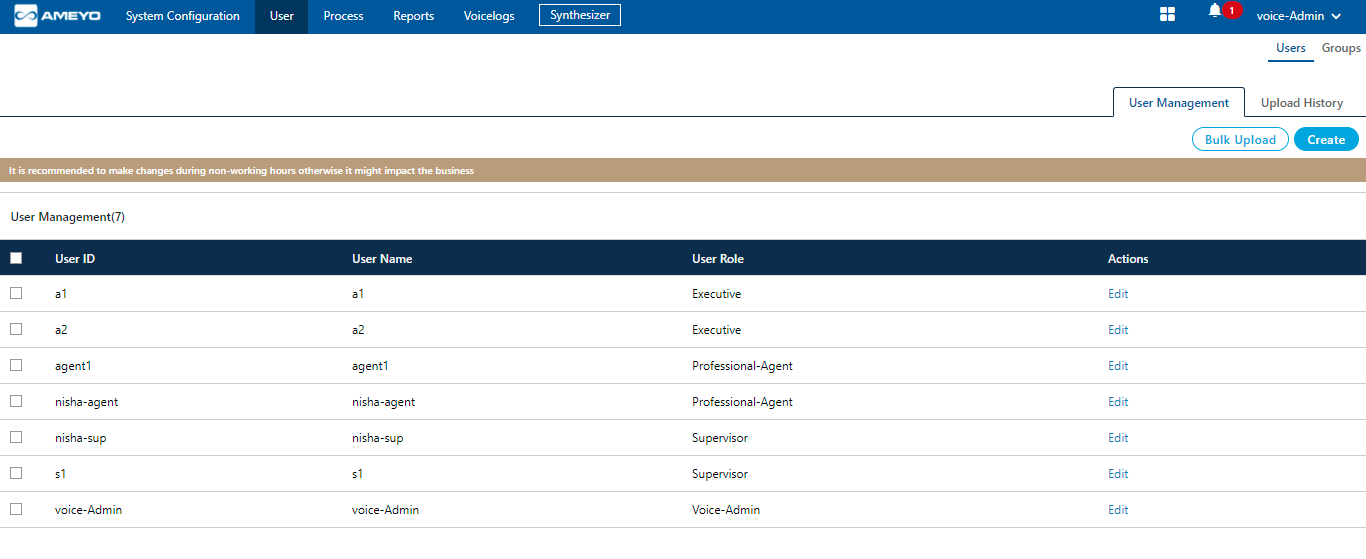
The Voice-Admin can create new users and delete the existing users from Ameyo system.

Figure: User Management
Add User
To add a new user, click "Add User" button.

Figure: Add a User
Perform the following steps.
- Enter the User ID, User Name in the provided text boxes.
- Select the user role from the "System Role" drop-down menu. Here, you can use the search box to search for any role. It contains the following roles.
As per the license model in Ameyo, you can create the following users.
- By default, Professional Agent, Executive, and Supervisor can work in the Ameyo System, but it can be customized further for other user roles listed here. Please contact Services Team or On-site Engineer for more information.
- A user with Professional Agent role can login to one Chat, one Interaction and one Voice campaign. However in Blended Campagin, the user with Professional Agent role can select more than one voice campaign.
- A user with Executive Role can login to one chat, one Interaction, and more than one Voice Campaigns, even if they are not Blended.
- Blended Campaigns are preferred because it gives important to the inbound calls that helps in reducing the call drops.
License-based User Actual User Type in Ameyo Voice User Professional Agent Executive Agent (to be available in two voice campaigns without Blended Campaign option) Email User Professional Agent Chat User Professional Agent Social User Professional Agent Universal User Professional Agent Executive Agent (to be available in two voice campaigns without Blended Campaign option) Voice-Admin: As the name suggests, the user with the Voice-Admin user rights is the head of all the Ameyo and is able to do everything in the system.
MAdmin: MAdmin is the mini-Voice-Admin who has some privileges like the Voice-Admin but does not have the complete authorization like Voice-Admin.
Voice Admin: All the voice related administration level works are allowed to be done by the Voice-Admin user.
Analyst: The analyst is the user who analyses the complete work done by the agents.
Professional-Agent: The professional agent is the user who is professional in handling multiple customers and their calls at the same time while assigned in the multiple campaigns.
Executive: The executive is the person who is allowed to interact with the customer.
Supervisor: The supervisor is the user who has the privileges to monitor the work of the agents which are assigned under him.
UAM-Maker: The UAM-Maker (User Access Manager) user has the privileges to the create the users and assign them to their respective campaigns so that they, can work accordingly.
UAM-Checker: The UAM-Checker (User Access Manager) has to approve the users created by UAM-Maker.
Customer Manager: The Customer Manager is used to run the Customer Manager API.
Group Manager: The combination of multiple voice agents is known as group, and the group manager monitors the activity of the agents assigned in that group.
- Enter the password in the provided text box and confirm the password by re entering the same in "Confirm Password" text box.
- Enter the description about the user in the provided text area.
- Select the Allowed Interaction Extensions from the drop down field. Allowed Interaction Extension means that number of media interactions that is chat, mails, social media etc. can a Agent handle.
Select the number of Ticket Extensions which a user can handle at a time.
- To enable E-mail ID for user check the checkbox provided and enter the E-mail ID of the user in the textbox.
- Phone Number: The voice-admin can provide the phone number of the agent here.
- Login Policy: Select the Login policy from the provided drop down box.
- Click "Save" to add the user.
- Click "Cancel" to discard the changes.
Modify User
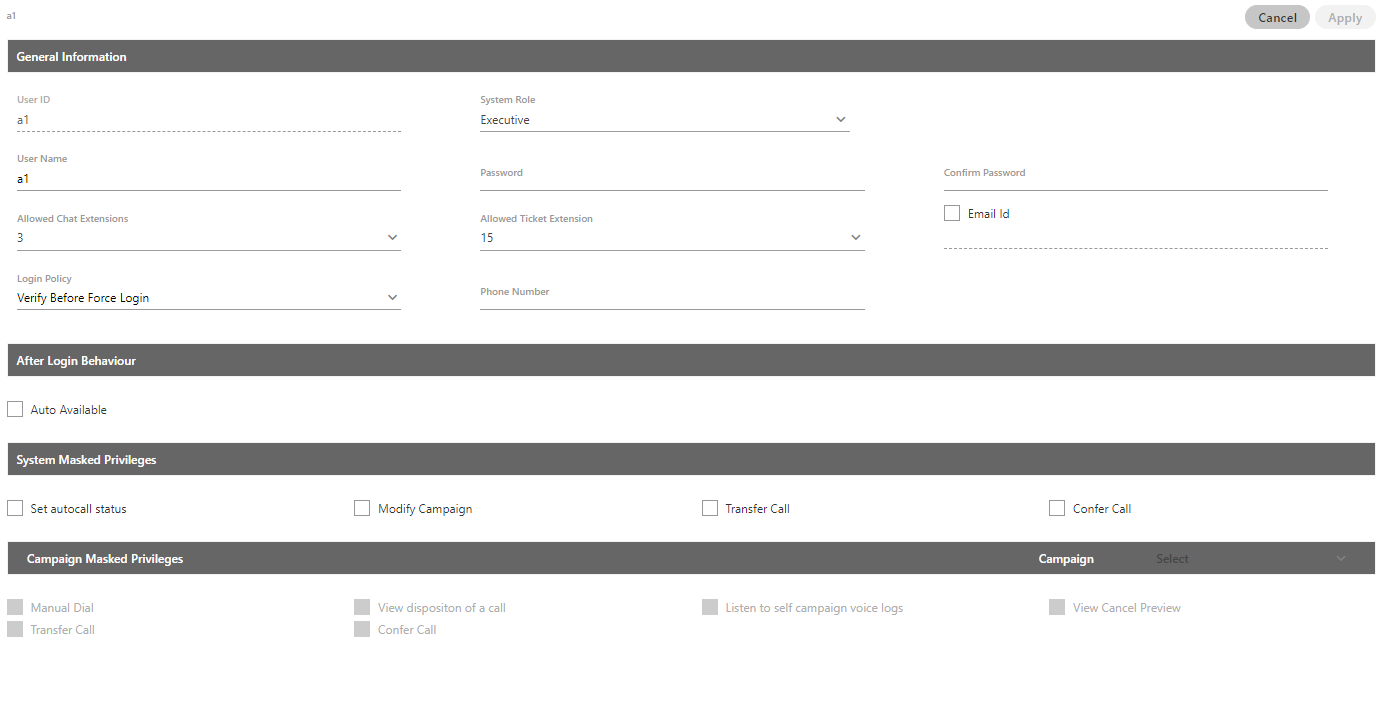
Voice-Admin can modify the general information of user and also change different privileges given to that particular user. To edit a particular user, select that user by checking the checkbox provided and click on edit option which is there in front of the name of that user. It shows the following pop-up.

Figure: Modify a User
Following information can be modified.
- General Information: Under this category, the following fields can be modified.
- System Role
- User Name
- Password
- Allowed Chat Extensions
- Allowed Ticket Extensions
- Check or uncheck "Email ID" field
- Add, modify, or delete Email Address
- Phone number of the user
- Change Login Policy
- After Login Behaviour: Here, you can check "Auto Available" to make the user auto-available after the login. Keep it uncheck to not make it auto-available after the agent login.
System Masked Privileges: The Voice-Admin can restrict the user from some actions related with system. Enable the checkboxes to restrict the user from the following restrictions.
Set autocall status: It restricts the user to change the status of the auto call. It means that the user is not able to change the status of the auto call, the status set either by supervisor or Voice-Admin remains available.
Modify Campaign: It restricts the user to change the campaign after login to another campaign. It means that the user is not able to change the campaign even if the user is assigned in multiple campaigns. Now, if the user selects the campaign at the time of login remains available only. The option to change campaign for the user from the main menu remains disabled.
Transfer Call: It restricts the user to transfer the call.
Confer Call: It restricts the user to confer the call.
-
End Call Allowed: It is used to allow the user to end the call.
Monitor: It restricts the user to view or working on the Monitor tab.
Manage: It restricts the user to view or working on the Manage tab.
Reports: It restricts the user to view or working on the Reports tab.
Voicelogs: It restricts the user to view or working on the Voicelogs tab.
Campaign Masked Privileges: The Voice-Admin can restrict some actions for particular user of the campaign (in which respective user is assigned) by simply checking the respective checkboxes.
Select the campaign from the drop down list of the available campaigns in which user is assigned. Following privileges can be restricted for any user:
Manual Dial: If the user is masked for the Manual Dial feature then the user is not able to dial the call to any customer from that campaign manually(auto call does not have any impact of this feature). This feature is useful for the users of "Inbound" type campaigns.
View disposition of a call: If this feature is enabled for any user, then that user is not able to view the dispositions for the call so that the user is not able to dispose off the call from the disposition list of dialer but the user is allowed to dispose the call from CRM in that campaign.
Listen to self campaign voice logs: If the user is masked from this feature then the user is not able to listen to the voicelogs which are created from the calls handled by that user. The option to listen to the voicelogs remains unavailable for that user.
View Cancel Preview: It masked the user to cancel the preview of the customer's details. It means that the user is not able to cancel the preview in the case of "Preview dialing" algorithm.
Transfer Call: It restricts the user to transfer the call.
-
View Cancel Preview: It masked the user to cancel the preview of the customer's details. It means that the user is not able to cancel the preview in the case of "Preview dialing" algorithm.
Confer Call: It restricts the user to confer the call.
If the "Confer Call" privilege has been masked for a Supervisor, then the "Call Conference" for that Supervisor will also be masked in "Live Monitoring" Tab.
It is a Campaign-level Privilege, which can be configured here. The change made by a Supervisor for this privilege will override the privilege configured by the voice-admin.If a user is assigned in multiple campaigns and Voice-Admin wants to mask the user from multiple campaigns, then you have to mask the user from all the campaigns one by one.
These features are available for all other users except Voice-Admin.- Voice Mail Configurations (Licensable): This feature is licensed. This tab will be only visible if voicemail license is procured at the center.
The Voice-Admin can enable Voicemail feature at system level is enabled by sliding the "voicemail" bar towards right. If this is not enabled, then voicemails will not be recorded. To enable sending the voicemails notifications, Voice-Admin needs to check the "Notification Email IDs" checkbox.- Notifications Email IDs: Voice-Admin can enter the multiple email ids (gmail domain only) separated by comma. For example, email1@domain.com, email2@domain.com, and others.
- Welcome Voicemail Prompt: Select the welcome voicemail prompt from the drop-down field.
- Finish Voicemail Prompt: Select the finish voicemail prompt from the drop-down field.
- Click "Apply" button to save the changes.
Rather, click "Cancel" to discard the changes.
Tabs Visibility: The voice-admin can mask the tab visibility of the supervisor. Enable the checkboxes to restrict the user from the following restrictions.
The tabs visibility section is only visible for the supervisor user roles. If the voice-admin edit user role other than the supervisor, then this section will not be visible.
Delete User
The deleted user cannot be restored. The deleted user will not be able to login to the Ameyo System.
Perform the following steps to delete the user.
- Select the user to be deleted by checking the checkbox.
- Click "Delete" to delete the selected user. It shows the following warning message.

Figure: Warning before deleting a User
- Click "Yes" to delete the user.
User Card
After the creation of the user, the user card is displayed while hovering the mouse on the user name of the user. Following screen is displayed while hovering the mouse over the username of the user.

Figure: User Card
The user card contains the user-role, username, and userID.
Bulk Upload
The bulk creation of users feature allows the voice-admin to create users in bulk in a single time. The voice-admin has been given an option from where he can upload the user identities with the help of a CSV. In this CSV file, the voice-admin can define all the fields required to be filled for the creation of the users. The voice-admin can also provide the metadata fields of the users.
Perform the following steps to upload the CSV file containing the user identities.
-
Create a CSV file with all the user fields in it.

Figure: CSV File
-
Click "Bulk Upload" button to upload the CSV file.
-
A pop-up to select the CSV file is displayed. Select the CSV file from here and click "Upload" button.
-
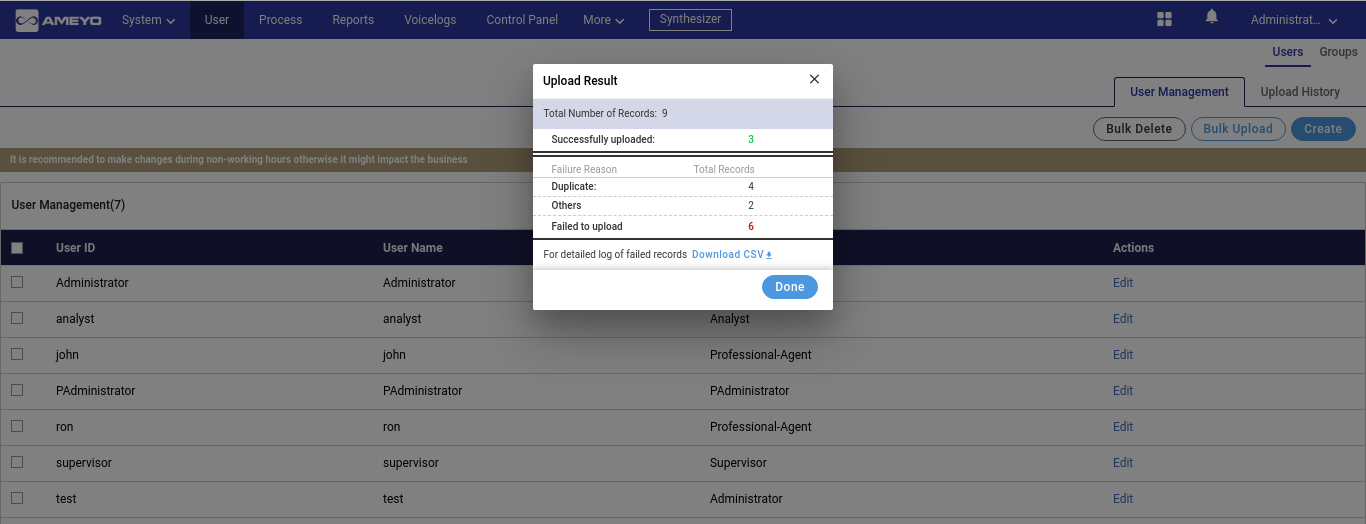
Once the file is uploaded, a modal is displayed, which shows the count of the successfully uploaded user records. If any user record is duplicated or an entry with respect to any user is already present in the system, then the count of those failed records will also be shown in this modal.

Figure: Modal shown for Bulk Upload of Users
-
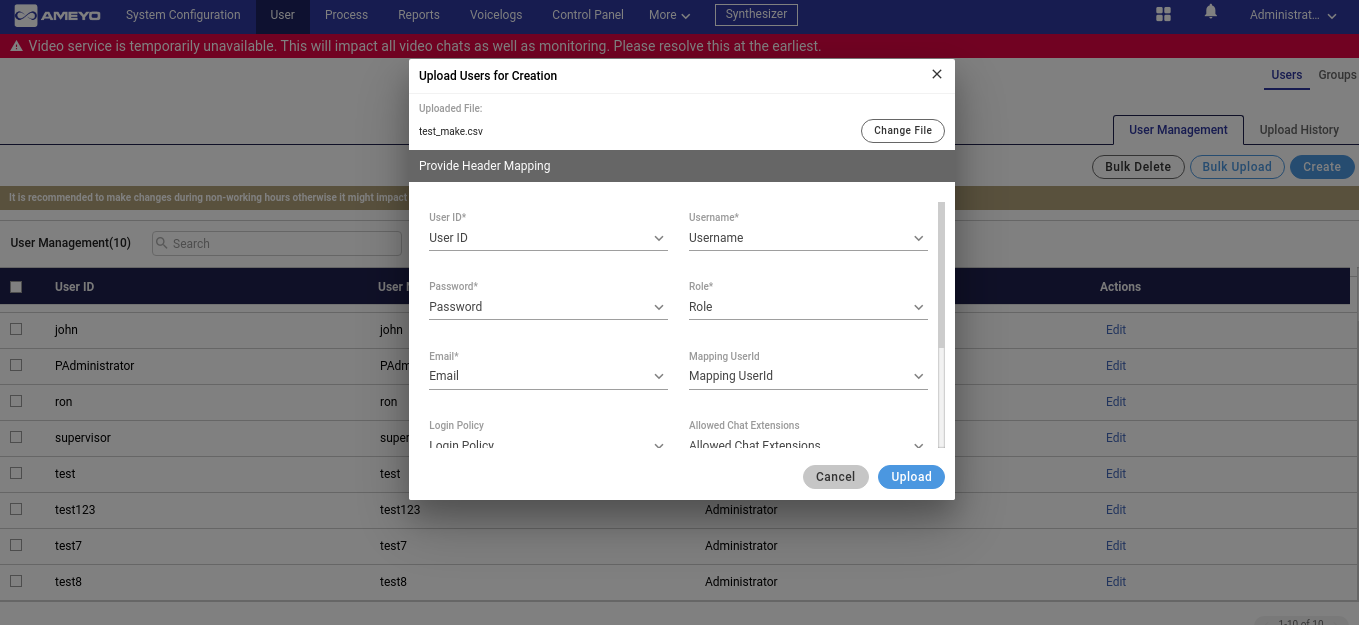
After the upload status, a modal is displayed in which the voice-admin has to map the columns of the CSV file with the columns of the users field.

Figure: Mapping of User fields
-
After the user creation step, the voice-admin can view the upload history of the users from the upload history tab.