Table Definition
In this tab, you can create, edit, and delete the table definitions.

Figure: Table Settings in "System Configuration"
After creating the table definitions here, you can use "Mapping" tab to create the mapping and "Filter" tab to create the filters.
Create Table Definition
Administrator has to perform the following steps to create a new data table.
- Click
 button. A pop-up will appear.

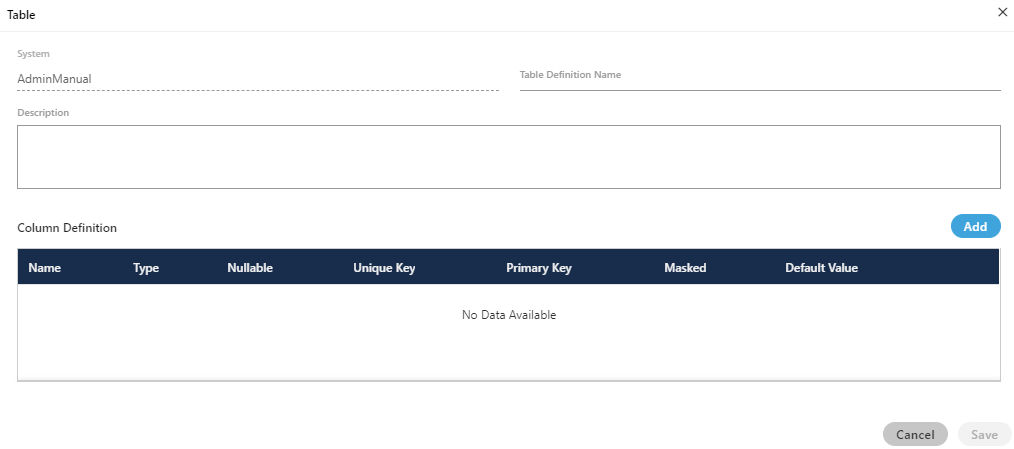
Figure: Create Table
- Provide the following details:
- System: This contains the system ID which is taken by default.
- Table Definition Name: Enter the name of the table. You can use only "_" (underscore) as a special character while providing a name for Table Definition. Other special characters are not allowed.
- Description: Enter the description regarding the table.
- Column Definition: Perform the following steps to add a column.
- Click "Add" to add a column. It shows the following row.

Figure: Add a row
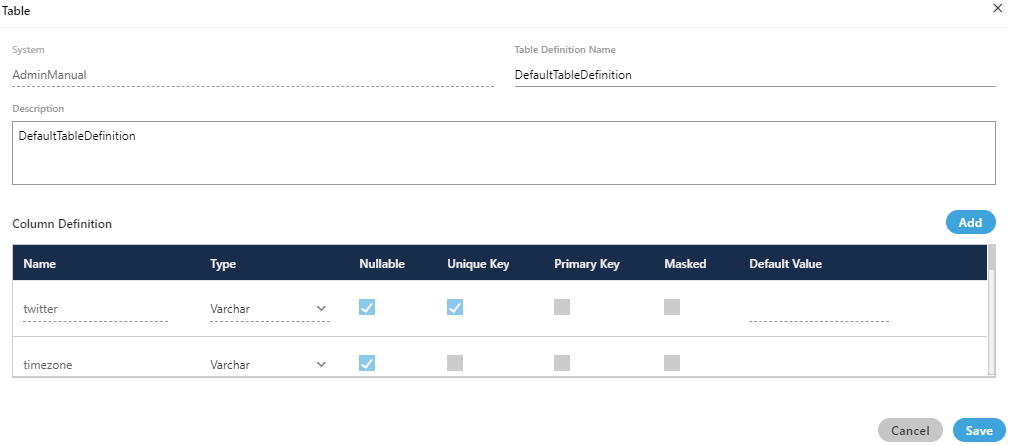
- Here, you have to provide the following values to add a column.
- Name: Provide a name of the column. You can use only "_" (underscore) as a special character while providing a name for a Column. Other special characters are not allowed.
- Type: Select any of the following options to specify the type of input received in this column.
- Integer: Select it to accept only whole numbers. It will not accept the decimals.
- Numeric: Select it to accept the numbers including decimals.
- Boolean: Select it to accept only two values that are "true" and "false".
- Varchar: Select it to accept the alphabets with numbers.
- Date: Select it to accept the date.
- Time: Select it to accept the time.
- Timestamp: Select it to accept the timestamp.
- Nullable: Select it to let any cell in the column to remain blank. If unchecked, it will be mandatory to enter some value in the cell.
- Unique Key: Select it to let the column accept only unique values in its cells.
- Primary Key: Select it to make the column primary.
Masked (Licensable): It provides the option to mask the values stored in a field.
The feature to unmask the already masked values will not be provided. So, use this feature consciously.
All or only important fields can be masked. If the Administrator selects a field to be maksed, then whatever data will be stored in this field will be masked at User Interface of the entire Ameyo System, in Customer Manager API, and at the backend, in the databases of PostgreSQL. For example, the data will be masked in AmeyoRefresh and CustomerProspect tables. Except the last 4 characters, all characters in the data will be masked with "X" letter such as XXXXXX1234.
If you are modifying an existing Table Definition or creating a new one in an already existing Ameyo Setup, only the new data will be masked in the field selected for masking, however, the old data will not be masked.
Perform the following steps to enable the masked Data Processor
Execute the following query to verify whether the maskDataPreProcessor is available or not.
SELECT * FROM system_configuration_parameter WHERE name = 'customerManagerPreprocessorsNames';
Execute the following query to enable the maskDataPreProcessor if it is not available.
update system_configuration_parameter set value='duplicatePreprocessor,numberRegexMatcherPreprocessor,standardNumberFormaterPreprocessor,maskDataPreProcessor' where name='customerManagerPreprocessorsNames';
Run the following query.
update column_definition set masking_policy_type='FIRST_X_LAST_Y_UNMASKED' where name=''; Update column_definition set masking_policy_properties='{"last_y_characters":"4","masked_string":"","first_x_characters":"6"}' where name='<Column_Name_To_Mask>';
It is configurable that how many digits of the data has to be masked or unmasked from starting and how many digits has to be masked or unmasked from the end.
Suppose the card number of 10 digits has to be masked. If it is configured that first 5 digits will be unmasked and the last 5 digits will be unmasked, then the complete number will remain unmask.If you select "Masked" for a field, then it cannot be "Primary Key" and "Unique Key". Also, default value of "Type" for a Masked field will be "VARCHAR" and it cannot be changed.

Figure: Sample Values to create a Table
There may be some cases arise when you have to disable the mask data fields. In this case, run the following query to disable the Mask Data Field.
update system_configuration_parameter set value='duplicatePreprocessor,numberRegexMatcherPreprocessor,standardNumberFormaterPreprocessor' where name='customerManagerPreprocessorsNames';- Default value: Enter the default value that will be displayed in all cells of this column.
- Click "Add" to add a column. It shows the following row.

Figure: Sample Values to create a Table
- Click "Save" button to create the table.
You can click "Cancel" button to not create the table.

Figure: Created a Table
