Call Routing Configuration
Here, Voice-Admin can configure incoming call routing policies and profiles based on incoming channel, DID or source phone. This Tab contains the following policies and their types.
- DefaultCallContextProfile: We can define the call contexts (like Zap trunks, SIP minutes) and route the calls through these contexts to a particular node flow in a campaign. Here we need not to identify the Source / Destination number.
- DefaultSourcePhoneProfile: This profile is used to identify a particular source phone and route the calls coming from that number to a particular node flow in campaign. Let's suppose if we want to do routing based on the phone number of caller. We will select the"DefaultSource Phone Profile" from Profiles tab and define the profile plans
- DefaultDestinationPhoneProfile: This policy is used to route the calls landing on a particular DID number. These calls can be routed to a particular node flow in a campaign. Let's suppose if we want to do routing for a particular DID number or toll free number. We will select the"DefaultDestinationPhoneProfile" and define the profile plans.

Figure: Routing Tab
Policies can be assigned by checking the "Assigned" checkbox. Uncheck this box to unassign the policy.
Order of policies can be moved from the "Up" and "Down" button. Policy will be followed in the sequential order from top to bottom.
Click "Apply" button to save the made changes. Rather, you can click "Cancel" button to discard the changes.
Create Plan for a Policy
The Voice-Admin can define the routing plan for the policies. Perform the following steps.
- Check the box to select a policy.
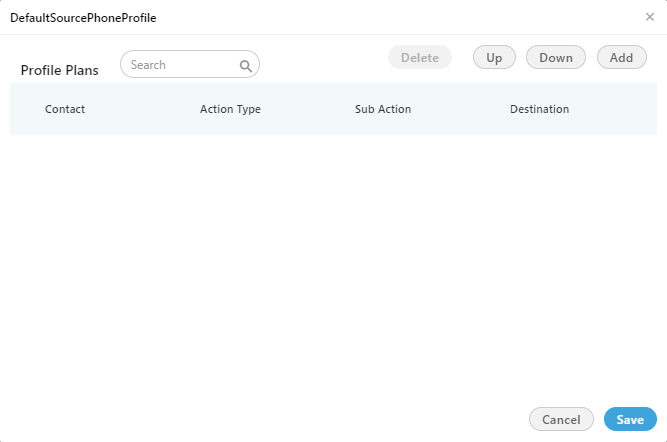
- Click "-" under "Plans" header adjacent to a policy for creating a new plan. The following pop-up is displayed on the screen.

Figure: Blank Plan for DefaultSourcePhoneProfile
- Click "Add" button to add a row in the text area.

Figure: Blank Raw for DefaultSourcePhoneProfile and DefaultDestinationPhone Profile

Figure: Blank Raw for CallContextProfile and DefaultDestinationPhone Profile
- Call Context: This field comes for CallContextProfile Plan only. You have to select any of the following options.
- audiocodes
- cc_voicetest_DefaultVR
- softphone1
- voip
OR
Contact: This field comes for both DefaultSourcePhoneProfile Plan and DefaultDestinationPhoneProfile Plan. You have to provide the contact number here. - ActionType: It has two options.
- Feature.action: Select it to route the call to nodeflow. When selected, Sub-Action drop-down shows the following options.
- default.acd.feature
- did.based.phone.feature
- manual.dial.feature
- Profile.action: Select it to route the call to another profile plan. When selected, Sub-Action drop-down shows the following options.
- cc.call.context.based.profile: Select it to transfer the call to the Call Context based Profiles. When selected, the available Call Context Profiles will be listed in the Destination drop-down menu.
- cc.destination.contact.based.profile: Select it to transfer the call to the Destination Contact based Profiles. When selected, the available Destination Contact Profiles will be listed in the Destination drop-down menu.
- cc.source.contact.based.profile: Select it to transfer the call to the Source Contact based Profiles. When selected, the available Source Contact Profiles will be listed in the Destination drop-down menu.
- Feature.action: Select it to route the call to nodeflow. When selected, Sub-Action drop-down shows the following options.
- Destination: If "feature.action" is selected in Action Type, then you have to select the available destination numbers in this drop-down menu. If "profile.action" is selected, you can select the relevant profile policy such as "DefaultCallContextProfile" for "cc.call.context.based.profile" sub-action, "DefaultDestinationPhoneProfile" for "cc.destination.contact.based.profile", and "DefaultSourcePhoneProfile" for "cc.source.contact.based.profile".
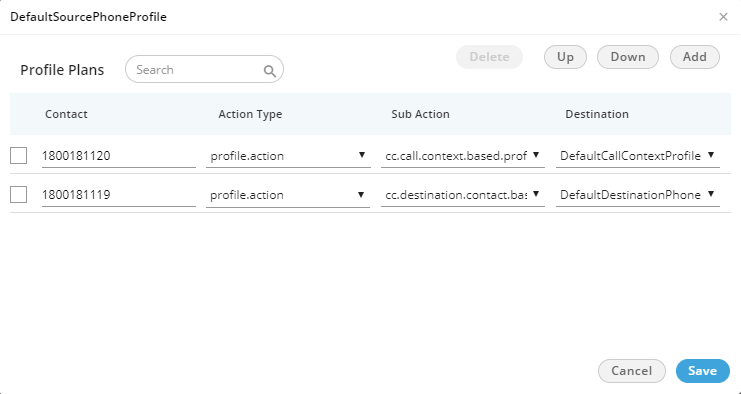
- You can add multiple rows in a plan of DefaultSourcePhoneProfile.

Figure: Adding Plan for DefaultSourcePhoneProfile
- To delete the created "Profile Plan", select that particular profile plan and click on "Delete" button.
- Any incoming call will be routed depending on the sequence of profiles defined. Profile moved at the top level will be followed first and then next defined profile will be followed.
- Click "Up" to move the row to up and click "Down" to move the row to down.
- Click "Save" to save the changes. Rather, you can click "Cancel" to discard the changes.
You can add and modify the plan for all policies.