Local IVR in a Campaign (Licensable)
"Local IVR" is a full-fledged IVR (Interactive Voice Response) running locally. The term locally or local refers to the telephony channel on which the IVR is running. Besides the channel there is no difference in a normal IVR running on an incoming channel and a local IVR.
Examples
If you take an example of a customer calling to book a travel ticket or a customer calling to bank, then the customer is welcomed by the main IVR of a Nested IVR. When the customer presses any option on the main IVR, a new IVR (that is a branch of main IVR) is presented.
Sometimes the Agent confer a customer's call with IVR for taking some input directly from the customer to the system. For example, the customer wants to change the PIN of a Debit/Credit Card after connecting the call with the agent.
Business Use Case
Agent is connected with customer via inbound call, then agent confer with Local IVR for verification or payment gateway. This is done in conference so that agent can guide the customer what to do on the IVR. However the information entered by the customer is not visible to the agent anywhere.
Local IVR Tab in Voice Campaign Settings
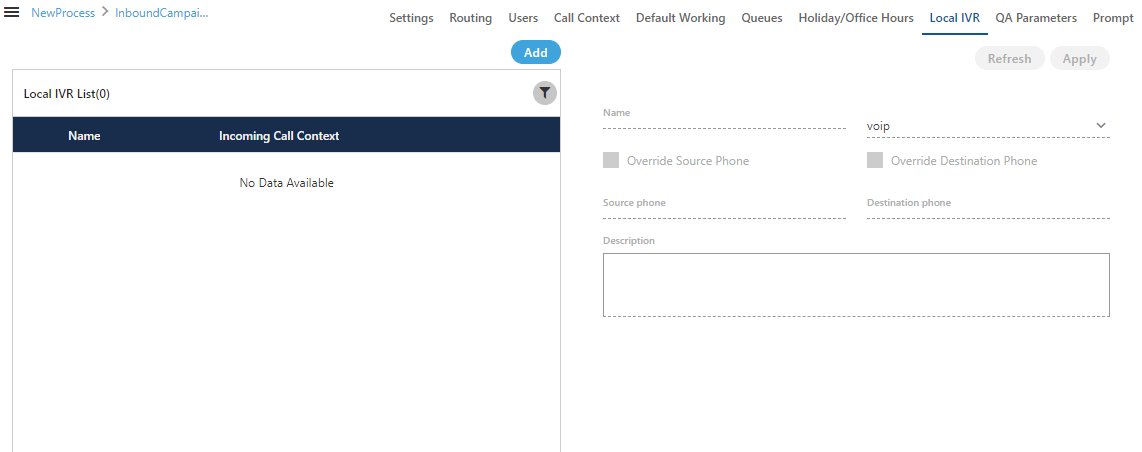
"Local IVR" Tab in Interactive Voice Application Campaign Settings lets the Voice-Admin create the Local IVRs.

Figure: Local IVR Tab
Add a Local IVR
Perform the following steps to add a Local IVR.
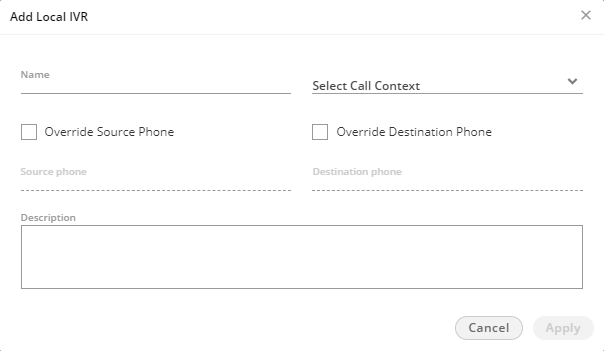
- Click "Add" to add a Local IVR using the following pop-up.

Figure: Add a Local IVR
- Provide a name for the new IVR.
- "Call Context" drop-down menu lists all Call Contexts that you have assigned to this campaign. Select anyone of them.
- Select "Override Source Phone" option to override the source number (from which a call is being received) of the incoming call with the provided number. After checking it, provide a number in its relevant textbox.
- Select "Override Destination Phone" option to override the destination number (to which a call is being dialled) of the outbound call with the provided number. After checking it, provide a number in its relevant textbox.
- Provide a description in "Description" text box.

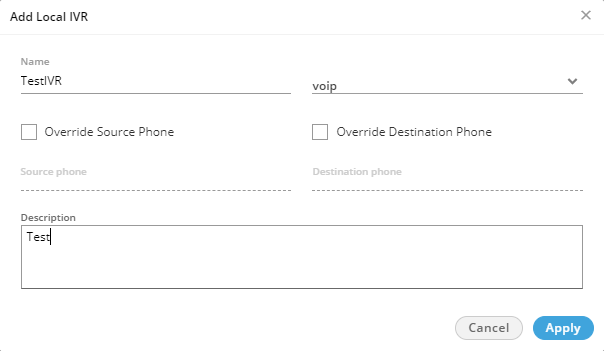
Figure: Sample Details
- Click "Apply" to create the local IVR using the selected call context.
Rather you can click "Cancel" to not create it
You can follow these steps to create multiple Local IVRs.

Figure: Local IVRs
Defining the Call Context at the System-level or Campaign-level
Scenario 1: System-level Call Routing for IVR
You have to define the Call Routing at the System-level if any of the following conditions is true.
System-level (or Contact Center level) Call Context has been selected to add the Local IVR.
Source Phone is specified to add the Local IVR.
Destination Phone is specified to add the Local IVR.
Refer to "System Call Routing" page to know about the steps to create a Call Routing Plan.
Scenario 2: Campaign-level Call Routing for IVR
You have to define the Call Routing in "Call Routing" tab of Campaign Settings only if the above conditions specified for System-level Routing are not true. The Call Context, which is used to add the Local IVR, have to be used to create a Context Feature in "Call Routing" of Campaign Settings. Refer to "Call Routing" page to know the steps to create a Call Routing in the Campaign Settings.
How Call Routing works with Local IVR?
Call Routing means that a call is being moved from an endpoint to another. The decisions in the Call Routing can be made using many reasons sucha as Caller Identification, Dialed Number, Time of Day, and Custom Defined Parameters established in an IVR (Interactive Voice Response) program script.
In Ameyo, we use term profiles for different routing sequence. Currently, the following three types of profiles are being used.
Source-based
Destination-based
Call Context-based
Important Point
The Ameyo System supports more than one "conferwithIVR" profiles to serve different types of Call Conferences as per the different business requirements.
Known Issues related to Local IVR in Ameyo
Local IVR is not supported for Outbound Campaigns.
The Agent can only confer the call with Local IVR. The Agent cannot transfer the call to the IVR.
Modifying an IVR
Perform the following steps to modify an existing Local IVR in the Campaign Settings.
In "Local IVR" tab, select a Local IVR to view its details in the right panel.

Figure: Sample Details
You can change the following fields while modifying a local IVR.
Name
Call Context
Enable or disable the option to override the Source Phone
Already provided Source Phone Number
Enable or disable the option to override the Destination Phone
Already provided Destination Phone Number
Description
If the System-level Call Routing Plan is created based upon the Call Context, Source Phone Number, or Destination Phone Number, then Call Routing will not work for this IVR if you change any of these fields.
If the Campaign-level Call Routing Feature is created based upon the Call Context, then the Call Routing will not work for this IVR if you change the Call Context.
Validate the changes carefully as the Call Routing can be disabled for this Local IVR if any change is made to Call Context, Source Phone, or Destination Phone.
Click "Apply" to apply the changes.
Rather, you can click "Cancel" to discard the changes.
Delete an existing Local IVR
The Deleted Local IVR will not be played at the assigned Call Context Feature, Source Phone Number, or Destination Phone Number.
The Deleted Local IVR cannot be restored using any method.
Sometimes an existing Local IVR becomes obsolete and it has to be replaced with an all new IVR. If you are planning to delete an IVR, then you have to plan properly before going ahead as the deleted IVR will not be played in the Call Flow.
Perform the following steps to delete a Local IVR.
In "Local IVR" tab, select a Local IVR to view its details in the right panel.

Figure: Sample Details
Click "Delete" button in the top right section. It shows the following warning message.

Figure: Warning before deleting an IVR
Click "Yes" to delete the local IVR.
Rather, you can click "No" to not delete the Local IVR.