Dashboard
The working and features of Dashboard page is similar for both Supervisor and Agent. However, the Group Manager does not have the privileges to access the Dashboard, as the group manager is not allowed to work in interaction and chat campaigns.
Login Dashboard
After the logon to the agent's console with the IC Campaign, then the Dashboard shows all tickets created while interacting with the customers through any medium.
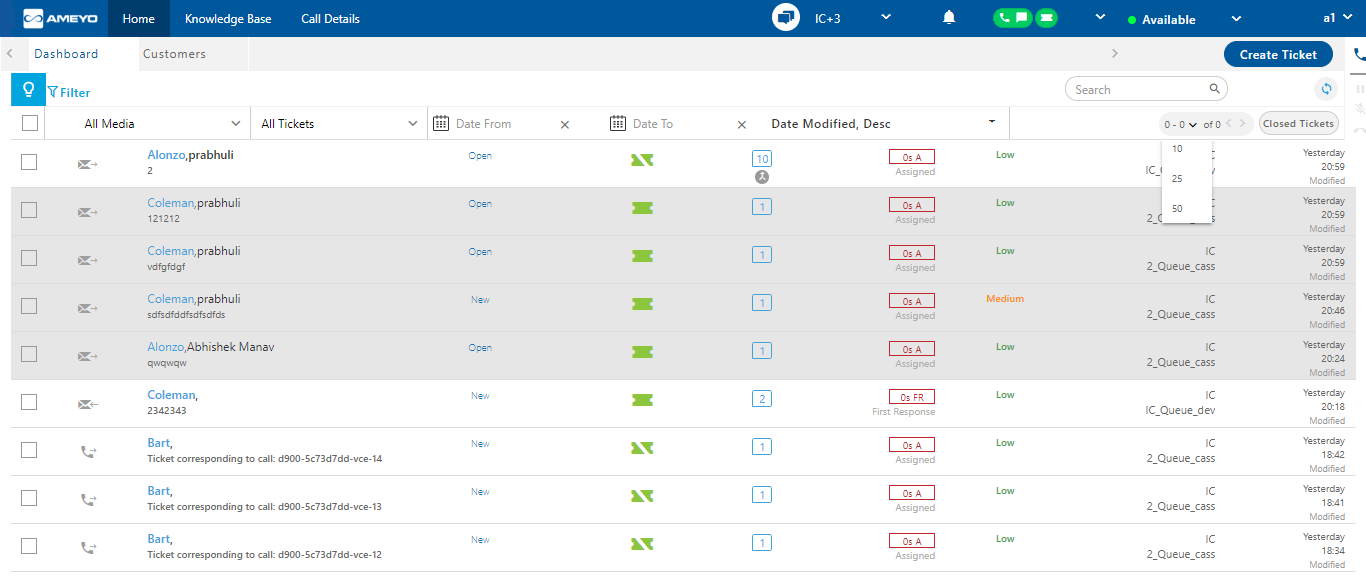
Figure: Dashboard
Here, the agent can perform the following operations.
The key difference between the supervisor and agent is that the supervisor can see all the tickets present in the campaign whereas, the agent is allowed to see the tickets present in that queue on Dashboard.
Smart Mode
Click ![]() icon to turn on the smart mode. In smart mode, the agent can see what tickets have to be dealt with first. Agent can click "Smart Mode" icon again to turn it off. Know more...
icon to turn on the smart mode. In smart mode, the agent can see what tickets have to be dealt with first. Agent can click "Smart Mode" icon again to turn it off. Know more...
Filter
Click ![]() icon to filter the tickets on the dashboard using the following pop-up.
icon to filter the tickets on the dashboard using the following pop-up.
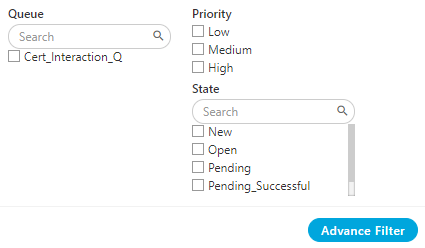
Figure: Filter Box
You can filter the tickets from the following list of available filters.
-
Queue: Enable the checkbox of the queue for which you want to search the tickets. The agent can select multiple queues at the same time. You can search the queue name, enter the queue name in the search box and press "Enter" key.
-
Priority: Agent can filter the tickets based on their priorities. Enable the checkbox of the specific priority.
-
State: Agent can apply the filter on the ticket states as well. Ticket state defines the current state of the ticket in which it lies at present. You can search the state by typing the state name in the search box.
After the selection of the filters, click "Apply" button.
Advanced Filter
You can click "Advance Filter" to create an advanced filter.
For the advanced filters, click "Advance Filter" button present at the bottom of the filter section.
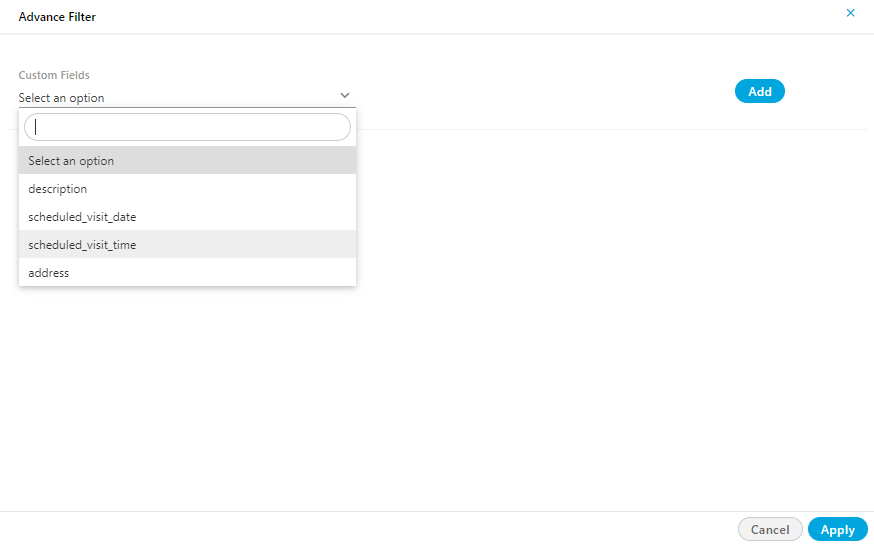
Figure: Advance Filter Box
On the new pop-up page, select the custom filters from the drop-down list, based upon your criteria and the usage and click "Apply" button. It filters the tickets based upon the custom fields.
The Advance Filter can be enabled or disable from back-end, hence if it is disabled it will not be visible on the filter tab.
Ticket Assignment Notification
In a case when some of the tickets have been assigned to the agents, then it is important to notify the agents about the tickets and the total count of tickets. To solve this problem, a notification comprises of the total count of the tickets will be sent to the agent. Know more...
Chat Delivery Notifications
In case when the agent is assigned in a Chat Campaign, but the agent is on another secondary tab in the Web browsers, there were chances that the agent will miss the incoming chat. To avoid such cases, Desktop Notification App has been improved further. Now if the agent is browsing other tabs (instead of Primary Tab) in Web browsers, then a desktop notification is displayed informing about a new incoming chat. The agent can click the notification to reach the Primary Tab to attend the Incoming Chat.
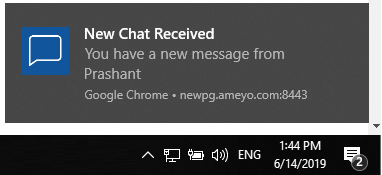
Figure: Desktop Notification for New Incoming Chat
If the agent does not click it, this notification will continue to show the incoming messages from the customer. In an operating system like Windows 10, the notifications will be displayed in Windows' native Message Center. Refer to the following screenshot.
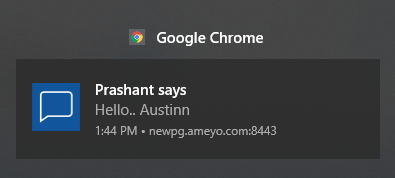
Figure: Desktop Notification for New Message in the Incoming Chat
This feature of"Desktop Notification" App helps the agent to attend the chat within SLA and decreases the chances of not connected chats.
Search Tickets
The agent can use the search box, located on the right corner to search for the tickets.
The agent can use the Custom ID also to search for the tickets. Enter the custom id of the ticket to search the ticket associated with that custom id. Tickets can only be searched with the help of Custom ID, if custom id is enabled by the administrator.
Computation of Tickets: While searching large number of tickets, the computation of ticket searching is performed on the server-side. Therefore, there will be no effect on the client-side. It has optimized the performance of Ameyo to handle the large number of tickets. And hence, the time consumption for fetching these tickets is reduced.
Refresh
Click ![]() icon to refresh the view of the dashboard.
icon to refresh the view of the dashboard.
Create Ticket
Click "Create Ticket" button to create a new ticket manually.Know more...
Row Filters
There are some filters that can be used to sort the tickets. It helps the user to see the tickets according to the usage and need. Following are the types of filters.

Figure: Filter Row
-
Media Type Filter: The media type filter helps the agent to filter tickets according to different media created in the system. Click on the type of media for which you want to see the tickets. Some of the following media are:
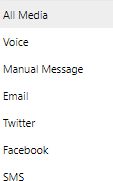
Figure: Media Type Filter
-
All Media: It shows all the types of tickets irrespective of the media type.
-
Voice: It shows the tickets which are created from the voice calls.
Voice tickets can only be shown if the setup is based on IC+Voice setup.
-
Email: It shows all those tickets which are created through the email media profile.
-
Facebook: It shows all those tickets which are created through the Facebook media profile. It includes the messages sent as the post on Facebook page of the customer.
-
Twitter: It shows all those tickets which are created through the twitter media profile.
-
Manual Message: It shows those tickets which are created manually, which means those tickets which are created by the user.
-
SMS: It shows those tickets which are created through the SMS medial profile.
-
WhatsApp: It shows those tickets which are created through the message sent on the configured WhatsApp number.
-
Fb Messenger: It shows those tickets which are created through Facebook messenger. It includes the messages sent over the Facebook messenger.
Here, the media profile means the type of source from which the ticket is received in Ameyo.
-
Customer Portal: It shows those tickets which are created or updated through the customer portal.
-
-
Ticket Status Filter: Agent can filter the tickets according to the various following ticket status.
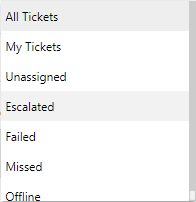
Figure: Filter Based on Ticket Status
-
All Tickets: It shows all those tickets which are assigned in the particular queue in which the user is assigned.
-
My Tickets: It shows only those tickets which are assigned to the user.
-
Unassigned: It shows those tickets which are unassigned and are still waiting for their response.
-
Escalated: It shows those tickets which have been escalated from any of the users in that queue.
-
Failed: It filters those tickets which are failed and not yet delivered to the customer. This case may arise when either the customer’s destination id is incorrect, or the message delivery fails due to some external effects like network failure, provider issue and so on.
-
Missed: It filters those tickets for which the customer left the message for the agent, but the agent was not available to attend the ticket while the customer was available, and the message or chat has been missed.
-
Offline: It shows those tickets that have been raised when all the agents were offline or during the non-working hours.
-
-
Date Filter: The date filter helps you to filter the tickets based on the provided time duration. It shows all the tickets which are created in the provided time duration.
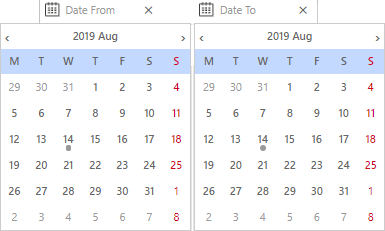
Figure: Date Filter
Select the initial date from “Date From” column and last date from “Date To” column.
-
Ticket Sorting Filters: The sorting filter helps the agent to filter the tickets in the following sorting orders.
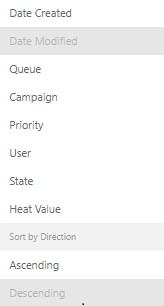
Figure: Sorting Filter
-
Date Modified: It sorts the tickets according to the modification date of tickets. If there is any task performed over the ticket, then the time and date are known as modification date and time. The date modified metric will be updated with the following activities .
When agent views the ticket
Activity when a new ticket is being created.
When an agent picks the ticket
Assignment/Un-assignment/Re-assignment of the ticket.
If ticket is being "escalated"
When the ticket is being transferred.
When agent "link" the ticket with other ticket.
When ticket is "merged"
Agent replies to a ticket
Adding/deleting/updating a "note"
Adding or deleted an attachment
Change in the Ticket Status
Adding/Updating/Deleting a custom field
-
Date Created: It sorts the tickets according to the creation date of tickets.
-
Queue: It sorts the tickets according to the queue names.
-
Campaign: It sorts the tickets according to the campaign names.
-
Priority: It sorts the tickets according to the priority of the tickets.
-
User: It sorts the tickets according to the name of the users.
-
State: It sorts the tickets according to the states of tickets.
-
Heat Value: It sorts the tickets according to the heat value of tickets.
-
Sort by direction: All the above sorting filters are based on the order of the tickets in which they can be shown on the page. The sorting parameters are compulsory to apply with all the above sorting parameters. There are two types of sorting directions.
-
Ascending: It sorts the tickets in the ascending order, that is, the oldest ticket (according to the above-applied filter) comes first, and the new ticket comes at the end of the tickets list.
-
Descending: It sorts the tickets in the descending order, that is, the newest ticket (according to the above-applied filter) comes first, and the oldest ticket comes at the end of the tickets list.
-
-
-
Number of Tickets per Page: It shows the total number of tickets to be shown per page. CLick
 icon to select the number of tickets to be shown on a single page. By default, 10 tickets show on a single page.
Click icon to move to the next page of tickets or
  icon to move to the previous page of tickets.
Figure: Tickets on Single Page Filter
Attach Call Tickets
The agent is able to attach the call Tickets with existing tickets or can create a new ticket. Know more...
View Closed Tickets
The agent can now see the closed tickets at the Customer Details page. Click "Closed Tickets" button to see the closed tickets. Know more...

Figure: Showing Closed Tickets
The currently opened tickets will not be visible while viewing the closed tickets. The user has to close the dashboard of the closed tickets to see other tickets.