Chat Campaign Settings
In the left navigation bar of Process Tab, you can select a Chat Campaign to view its settings.
The changes made in settings of one Chat Campaign will be applicable to that campaign itself. They will not be applicable on other similar (chat) and different (non-chat) campaigns.

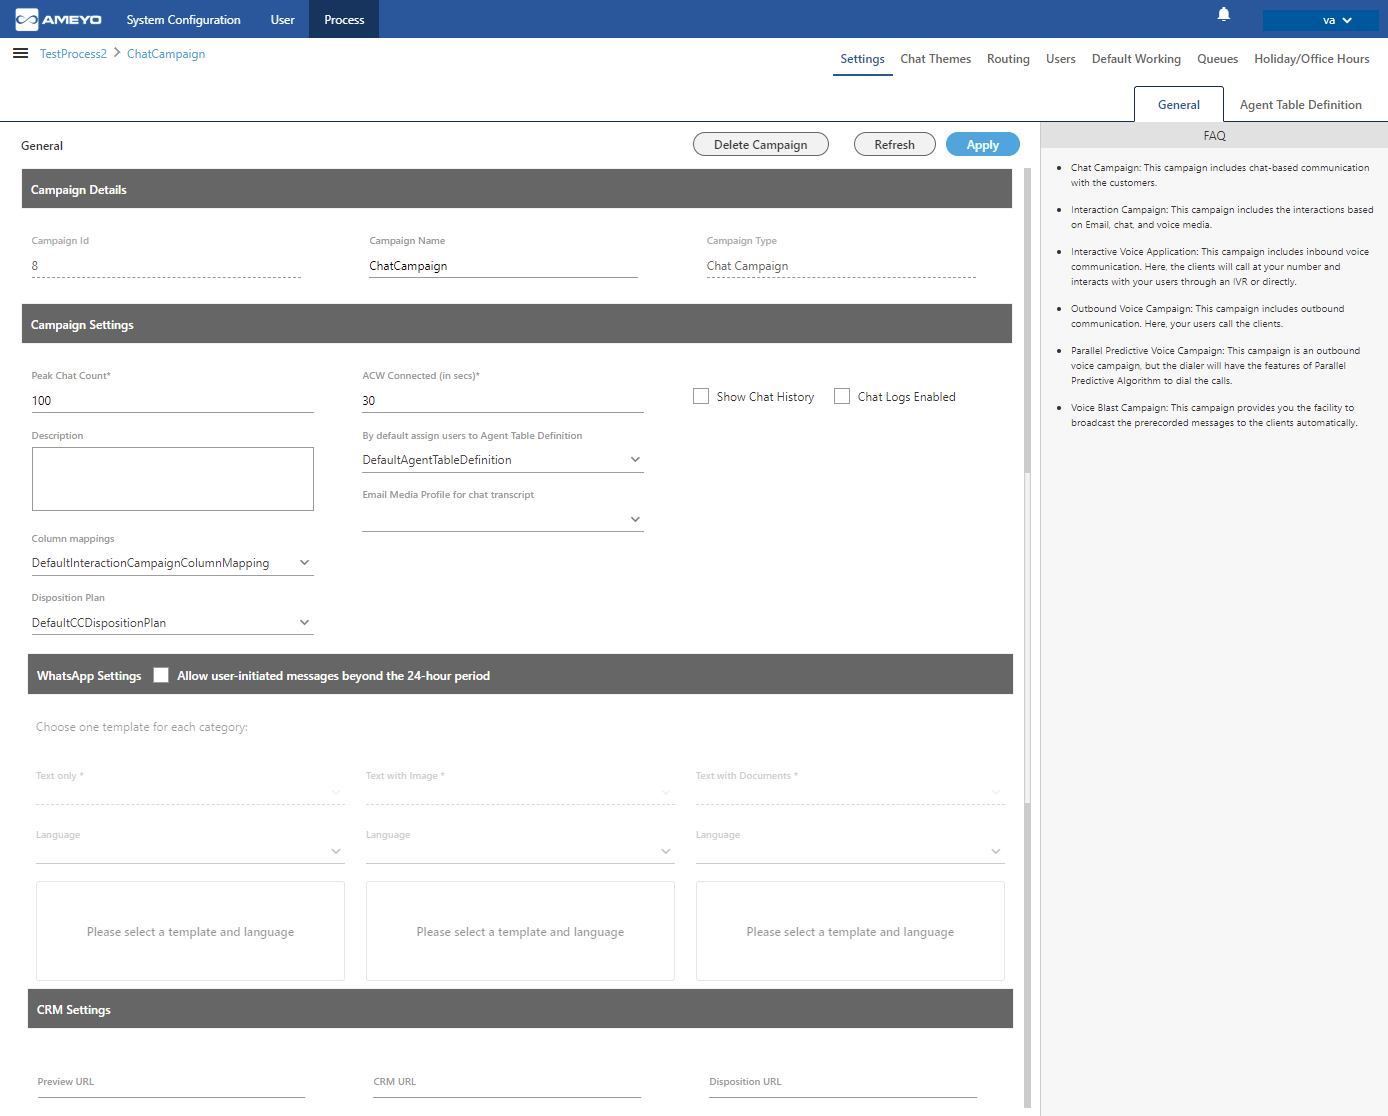
Figure: Settings of Chat Campaign
The proxy server with the chat (Ameyo WebChat or any other chat medium) can be used. The Voice-Admin has to configure the proxy server, named as nginx-based Proxy Support . After configuration, all the messages coming through Chat medium will first route from proxy server and then they will be received at Ameyo application server. For further information contact Ameyo Support team.
At the right side of the campaign settings page, some of the commonly asked definitions of settings are defined. You can refer to those definitions.
It contains the following tabs.
- Settings
- Queues
- Routing
- Chat Themes
- Users
- Default Working
- Holiday/Office Hours
Linking Chat Campaign with Interaction Campaign
You have to perform the following steps to link the Chat Campaign with Interaction Campaign. The tickets will not be created for any Chat Message, if it is not linked.
- At the Linux-based Server where Ameyo is installed, execute the following command to enter the console of PostgreSQL.
psql -U postgresql
- Execute the following command to access "ameyodb" database.
\c ameyodb
- Execute the following command to link the Chat Campaign with an Interaction Campaign.
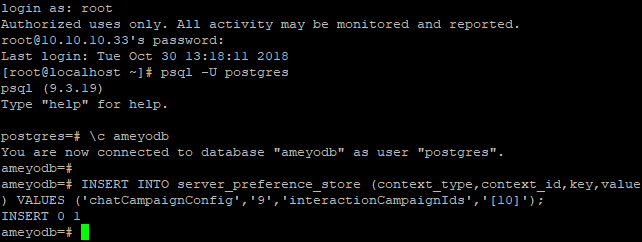
INSERT INTO server_preference_store (context_type,context_id,key,value) VALUES ('chatCampaignConfig','<chat_campaign_id>','interactionCampaignIds','<interaction_campaign_id>]');
You have to replace the "Chat_Campain_ID" with the ID of the Chat Campaign and "Interaction_Campaign_ID" with the ID of the Interaction Campaign, which you want to link.
Figure: Commands to link Chat Campaign with Interaction Campaign
- Now, execute the following command to exit from the database and PostgreSQL console.
\q
General Settings of Chat Campaign
This tab contains only "General Settings".

Figure: General Settings for Chat Campaign
Here, the General Settings is divided into the following sections.
Campaign Details
These are the same details, which you have provided while creating this campaign. You can only change the campaign name here.
Campaign Settings
It contains the following settings, which you have configured while creating a Chat Campaign. You can modify them here.
Peak Chat Count
ACW Connected (in secs)*
Column Mappings
Disposition Plan
Description
In addition, it contains the following new settings that you can configure only while modifying an existing Chat Campaign.
By default assign users to Agent Table Definition: Here, you can select the default Agent Table Definition for this campaign.
Email Media Profile for chat transcript: Here, you can select the Email Media Profile through which the Chat Transcript of Ameyo Web Chat will be sent to that customer who have opted to send the Chat Transcript.
Show Chat History: Select this option to to show the Historical Chat in the Ameyo Web Chat to both the customers and the agents.
Chat Logs Enabled: Select this option to enable the logging of Chat.
WhatsApp Settings
WhatsApp Settings present of Chat Campaign helps to create and configure the templates for WhatsApp Outbound notifications. These configured notifications will be sent to the customers. The customer can reply to the received notification and then have a conversation with the agent. This feature helps the business to reply after the 24 hour, as the agent only get the 24 hour window in which the agent can reply.
The "Reply Via" feature is available for "WhatsApp for Business". However, WhatsApp for Business allows responding to messages (from the agent to the customer) within 24 hours of the last incoming message sent by the customer to the agent.
After that window of 24-hour, the WhatsApp for Business allows sending the template-based messages only, which may contain the text. It is a paid service.

Figure: WhatsApp Settings of Chat Campaign
Perform the following steps
Enable WhatsApp Settings option, as these settings are not enabled by-default.
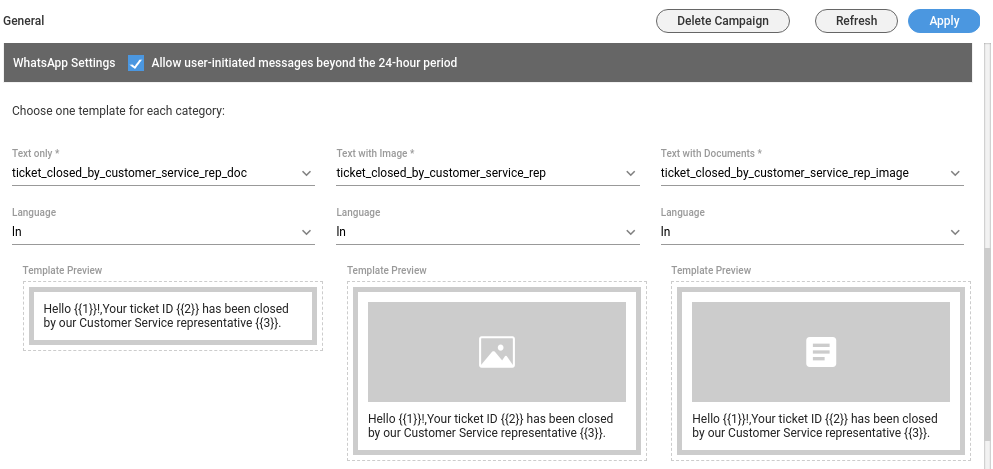
Select the text from the drop-down list. It is the configured notification that has been configured from backend. The Voice-Admin can select the notification that has been configured with image or document.
Select the language from the language drop-down.
Save the settings.

Figure: Configured WhatsApp Settings Sample
The Voice-admin can select "text" type template to send the text messages, "image" type template to send the images (only in png and jpeg), and "doc" type template to send the documents in PDF format only.
CRM Settings
These are the same settings, which you have provided while creating this campaign. You can modify all of its fields here.
Click here to know more about the Campaign Details and CRM Settings for this campaign.After modifying the settings, click "Apply" on top to apply these settings. Else, you can click "Refresh" to discard the changes.
Chat Themes
This tab has already been explained in the Process Settings. Know more...
Holiday/Office Hours
This tab has already been explained in "System Configuration". Know more...
Other Settings
Remaining Settings of a Chat Campaign are explained in the following pages. Click the link to know more about them.