Parallel Predictive Voice Campaign Settings
In the left navigation bar of Process Tab, you can select a Parallel Predictive Voice Campaign to view its settings.
The changes made in settings of one Parallel Predictive Voice Campaign will be applicable to that campaign itself. They will not be applicable on other similar (parallel) and different (non-parallel) campaigns.
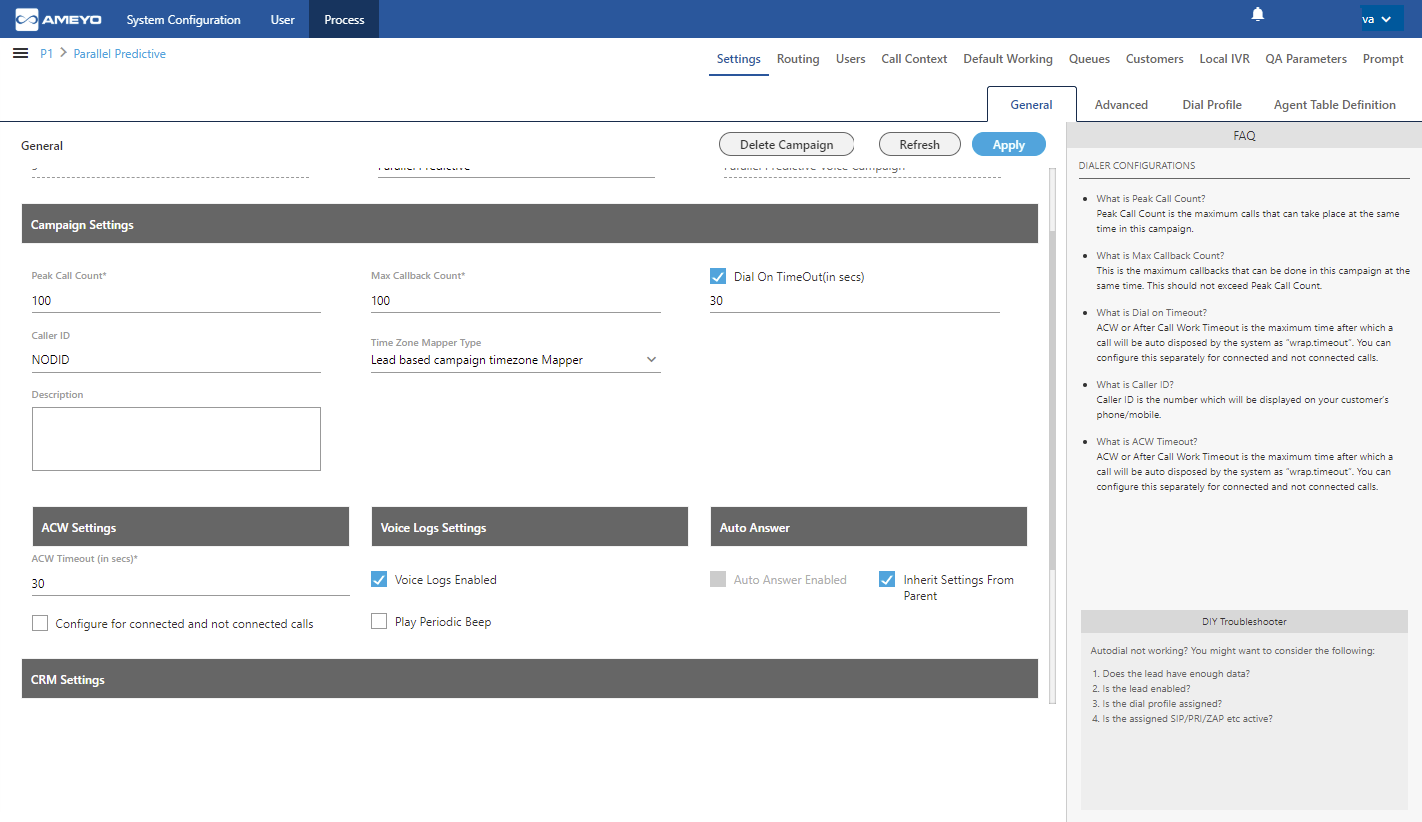
Figure: Settings of Parallel Predictive Voice Application Campaign
It contains the following tabs.
- Settings
- General Settings
- Advanced Settings
- Dial Profile Settings
- Agent Table Definition
- Queues
- Routing
- Users
- Default Working
- Holiday/Office Hours
- Call Context
- Customers
- Local IVR
- QA Parameters
- Prompt
Settings Tab of Parallel Predictive Dialing Campaign
This tab contains "General Settings", "Advanced" Settings, and "Dial Profile" Settings.
General Settings
Here, the General Settings are divided into the following sections.
- Campaign Details: These are the same details, which you have provided while creating this campaign. You can only change the campaign name here.
- Campaign Settings: It contains the same settings, which you have configured while creating this campaign.
- CRM Settings: These are the same settings, which you have provided while creating this campaign. You can modify all of its fields here.
- TPV Phone: As per the process requirement, there may be a few numbers to which transfer of calls is very frequent. Third-party verification (TPV) number is used to transfer the call to verifier. Here, such frequently used TPV numbers are added so that the user can directly transfer the case to these numbers.

Figure: TPV Phone
Click "Add" to show a row to add TPV Phone number. Enter the name and phone number. You can add multiple TPV Numbers. To delete a TPV phone number, click its checkbox to select it and click "Delete".
Click here to know more about the Campaign Details and CRM Settings for this campaign.
After modifying the settings, click "Apply" on top to apply these settings. Else, you can click "Refresh" to discard the changes.
Advanced Settings
Here, the Voice-Admin can configure the Advanced Settings of a Parallel Predictive Voice Campaign.
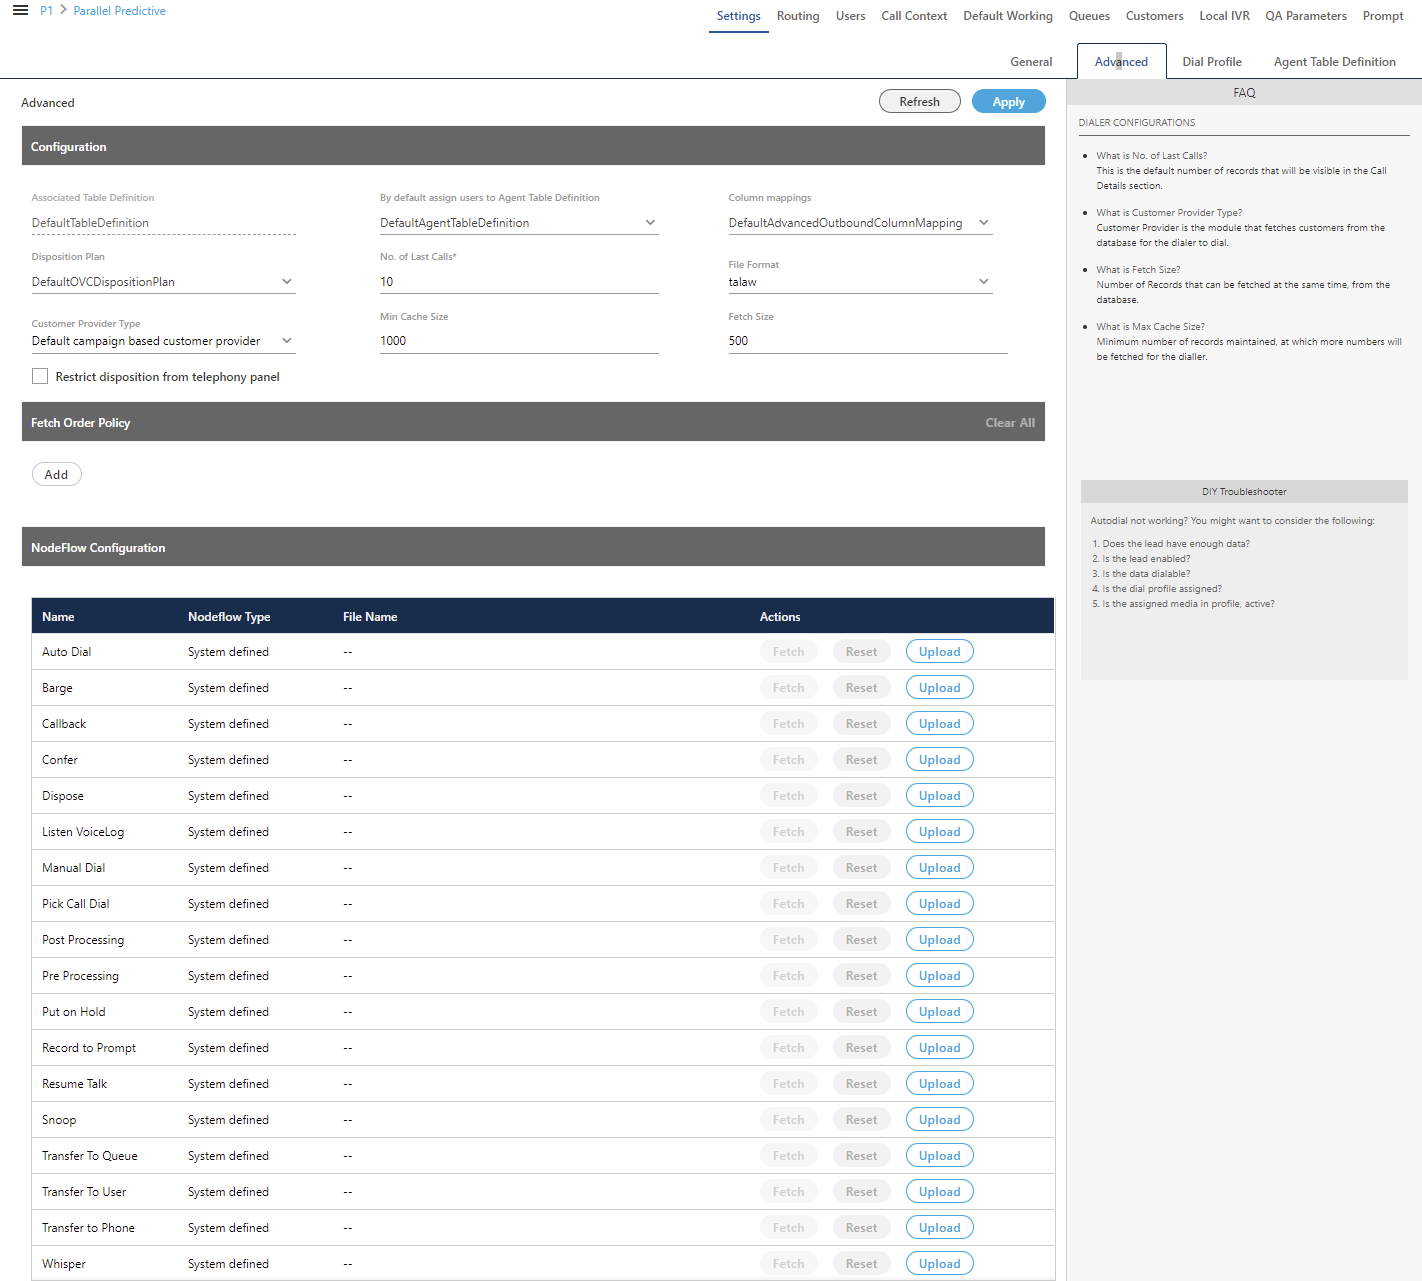
Figure: Advanced Settings
This tab can be divided into these sections: "Configuration", "Fetch Order Policy", and "NodeFlow Configuration".
Configuration
It contains the following settings, which you have configured while creating the campaign.
Disposition Plan
Column Mappings
No. of Last Calls
File Format
It also contains the following settings, which you can configure after creating the Outbound Campaign.
Default Table Definition: Here, you can select the default Table Definition for this campaign.
By default assign users to Agent Table Definition: Here, you can select the default Agent Table Definition for this campaign.
- Customer Provider Type: Select the algorithm for the dialer to pick and dial the customers from the database.
- Campaign Based Customer Provider: It is the default customer provider, which will fetch maximum possible numbers from the highest priority leads in one query. If numbers fetched are less than the required numbers, then it will also fetch numbers from the lower priority leads. Cache will not be maintained on per lead basis.
This provider will fallback to Lead Based Customer Provider in a Predictive Parallel Campaign.
Lead Based Customer Provider: It can be used to dial the numbers as per the lead priority. Customers with high priority will be dialed first, whereas customers with less priority will be dialed after it. If two leads have same priority numbers, then they will be selected for dialing as per their weights.
- Lead Based Customer Provider is the recommended for Parallel Predictive Dialer and Parallel Predictive Campaign.
- It is recommended to maintain cache per lead in case of lead to queue mapping in a Parallel Predictive Campaign so that all the queues get enough numbers, if available.
- This method is not recommended when lead leveling is not required.
- If large number of leads are enabled for a campaign and no lead leveling is required, then this method is not recommended. Else, the Campaign Based Customer Provider is recommended in such a scenario.
- PACE Based Customer Provider: It is the recommended method for a Parallel Predictive Campaign. Select it to enable the PACE.
- Campaign Based Customer Provider: It is the default customer provider, which will fetch maximum possible numbers from the highest priority leads in one query. If numbers fetched are less than the required numbers, then it will also fetch numbers from the lower priority leads. Cache will not be maintained on per lead basis.
- Minimum Cache Size: Provide the minimum size for the cache that is the count of numbers that can be stored a time.
- Fetch Size: Provide the count of numbers that can be fetched at a time.
Fetch Order Policy
Here, you have to add and define "Fetch Order Policy" to fetch the customers' numbers. Select any of the following policies.
- Customer Upload Time: The customers to be dialed are selected as per the time of the uploading of their numbers to the campaign. After selecting it, you can select ascending or descending order of the sorting the numbers.

Figure: "Customer Upload Time" Fetch Order Policy
In the ascending order, the customer whose number is uploaded very first will be dialed first and so on. In the descending order, the customer whose number is uploaded very last will be dialed first and so on. - Randomized order of lead upload: The customers to be dialed are selected randomly from the lead. The random algorithm to sort the values in the database is used.
- Natural Order of Lead Upload: The customers to be dialed are selected as per the same order as they are originally presented in the CSV file, which was uploaded.
- Number of Attempts: The customers to be dialed are selected as per the number of attempts made to dial their numbers. After selecting it, the Voice-Admin can select the Ascending or Descending order.

Figure: "Number of Attempts" Fetch Order Policy
- Customer Information: The customers to be dialed are selected as per the ascending or descending order of the values of any customer information field. After selecting it, the Voice-Admin has to select the customer information field as per which the customers to be dialed has to be selected.
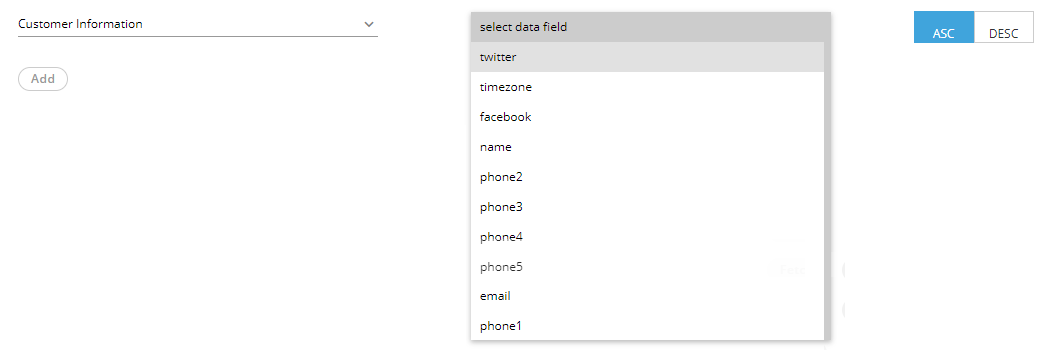
Figure: "Customer Information" Fetch Order Policy
After selecting the field, the Voice-Admin can opt for ascending or descending sorting. - CUSTOM :Here, the Voice-Admin can provide its own customized JavaScript code to create a customized order of selecting the customers to be dialed. Multiple conditions can be mixed using this method.
- User Disposition Retry Time: The customers to be dialed are selected as per the retry time attached to their disposition. After selecting it, the Voice-Admin can select the Ascending or Descending order.

Figure: "User Disposition Retry Time" Fetch Order Policy
In Ascending order, those customers will be dialed first who has least disposition retry time. In descending order, those customers will be dialed first who has the highest disposition retry time.
NodeFlow Configuration
It lets you upload the nodeflow for the different functions listed herein below.
- Transfer to User
- Manual Dial
- Transfer to Phone
- Confer
- Dispose
- Barge
- Snoop
- Put on Hold
- Resume Talk
- Transfer to Queue
- Callback
- Listen VoiceLog
- Pick Call Dial
- Record to Prompt
- Post Processing
- Whisper
- Pre Processing
- Auto Dial
Dial Profile Settings
Here, the Voice-Admin can create the dial profiles for this campaign using the Routing Plans. So, it is necessary to create the Routing Plans first before configuring this tab.
Before creating a routing plan, you have to assign and manage the users, assign the call contexts, and create the queues.
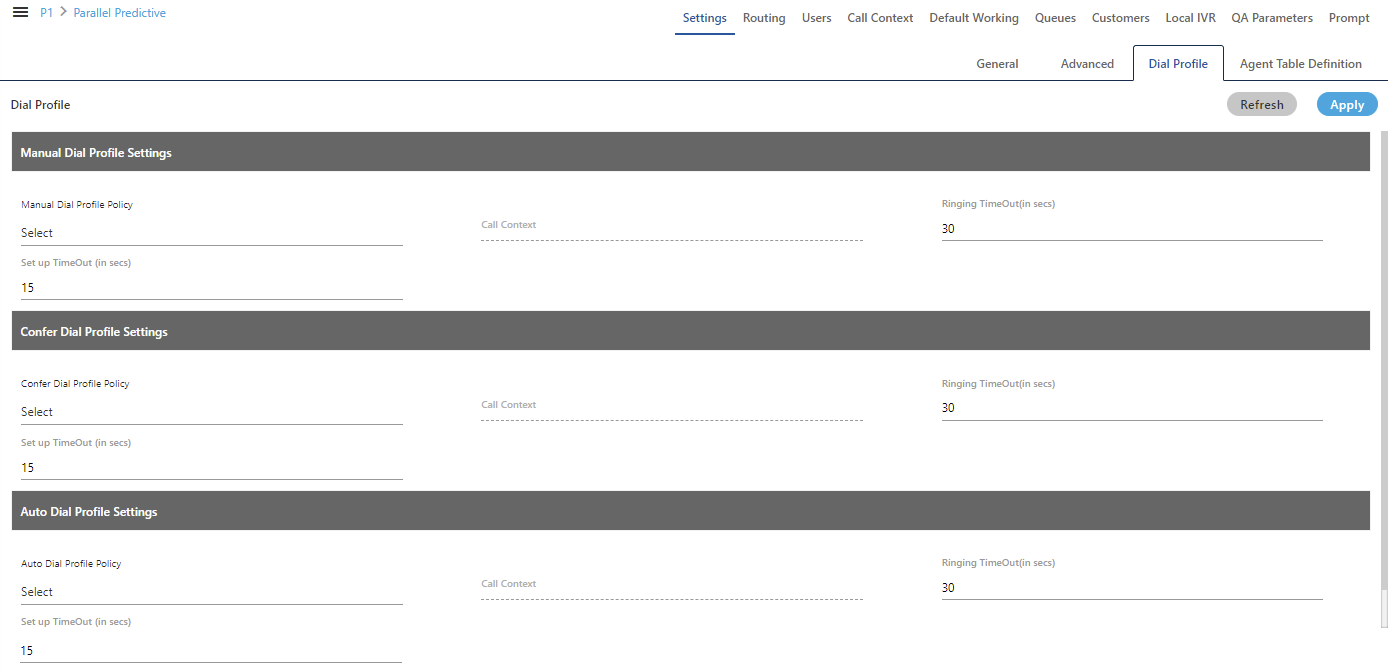
Figure: Dial Profile Settings
Perform the following steps to configure the Dial Profile Settings for Manual Dial, Confer Dial (Conference Dial), and Auto Dial.
- Manual Dial Profile Settings: It lets you configure the settings for Manual Dial Profile. Perform the following steps.
- "Manual Dial Profile Policy" lists the Outbound Routing Policies that you have created in "Routing Tab" → "Outbound Feature Context".
- Ringing Timeout (in secs.): It is the maximum ringing time, after which call gets disconnected if the recipient does not answer the call. Provide a value in seconds for the same. The default value is 30 seconds
- Setup Timeout (in secs.): It is the time required from the initiation of a call till the connection gets established, after which call gets disconnected if the call is not connected. Provide a value in seconds for the same. The default value is 15 seconds
- Confer Dial Profile Settings: It lets you configure the settings for Confer Dial (Dial during Conference) Profile. Perform the following steps.
- "Confer Dial Profile Policy" lists the Outbound Routing Policies that you have created in "Routing Tab" → "Outbound Feature Context".
- Ringing Timeout (in secs.): It is the maximum ringing time, after which call gets disconnected if the recipient does not answer the call. Provide a value in seconds for the same. The default value is 30 seconds
- Setup Timeout (in secs.): It is the time required from the initiation of a call till the connection gets established, after which call gets disconnected if the call is not connected. Provide a value in seconds for the same. The default value is 15 seconds
- Auto Dial Profile Settings: It lets you configure the settings for Auto Dial Profile. Perform the following steps.
- "Auto Dial Profile Policy" lists the Outbound Routing Policies that you have created in "Routing Tab" → "Outbound Feature Context".
- Ringing Timeout (in secs.): It is the maximum ringing time, after which call gets disconnected if the recipient does not answer the call. Provide a value in seconds for the same. The default value is 30 seconds
- Setup Timeout (in secs.): It is the time required from the initiation of a call till the connection gets established, after which call gets disconnected if the call is not connected. Provide a value in seconds for the same. The default value is 15 seconds
- Click "Apply" to apply the dial profile for any section.
Rather, you can click "Refresh" to discard the changes.
When you click apply, the values for Call Context for the selected Policy is populated in the "Call Context" column.
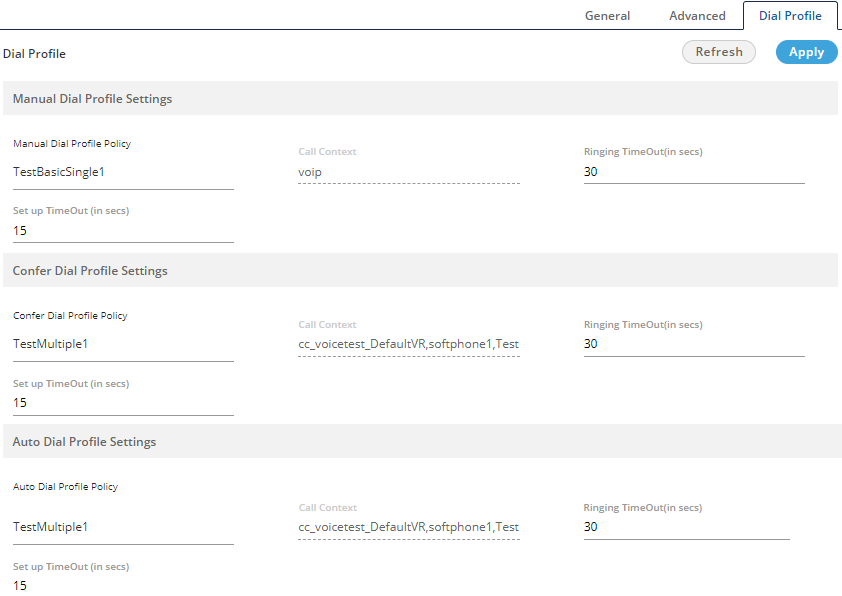
Figure: Configured Dial Profile Settings
Agent Table Definition
This tab allows you to select the default Agent Table Definition for the campaign and assign the users to the selected Agent Table Definition. Know more...
Users
Here, you can assign and unassign the users to this campaign. This tab has already been explained in the Chat Campaign Settings. Know more...
Queues
Here, you can create and manage the queues. This tab has already been explained in the Inbound Campaign Settings. Know more...
Default Working
Here, you can select the users who will be logged in to this campagin, by default, and will not receive the prompt to select the campaign. This tab has already been explained in the Chat Campaign Settings. Know more...
Holiday/Office Hours
Here, you can define the holidays, office hours, and non-working hours for this campaign. This tab has already been explained in "System Configuration". Know more...
Call Context
Here, you can define the call contexts for this campaign. This tab has already been explained in "Interactive Voice Application Campaign". Know more...
Routing
Here, you can define the routing policies for this campaign. This tab has already been explained in "Interactive Voice Application Campaign". Know more...
Local IVR
Here, you can create the Local IVRs for this campaign. This tab has already been explained in "Interactive Voice Application Campaign". Know more...
QA Parameters
Here, you can assign or unassign the QA Parameters to this campaign. This tab has already been explained in "Interactive Voice Application Campaign". Know more...
Prompt
Here, you can create and manage the Voice Prompts for this campaign. This tab has already been explained in "Interactive Voice Application Campaign". Know more...
Customer Tab
Here, you can assign and unassign the customer filters and group the filters in this campaign. This tab has already been explained in "Outbound Voice Campaign". Know more...